



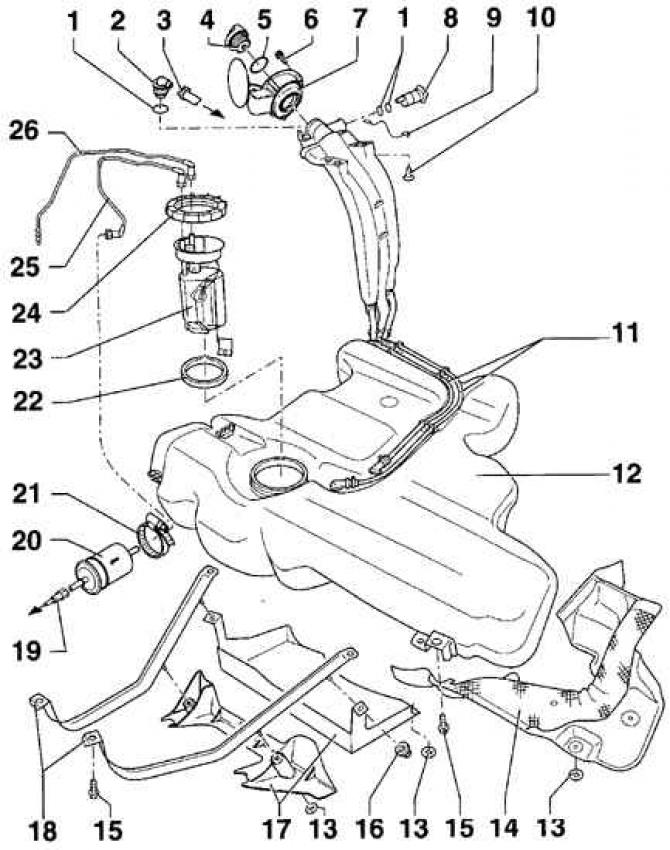
- 1 - sealing ring. Always subject to replacement;
- 2 - valve. Checking the valve by blowing: valve in vertical position - open, valve in 45° inclined position - closed;
- 3 - ventilation hose. To the canister with charcoal;
- 4 - lid;
- 5 - sealing ring. Always subject to replacement;
- 6 - bolt;
- 7 - tank valve/rubber cup;
- 8 - ventilation valve;
- 9 - connection to ground;
- 10 - bolt, 10 Nm;
- 11 - ventilation hoses;
- 12 - fuel tank;
- 13 - ring, 2 Nm;
- 14 - heat shield;
- 15 - bolt, 25 Nm;
- 16 - clamping nut, 2 Nm;
- 17 - casing;
- 18 - tension band clamp. They have different lengths;
- 19 - Fuel supply hose, black. To the engine. Fastened with clamps;
- 20 - fuel filter. The arrow on the filter housing indicates the direction of fuel flow;
- 21 - Clamp. For fuel filter;
- 22 - sealing ring. If damaged, replace. Moisten with fuel before installation;
- 23 - Fuel level sensor/fuel pump;
- 24 - union nut, 60 Nm;
- 25 - Fuel supply hose. To the fuel filter;
- 26 - return fuel hose. From the engine
Before removing the fuel tank, pump out the fuel from the tank.
Remove the fuel tank from underneath the vehicle. Use a jack to support the fuel tank.
Even an empty fuel tank contains fuel vapors that are explosive, so use caution.
After installing the fuel tank, start the engine and check the fuel system for leaks.
Fuel pump/fuel level sensor
On models with petrol engines, the fuel pump together with the fuel level sensor are installed in the fuel tank. The fuel level sensor consists of a potentiometer and a float connected to it. When the amount of fuel decreases, the float of the sensor drops and, increasing the resistance of the potentiometer, reduces the voltage on the fuel level indicator located on the instrument cluster.
Visitor comments