
Maintenance free battery
Virtually maintenance-free batteries do not have screw-on cell plugs. Checking the electrolyte level and its density is not necessary for these batteries, because the electrolyte does not evaporate.
These batteries usually have a so-called «magic peephole». which is an optical indicator of the electrolyte level. By changing the color of the optical indicator, the electrolyte level and the degree of battery charge are determined:
- the color of the optical indicator is green. The condition and charge of the battery is normal.
- the color of the optical pointer is black. The battery is not charged or the charge is too weak.
- the color of the optical indicator is different. The critical state of the electrolyte has been reached. The battery should be replaced.
Attention! Batteries of the new generation are equipped with ignition protection. The gas generated during battery charging is vented through a hole in the top cover to a receiver, which is a round fiberglass gasket that functions as a valve.
Conventional battery
A battery of a conventional type differs from a battery that does not require maintenance in that its top cover has screw-on cell plugs or a bar that closes the cell openings. This battery requires regular checking of the electrolyte level in the cells.
Checking the electrolyte level
The electrolyte should cover the battery plates. Its layer above the plates should be approximately 5 mm thick.
In some types of batteries, the electrolyte level is visible through a transparent case. In this case, it should be between the MAX and MIN·marks on the case. For batteries with an opaque case, the electrolyte level should be at the lower edge of the protrusion in the vent hole.
1. Unscrew the plugs of the cells with a wide screwdriver or remove the bar by carefully prying it out with a screwdriver.
2. Top up, if necessary, with distilled water, bringing the electrolyte level in all cells to normal.
3. Screw in the cell plugs or close them with a bar.
4. Charge the battery and check its charging under load.
Electrolyte Density Check
The degree of electrolyte density in combination with voltage measurement data allows one to draw conclusions about its condition.
To check, you need a densimeter, for example, HAZET 4650-1, which can be purchased from specialized stores.
The electrolyte temperature of the tested battery must be at least +10°C.
5. Turn off the ignition.
6. Remove all filler caps (see illustration) or use a screwdriver to remove the bar covering the openings of the battery cells.
7. Lower the densimeter into the battery cell and remove the electrolyte in such a volume that the float of the densimeter floats freely (see illustration).
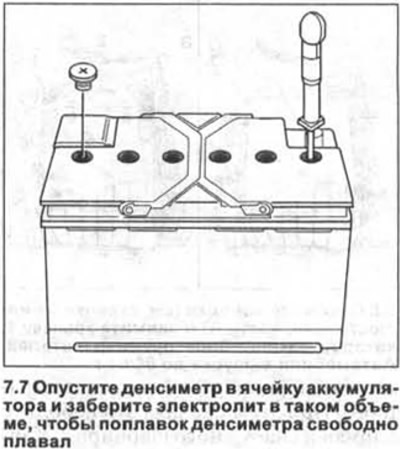
The greater the specific gravity (electrolyte density), the higher the float rises. On the densimeter scale, the density of the electrolyte can be determined in specific gravity in g / ml or in degrees Baume (+° Be). The density of the electrolyte must be at least 1.24 g/ml. If the density is less, then the battery should be charged.
| Battery charge level | +° Be | g/ml |
| Discharged | 16 | 1,12 |
| half empty | 24 | 1,20 |
| well charged | 30 | 1,28 |
8. Check all battery cells one by one. They should all have about the same density (maximum difference±0.04 g/ml). If the density of the electrolyte in the cells varies greatly, then a battery malfunction can be assumed.
9. Screw in the cell plugs or replace the bar.
Batteries of the usual type and maintenance-free
Battery test under load
10. Attach a voltmeter to the battery poles. Do not disconnect the wire terminals from the poles.
11. Start the engine and read the voltmeter. When starting the engine, the battery voltage should not fall below 10 volts (at an electrolyte temperature of about +20°С).
If the battery voltage immediately drops, and the cells have different electrolyte densities, then a battery malfunction can be assumed.
Battery idle test
Checking the condition of the battery is performed by a voltmeter, which is connected to the poles of the battery.
12. Remove the power wire terminals from the battery poles.
The battery must be disconnected for at least two hours to carry out the test.
13. Connect a voltmeter to the battery terminals and check the voltage (see illustration).
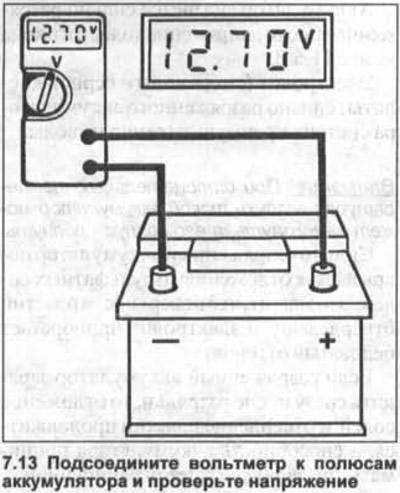
The resulting reading is 12.7 V or higher - the condition of the battery is good. The battery voltage is below 12.7 V - the battery condition is unsatisfactory.
Charge or replace the battery.
14 Connect the battery by attaching the terminals of the power wires to its poles.
Battery self-discharge
Depending on the vehicle configuration, the natural self-discharge of the battery is supplemented by current consumption by various control devices that continue to work even when the engine is turned off.
Therefore, the battery of a car that has not been used for a long time must be recharged at least every 6 weeks.
If there is a suspicion that there are leakage currents, then check the on-board electrical system as follows, using a charged battery:
15. Set the ammeter to the upper measuring range.
16. Disconnect the wire terminal from the negative pole of the battery «masses» (-).
17. Connect the positive (+) ammeter lead to wire terminal «masses» (-), taken from the negative pole of the battery, and the negative (-) ammeter output - to the negative pole of the battery (see illustration).
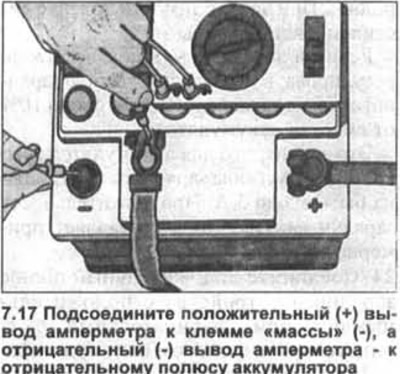
Attention! You can also check with a test light. But if the light bulb connected to the ground wire terminal (-) and the negative pole of the battery does not light up, then the test must be repeated using an ammeter.
18. Turn off all current consumers, turn off the clock and other permanent consumers of electricity, close the doors.
19. Switch the ammeter to smaller measuring ranges until the ammeter starts to register voltage and the reading can be read (1-3mA are allowed).
20. Interrupt various electrical circuits by removing one fuse after another. If, when a circuit is disconnected, the ammeter readings drop to zero, the fault should be sought in this circuit. Its sources can be corroded or dirty contacts, frayed wires, internal short circuit in the circuit.
If no fault is found in the fused circuits, disconnect the wires from the non-fused devices such as the alternator and starter.
If, when disconnected from the terminals of any of the units that are not protected by fuses, the readings of the device drop to zero, then sort or replace the corresponding device. In case of current losses in the starter or in the ignition system, it is imperative to check the ignition switch according to the diagram (workshop work).
21. Connect the ground wire terminal (-) to the battery.
Battery - charging
Precautionary measures:
- A) Do not disconnect the battery while the engine is running.
- b) Do not short circuit the battery, i.e. do not connect positive (A) and negative (-) poles. If a short circuit occurs, the battery will heat up and may burst.
- V) Do not expose the battery to naked flames. The electrolyte is corrosive. Avoid contact with eyes, clothing or skin. Wash it off with plenty of water if necessary.
- G) Do not unscrew the battery vent plugs when charging, but make sure the battery vent hose is connected.
- d) Let the battery thaw if it is frozen. A fully charged battery freezes at about -65°C, a half-discharged one at -30°C, and a fully discharged one freezes already at a temperature of about -12°C. Make sure that the case is not cracked on the thawed battery. A battery with a broken case must be disposed of.
- e) Charge the battery in a well-ventilated area or outdoors. When charging the battery without removing it from the vehicle, leave the hood open.
22. Remove the battery to charge it with a conventional charger or a quick charger. If the battery is not removed, then the terminals must be removed from the poles.
Attention! If you charge the battery without removing the terminals from the poles, you can damage the electronic control units of the car.
The temperature of the electrolyte when charging the battery must be at least +10°C.
23. Battery of the usual type. Check the electrolyte level before charging. Top up with distilled water if necessary.
If the charging current can be adjusted on the charger, then the charging current should be about 10% of the battery capacity.
This means that for a battery with a capacity of 50 Ah, the charging current should be about 5 A. The battery charging time is approximately 10 hours.
24. Connect the positive pole of the charger to the positive pole and the negative pole to the negative pole of the battery. The charger must be switched off at this moment.
25. Plug the charger into a power outlet. If necessary, turn on the charger.
26. Check the temperature of the battery by touch, with the palm of your hand, if the battery is charged with direct current.
The temperature of the electrolyte during charging should not exceed +55°C. If necessary, interrupt charging or reduce the charging current.
27. Turn off (if it is needed) charger after the battery is charged and unplug the charger from the mains.
28. Disconnect the charger wires from the battery.
29. Check battery charge, see relevant chapter.
30. Install the battery in the car tray, see the relevant chapter.
Batteries without ventilation
31. Before charging, unscrew the plugs of the battery cells and place them on the holes. In this way, splashing of the electrolyte caused by gases formed during charging is prevented.
32. Charge the battery until intense gas formation stops in all cells, and also until the increase in electrolyte density and voltage stops. These indicators are compared with three measurements of electrolyte density and voltage, performed at an interval of 1 hour.
33. Let the battery rest for about 20 minutes after charging is completed, and only after the specified time has passed, screw the plugs into the holes of the cells.
Charging a discharged and sulfated battery
Batteries that have not been used for a long time, such as those that have been left on a car that has not been driven, gradually discharge and can also become covered with sulphate salt deposits.
The battery is considered highly discharged if the open circuit voltage is less than 11.6 V.
Electrolyte (mixture of water and sulfuric acid) A heavily discharged battery consists primarily of water.
Attention! At negative air temperatures, such a battery may freeze, and its case may burst.
A heavily discharged battery is covered with deposits of sulfate salts. This means that the plate surfaces harden and the electrolyte acquires a whitish tint.
If a discharged battery is charged immediately after being discharged, salt deposits and plate hardening will continue, and the battery's ability to accept charging current will be limited.
A heavily discharged and sulfated battery should be charged with a small current.
The charging current in this case should not exceed 5% of the battery capacity. The charging current, for example, for a battery with a capacity of 60 A / h should be 3 A. The charging current voltage should not exceed 14.4 V.
Attention! A heavily discharged battery should not be charged with a quick charger.
Accelerated battery charging
Using the auxiliary battery
Boost charging or emergency engine starting using a booster battery should be an exception as the battery is exposed to a very high current in a short period of time.
With boost charging, the charging current is between 20% and 50% of the battery capacity.
Batteries that have been stored for a long time and are heavily discharged should not be charged using a rapid charger, as they are then charged with a so-called surface charge.
Battery storage
If the car will not be used for more than 2 months, the battery should be removed and stored in a charged state.
The most favorable storage temperature is from 0°С to +27°С. At these temperatures, the battery is the least discharged.
It is necessary to charge the battery no later than after 2 months of storage. Otherwise, the battery will become unusable.
If a battery that has been stored for a long time is charged from an accelerated charger, then it either does not accept the charging current or turns out to be allegedly charged with a so-called surface charge. Such a battery has all the signs of a faulty one.
Before such a battery is considered defective, it must be checked.
34. Measure the density of the electrolyte. If the density of the electrolyte in all cells differs by no more than 0.04 g / ml, then the battery can be charged with a conventional battery charger.
35. Check the battery after charging under load, see the relevant chapter. In the workshops, special devices are used for this. If the battery voltage is below 9.6V, then the battery is bad.
36. Check electrolyte density. If in one or two adjacent cells the density is significantly lower, then the battery has a short circuit and is faulty.
37. Recharge a heavily discharged and sulphated battery.
Care of battery terminals
38. Check the battery terminals for signs of corrosion. Pole corrosion appears as white or yellowish powdery deposits.
39. Remove the battery.
40. Treat the battery terminals with a solution of water and soda. During the resulting reaction, the formation of bubbles will occur. The pins will turn brown.
41. Process the findings (if necessary) wire brush or battery terminal cleaner.
42. After the reaction is completed, wash the terminals and the battery itself with clean water and let it dry.
43. Replace the battery.
Accumulator with central gas outlet
For batteries with a central gas outlet, the gas exits through the corresponding hole through the ventilation hose, which ensures the safety of the battery. The removal of gases from the battery is carried out in different ways, depending on the installation position of the battery in the engine compartment.
As a rule, VW batteries have one vent 1 and 2 on both sides (see illustration 7.0).
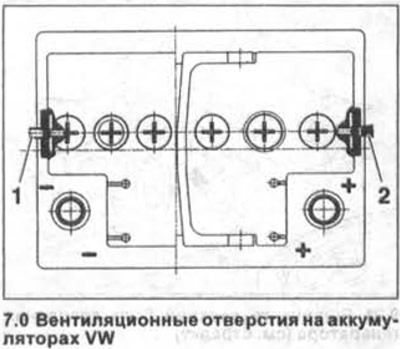
Of these two holes, one must be closed without fail.
In this way, targeted evacuation of gases via the connected hose is ensured. If both openings are closed when purchasing the battery, open the one that matches the installation position of the battery in the engine compartment.
Visitor comments