
Caliper C-38/C-II41
Attention! The brake mechanisms of the front wheels of Golf cars can be equipped with two types of calipers. It is recommended to use the illustrations to determine the type of caliper on the car being repaired.
Removing
Attention! Brake linings belong to the category of materials for which an operating permit is required and they are included in the general operational permit register (AVE). In addition, they are selected by the manufacturer for certain car models. Therefore, it is recommended to use only overlays. offered by the manufacturer.
Attention! Jacking up the vehicle carries the risk of injury. It is recommended that you first familiarize yourself with the safety measures when installing the car on jack stands.
1. Jack up the car and jack it up.
2. Mark the direction of rotation of the wheel with an arrow on the sidewall of the tire and loosen the wheel bolts.
3. Jack up the rear of the vehicle and remove the rear wheel.
Attention! If the brake pads are to be reinstalled for later use, they should be marked before removal. Swapping the pads from the right wheel to the left and vice versa or swapping the outer and inner pads is not allowed. Be sure to change all front brake pads, even if only one of them has reached the maximum allowable thickness.
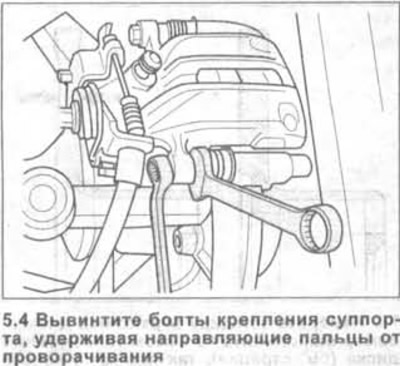
4. Unscrew the caliper mounting bolts, keeping the guide pins from turning (see illustration).
5. Remove the caliper from the shoe guide and secure it with wire to the body.
Attention! The caliper must be fixed so that it does not sag and its weight does not stretch or twist the connected brake hose.
6. Caliper C-38. Remove the brake pads.
7. Caliper C-II41. Remove the brake pads together with the pressure springs.
Installation
Attention! With the brake pads removed, do not press the brake pedal. In this case, when you press the pedal, the piston will be squeezed out of the brake cylinder.
8. Inspect the brake disc for damage and wear. Clean the caliper with alcohol only.
Do not use sharp objects or a metal brush for this purpose.
9. Press in the brake cylinder piston using a special pressing tool 1 for rear disc brakes, eg. HAZET 4970/6 (see illustration).
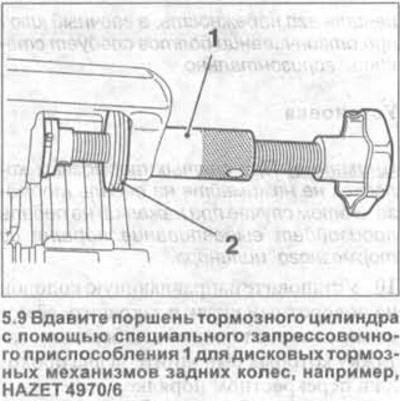
Attention! Pressing in the wheel cylinder piston using conventional tools is not allowed, because in this case the parking brake adjusting device is damaged.
10. Screw the piston into the wheel cylinder by turning the special tool handle clockwise. Protrusion 2 of the tool must be in contact with the caliper.
Make sure that the protective cap of the cylinder is not damaged. If the piston is difficult to enter, then when screwing in the piston, turn the tool rod by the flats with a wrench.
Attention! When the piston is screwed in, the brake fluid is squeezed out of the wheel brake cylinder into the expansion tank. Keep an eye on the level of brake fluid in the expansion tank and, if necessary, take it away to prevent it from splashing out.
11. Apply a light coat of high temperature grease to the caliper guide surfaces, such as Liqui Moly, before installing the brake pads.
12. Remove the protective foil from the base plate of the brake pads.
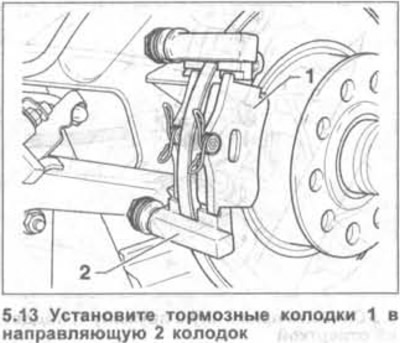
13. Caliper S-38. Install the brake pads 1 in the pad guide 2 (see illustration).
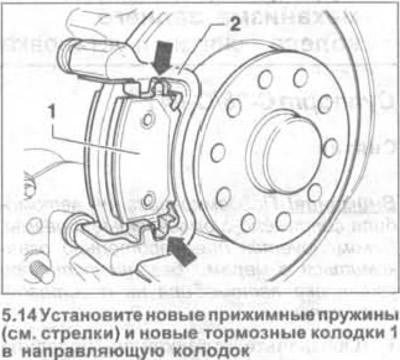
14. Caliper C-II41. Install new pressure springs (see arrows in illustration) and new brake pads 1 into the pad guide. Make sure the pads are properly seated in the compression springs.
15. Fasten the caliper with new self-locking bolts to 35 Nm while holding the guide pins from turning.
Attention! Self-locking bolts are included in the repair kit.
16. Establish the removed wheel according to the marks put at removal.
17. Screw in wheel bolts and lower the car on wheels.
18. Tighten the wheel bolts in a cross pattern to 120 Nm.
Attention! Squeeze out a few times a brake pedal against the stop, the strong resistance to pressing is not felt yet. When this action is performed, the brake pads are centered and they self-adjust to the working position.
19. Check the brake fluid level in the expansion tank. If necessary, add fluid up to the maximum mark
Visitor comments