



Caution! When handling brake fluid, keep the following in mind:
- Brake fluid is poisonous. It should never be sucked out by mouth through a hose. Pour brake fluid only into containers that prevent human consumption
- Brake fluid has a corrosive effect, so it should not come into contact with car varnish. If brake fluid gets on the surface, wipe it off immediately and wash the surface with plenty of water
- Brake fluid is hygroscopic, meaning it absorbs moisture from the air, which lowers its boiling point. Therefore, store brake fluid only in closed containers
- Brake fluid that has already been used in the brake system once cannot be added again. When bleeding the brake system, only add new (fresh) brake fluid
- Brake Fluid Specification: FMVSS 116 DOT 4
- Brake fluid should not come into contact with petroleum products. Even small amounts of petroleum products make the brake fluid unusable or cause the brake system to fail. Brake system plugs and seals become unusable when in contact with petroleum-containing products. When cleaning, do not use rags soaked in petroleum products
- Brake fluid should be changed every two years, if possible after the winter period of operation
Attention! Brake fluid must be disposed of at special collection points.
Removal air
After any brake repair that involved opening the brake system, air may enter the hydraulic pressure lines.
In this case, it is necessary to remove this air from the brake system.
The presence of air in the pipelines can also be judged by the fact that when pressing the brake pedal, no strong resistance is felt. In this case, it is necessary to eliminate the leak and remove air from the system.
In workshops, air is removed from the system using a combined device for filling brake fluid and bleeding the brake system.
Attention! It is absolutely necessary to use a combined device if the brake hose was disconnected, one of the expansion tank chambers was completely emptied, or if it is necessary to bleed the clutch hydraulic drive.
In all other cases, you can do without the specified device. In this case, air is removed from the brake system by pumping using the brake pedal. An assistant is needed for this operation.
If you need to bleed the entire system, you need to remove air from each wheel cylinder. This is necessary when air gets into all wheel cylinders. In this case, you should use a combined device.
If the caliper of only one brake mechanism was replaced or repaired, then, as a rule, it is sufficient to simply remove air from the corresponding wheel cylinder.
Attention! If one of the chambers of the expansion tank for brake fluid has been completely emptied, for example, due to a leak or due to carelessness when bleeding the brake system, then the fluid should be topped up. It is also recommended in such cases to contact a workshop to bleed the air from the brake system. because in this case the air gets into the ABS hydraulics. When equipping the car with the EDS system, you should first bleed the air from the brake system, and also perform a basic adjustment using a diagnostic tester.
When installing a new brake hose, the system should also be bled using a combination device.
Air removal sequence:
- a) front left wheel brake mechanism;
- b) front right wheel brake mechanism;
- c) rear left wheel brake mechanism;
- d) brake mechanism of the rear right wheel.
1. Mark the direction of rotation of the wheel with an arrow on the sidewall of the tire and loosen the wheel bolts.
2. Jack up the car, place it on jack stands and remove the wheels.
Attention! Access to the rear wheel brake bleed nipples is only possible after removing the rear wheels.
3. Add brake fluid to the expansion tank up to the maximum mark.
Attention! Loosen the bleed nipples carefully so as not to strip the threads. It is recommended to apply a rust converter to the nipple threads two hours before bleeding the system or support. If the nipple does not open despite the measures taken, it is recommended to contact a workshop and perform bleeding there.
Caution! During bleeding, check the brake fluid level in the expansion tank from time to time. Do not allow the brake fluid level in the tank to drop to the limit or for the tank to be completely "empty". In this case, air will be pumped into the system. Replenish the amount of brake fluid in the expansion tank, adding only fresh fluid.
4. Remove the protective cap from the bleed nipple of the working brake cylinder.
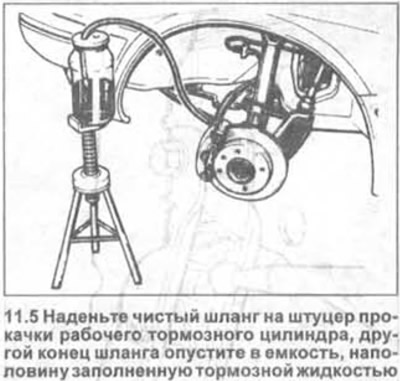
5. Clean the nipple, put a clean hose on it, lower the other end of the hose into a container half filled with brake fluid (see illustration).
6. Ask an assistant to press the brake pedal all the way ("pump") several times until the pressure in the brake system increases. This is felt by the increase in resistance when pressing the pedal.
Once sufficient pressure has been generated, the pedal should be pressed all the way down and held in this position.
7. Use a wrench to loosen 1 bleed nipple by about half a turn (see illustration).
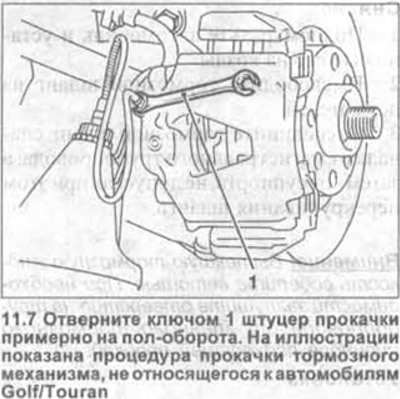
Collect the leaking brake fluid in a container. To unscrew the nipples, use a key designed for unscrewing bleed nipples, such as HAZET 4968/5. Make sure that the end of the hose in the container for collecting the leaking brake fluid is always below the fluid level.
8. Close the bleed screw as soon as the brake fluid pressure in the system decreases.
9. Repeat the pressure build-up in the brake system using the brake pedal. Then press the brake pedal down as far as it will go and hold it with your foot. Open the bleed nipple and, as soon as the brake fluid flows out and the pressure in the system drops, close the nipple.
10. Repeat bleeding the system on one wheel cylinder until air bubbles no longer appear in the fluid flowing into the container.
11. After removing the air, remove the hose from the bleed nipple, tighten the nipple with a force of 10 Nm and put the dust cap on it.
Remove air from the remaining wheel cylinders in the same manner, while observing the bleeding sequence.
After bleeding is complete, add brake fluid to the expansion tank up to the MAX mark.
Removal air using a combination device
12. Remove the cap from the expansion tank with brake fluid and screw on the bleeding device adapter in its place.
13. Create a working pressure of 2 bar in the brake system.
14. Cars with EDS. First, bleed the brake system if one of the expansion tank chambers emptied during its bleed. First, bleed the front brake mechanisms at the same time, then the rear ones. To do this, put hoses on the nipples of both mechanisms, open the nipples and let the brake fluid drain until air bubbles stop appearing in it. Then close the nipples and adjust the system using a diagnostic tester. After adjustment, bleed the brake system again.
15. All vehicles. Remove air from each brake cylinder, following the bleeding sequence specified above. To do this, put a hose on the nipple, open the nipple and let the brake fluid drain until air bubbles stop appearing in it. Then close the nipple.
16. Remove the adapter from the expansion tank together with the bleeding device. Remember that the brake system is under pressure.
17. Bleed each brake mechanism additionally in the usual way without a bleeding device at least 5 times.
18. Install the removed wheel in accordance with the marks made during removal.
19. Screw in the wheel bolts and lower the car onto its wheels.
20. Tighten the wheel bolts in a criss-cross pattern to a torque of 120 Nm.
Attention! Make sure that:
- a) the brake hoses are securely connected,
- b) the brake hoses are secured in the holders,
- c) the brake drive bleed nipples are screwed in,
- d) there is a sufficient volume of brake fluid in the expansion tank.
The article is posted on this website [VWManual]
21. Perform a leak test of the brake system by starting the engine. To do this, press the brake pedal with a force of 200-300 N (20-30 kg) and hold it for about 10 seconds. The pressure in the system and, accordingly, the resistance of the brake pedal, should not decrease. Check all connections for leaks.
22. Perform several braking tests on a road with light traffic. At least one braking test should be performed with the ABS operating, which is felt by the pulsation of the brake pedal.
Caution! When checking the brake system in the manner described, take into account the situation on the road and watch the traffic behind you.
Visitor comments