
Touran cars
Removing
1. Remove the floor in the trunk.
2. Remove, if available, the glove box on the rear of the boot floor. To do this, open the lid of the box and unscrew the four bolts.
3. Remove facing from a back crossbar.
4. Remove the decorative strip from the ceiling by releasing it from the latches and from under the door seal.
5. Remove facing of a back rack D.
6. Remove facing from a back rack With.
Attention! It is not necessary to detach the rear passenger's seat belt anchor from the pillar.
Five-seater car
7. Unscrew two bolts 1 and remove eyelet 2 from the side wall (see illustration).
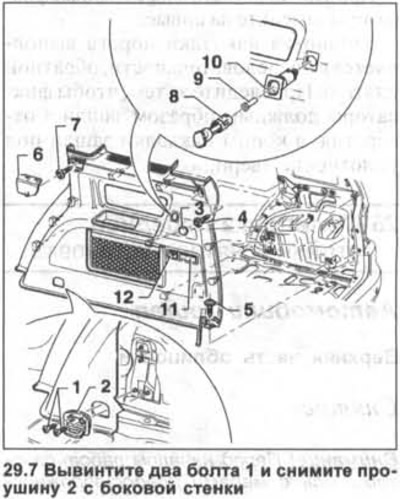
8. Remove plug 3 and cover 6 and unscrew screws 4, 5 and 7 (see illustration 29.7).
9. Turn the hook 8 counterclockwise and unscrew it from the holder 10 (see illustration 29.7).
10. Remove the spacer 9 and remove the holder 10 from the side upholstery (see illustration).
11. Remove the upholstery from the side wall.
12. Disconnect the plugs of the lamp 11 of the trunk lighting and sockets 12 located on the back of the upholstery (see illustration 29.7).
Seven-seat cars
13. Unscrew two screws 1, remove lug 2 from the side wall, remove plugs 3 and 8 and unscrew screws 4, 9 and 10 (see illustration).
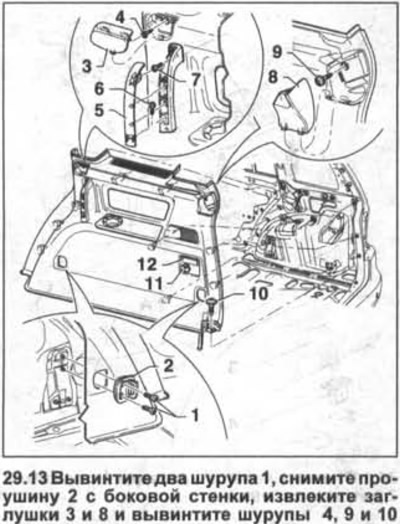
14. Remove, prying with a screwdriver, the cover 5 of the handle on the side wall, unscrew the bolts 6 and 7 and remove the handle (see illustration 29.13).
15. Remove the upholstery from the side wall.
16. Disconnect the plugs located on the back of the upholstery lamp 12. trunk lighting and sockets 11 (see illustration 29.13).
Installation
17. Make sure that the cladding retainers are not damaged and that they are properly seated on the cladding. If necessary, replace damaged clips with new ones.
Installation of facing of a rack is carried out in sequence, return to removal.
18. Fasten the lug to the side wall with a screw using a tightening torque of 6 Nm.
19. Seven-seat cars. Replace the handle on the side wall and fasten it with screws with a tightening torque of 4.5 Nm.
Visitor comments