



Contents: Removal ↓ Installation ↓
Removal
Caution: Before starting work, read the safety precautions regarding handling airbags.
1. Disconnect the negative (-) battery terminal first, then the positive (+) battery terminal to avoid possible airbag deployment. Wrap the negative battery terminal with insulating tape.
2. Remove the upper and lower parts of the center pillar trim.
Caution: There is no need to disconnect the seat belt mounting bracket from the pillar.
3. Remove the rear D-pillar trim.
4. Remove cover 1 with the inscription "Airbag" from the trim and unscrew the screw 2 located underneath it (see illustration).
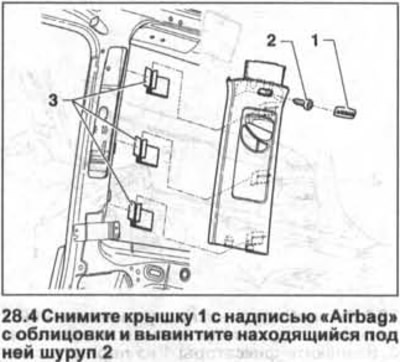
Attention! The "Airbag" cover is damaged when removed and must be replaced with a new one.
5. Release the 3 fasteners securing the top of the trim to the pillar (see illustration 28.4).
6. Remove the rear side trim.
7. Unscrew the mounting bolt and remove the rear seat belt mounting bracket from the side wall.
8. Release the seat belt strap through the slot under the belt position adjustment button and remove the upper part of the center pillar trim.
Installation
9. Make sure that the trim fasteners are not damaged and are seated correctly on the trim. If necessary, replace damaged fasteners with new ones.
The installation of the pillar trim is carried out in the reverse order of removal.
10. Secure the seat belt bracket to the pillar with the bolt, tightening it to 40 Nm.
11. Make sure that the trim fits under the door seal and that the belt position adjustment button fits correctly into the catch.
12. Check the operation of the seat belt height adjuster.
Visitor comments