
- filling tank for distilled water;
- densimeter.
Materials needed: distilled water if the electrolyte level in the cells is low.
1. Inspect the battery and make sure that its case is not damaged.
If the case is damaged, electrolyte leakage may occur, which in turn is fraught with serious damage to nearby parts. Replace battery if necessary.
2. Check that the battery is secure in the tray by pushing it from side to side with sufficient force. A loose battery can cause wire fires or damage to the electrical system.
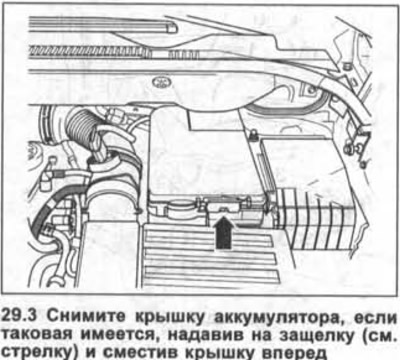
3. Remove the battery cover, if any, by pushing the latch (see arrow in illustration) and sliding the cover forward.
4. Check that the battery is secure in the tray by pushing it from side to side with sufficient force. If the battery seat in the tray is loose, then tighten the fastening bolt with a force of 20 Nm.
Attention! If the terminal on the positive pole of the battery is loose, then before tightening it, remove the wire terminal from the negative pole «masses» (-), to prevent short circuit.
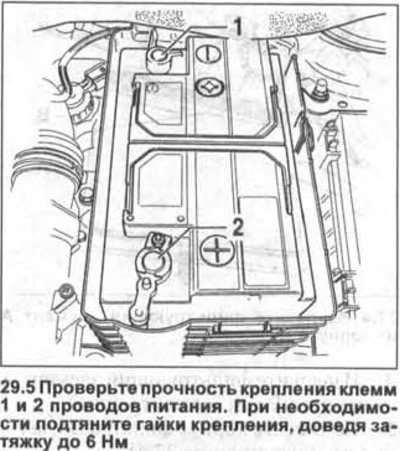
5. Check up firmness of fastening of plugs 1 and 2 wires of food. If necessary, tighten the fastening nuts, bringing the tightening to 6 Nm (see illustration).
6. Close the battery cover, if there is one.
Checking the electrolyte level
Batteries with indicator and cell plugs
Attention! Indicator 1, called «magic eye», may be located elsewhere (see illustration 29.7). It may be necessary to remove the battery cover to check the electrolyte level in the cells.
7. Check the electrolyte level and the degree of charge using indicator 1 on the battery, illuminating the indicator with a flashlight (see illustration). The indicator optically displays the battery status and can be colored in one of the three colors shown below.

The display color is green. The battery charge is sufficient. The electrolyte level is normal.
The display color is black. The battery is not charged or the charge is too weak.
The color of the indication is yellow/colorless. The critical state of the electrolyte has been reached. Be sure to add distilled water.
Attention! Due to air bubbles on the indicator, the assessment of the battery condition may be erroneous. In this case, it is recommended to lightly tap the battery case with a suitable object before inspection.
Attention! If the battery life is 5 years or more, and the color of the indicator is colorless, then this battery is recommended to be replaced with a new one.
Due to the fact that the indicator is located only above one cell, the indication concerns only this cell. An accurate assessment of the condition of the battery is possible only by checking it under load.
Attention! Open flames are not allowed to illuminate an open battery (lighter, matches). An explosion is possible. The battery should only be illuminated with an electric flashlight.
Filling with distilled water
8. Turn off the ignition.
9. Remove the foil covering the cell plugs.
10. Unscrew plugs 2 using, for example, a HAZET-4650-3 screwdriver (see illustration 29.7).
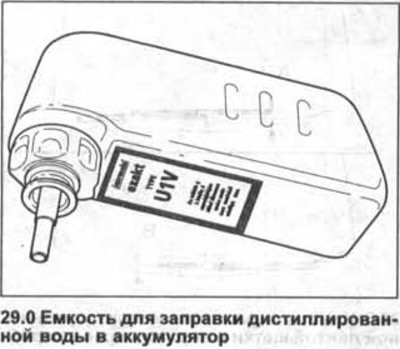
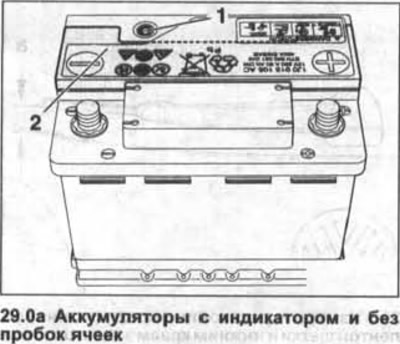
Attention! In workshops, the VAS-5045 tank is used to fill the battery with distilled water (see illustration 29.0). The design of this container does not allow overflow and, accordingly. electrolyte leakage. As soon as the electrolyte level during filling reaches the maximum allowable level, the supply of distilled water from the indicated container is automatically stopped.
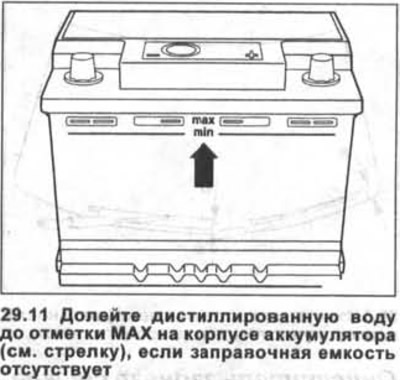
11. Add distilled water up to the MAX mark on the battery case (see arrow in illustration), if there is no filling capacity.
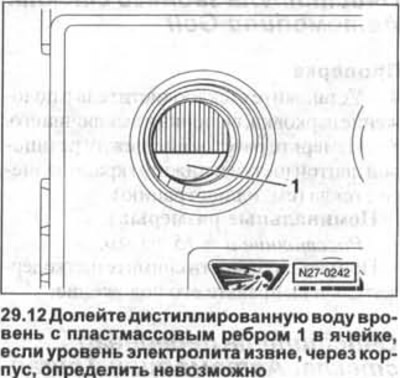
12. Add distilled water flush with plastic rib 1 in the cell, if the electrolyte level from outside, through the body, cannot be determined (see illustration).
13. Screw in and tighten the plugs.
Attention! Do not overfill the cells with distilled water, as the electrolyte will overflow and damage nearby parts. Remove excess electrolyte if necessary.
Batteries with indicator and without cell plugs
Attention! Checking the condition of such batteries is carried out in the same way as for batteries with plugs. However, in this case, if the electrolyte level is low and indicator 1 is yellow or colorless, the battery should be replaced (see illustration 29.0a).
Attention! Cap 2 is designed for charging the battery at the factory. Its removal is not allowed. Otherwise, the battery will be unusable (see illustration 29.0a).
Batteries without indicator
14. Check the electrolyte level and, if necessary, add distilled water to the cells.
15. Check the electrolyte level through the transparent battery case. If the electrolyte level in the battery cells drops below the MIN·mark, it is necessary to add distilled water (see illustration).
Attention! If the battery case is not transparent, unscrew the plugs and check the electrolyte level by looking into the holes. Do not light the battery with an open flame. Possible explosion!
16. Turn off the ignition.
17. Pour distilled water into each cell up to the MAX mark or up to the edge of the plastic rib 1 (see illustration 29.12).
18. Screw in and tighten the plugs.
Attention! Do not overfill the cells with distilled water, as the electrolyte will overflow and damage nearby parts. Remove excess electrolyte if necessary.
Battery open circuit voltage test
19. Turn off the ignition, remove the key from the ignition lock and turn off all consumers of the on-board network.
20. Disconnect the power wire terminals from the battery poles.
Measurement of the open circuit voltage should be made no earlier than two hours after the battery is disconnected and all consumers are turned off.
The battery during this period should not be recharged or discharged.
21. Connect the combined instrument panel to the battery terminals (voltmeter) and measure the voltage.
Evaluation of the received testimony
12.5V or higher - Battery condition is good. If the voltage below 12.5V - the condition of the battery is unsatisfactory. Charge the battery.
If the battery has been charged, then check the open circuit voltage only two hours after the completion of charging.
If the open circuit voltage is less than 12.5 V even after charging the battery, it is recommended to replace the battery.
Visitor comments