
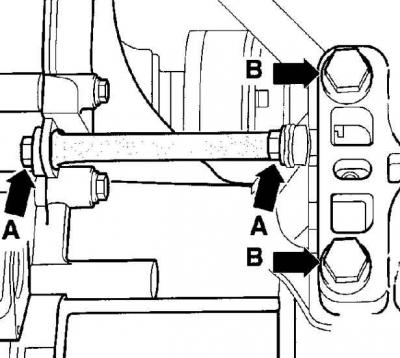
Location and tightening torques of the gearbox mounting bolts on models with 1.8-/1.9 engines
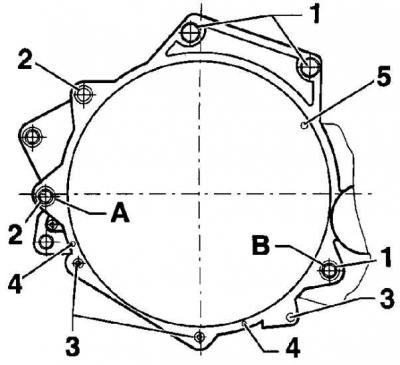
- A, B - location of centering bushings
| 1 | М12х55 | 80 Nm |
| 2 | М12х150 | 80 Nm |
| 3 | M10x50 | 40 Nm |
| 4 | М7х12 | 10 Nm |
| 5 | М7х12 | 10 Nm |
Location and tightening torques of the gearbox mounting bolts on models with 2.3-I engines
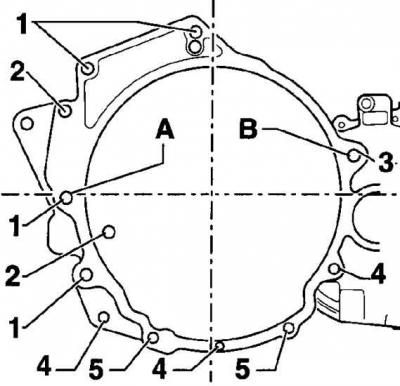
- A, B - location of centering bushings
| 1 | М12х55 | 80 Nm |
| 2 | М12х55 | 80 Nm |
| 3 | М12х65 | 80 Nm |
| 4 | М12х70 | 40 Nm |
| 5 | M10x60 | 10 Nm |
Removing
1. Remove the ground wire from the battery.
Warning: Disconnecting the battery will erase the contents of the memory locations, such as the radio code. Without a code, the radio can only be reconnected by the manufacturer.
2. Remove the air filter housing.
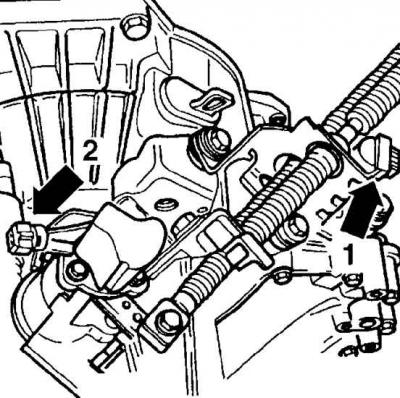
3. Disconnect the electrical connectors from the tachometer sensor (1) and reverse light switch (2).
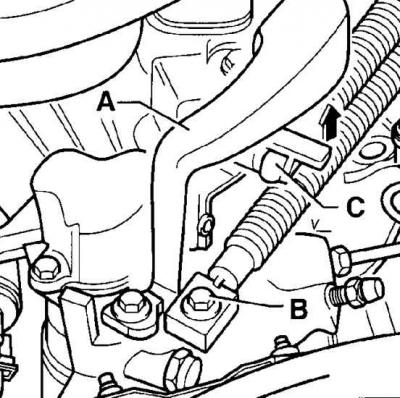
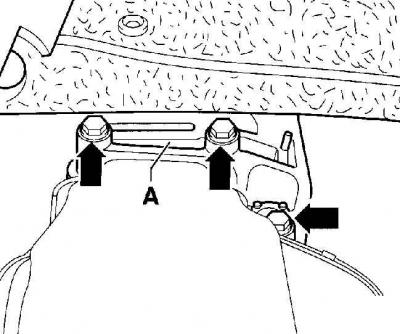
4. Unscrew stop (A) and cable attachment (IN) from the gear lever. Unscrew the gear selector rod from the lever (WITH) and turn it in the direction of the arrow.

5. Release the spring clip and remove the clutch hose from the bracket on the transmission. Remove the bolts and remove the transmission control cable support bracket from the transmission.
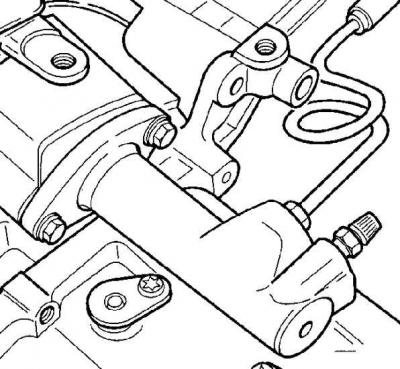
6. Unscrew the two bolts and remove the clutch slave cylinder from the gearbox. Using a soft wire, hang the clutch slave cylinder to the body without disconnecting the hose from it. With the clutch slave cylinder removed, do not depress the clutch pedal.
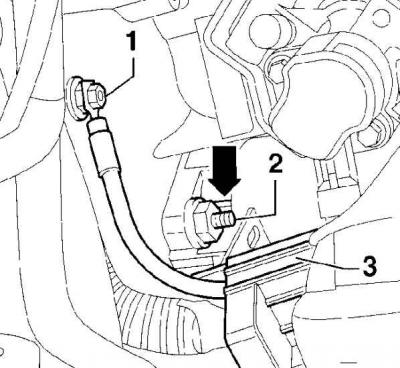
7. Unscrew the nut (1) and disconnect the ground bus from the power unit. Unscrew holder (3) starter wires and move it aside. Unscrew the nut (2) on the starter.
8. Unscrew all bolts of fastening of a transmission to the engine accessible from above.
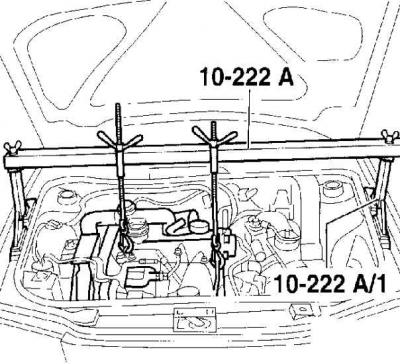
9. Using a lifting device or a special device VW 10-222A, raise the power unit so that the weight of the power unit is taken by the lifting device.
10. Raise the vehicles and remove the lower engine compartment mudguard.
11. Remove the starter.
12. Unscrew the power steering bracket from the gearbox housing.

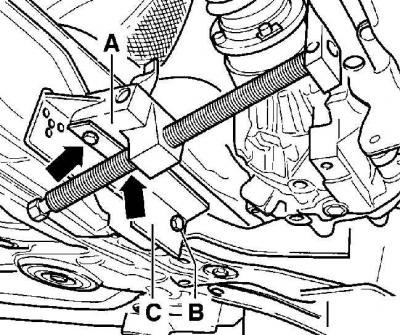
13. If present, remove the protective cap for the right hinged flange (A) drive shaft. unscrew the bolt (top arrow) securing the small bulkhead behind the right drive shaft and remove the bulkhead.
14. Unscrew the drive shafts from the gearbox. Using soft wire, tie the drive shafts as high as possible to the body. Be careful not to scratch the paintwork of the drive shafts.
15. Disconnect the exhaust system between the catalyst and the middle muffler.
16. Unscrew holders of a reception exhaust pipe from a transmission. If necessary, remove the exhaust pipe.
17. Unscrew the bolts securing the lower pendulum support of the power unit.
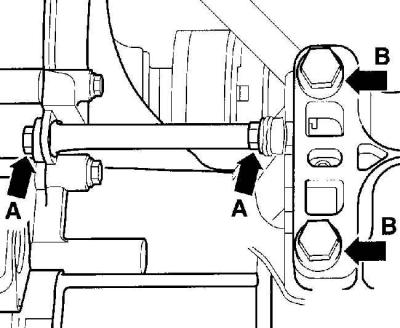
18. unscrew the bolts (A), then bolts (IN) fastening the left support of the power unit.
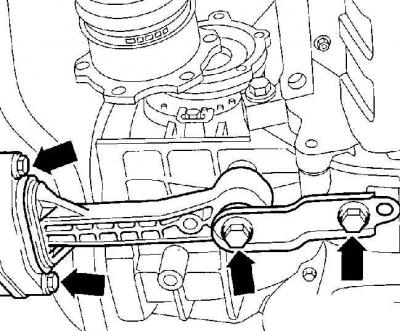
19. Unscrew the support (A) gearboxes from the gearbox.
20. Install special tool 457/1 at the bottom (WITH) and fix it with a bolt M 8x25 (IN) into the hole for attaching the pendulum support. Attach wringer 3300A (A) two bolts (indicated by arrows). Rotate the wringer screw to move the gearbox forward.
21. In the absence of a special wringing device, you can use a car jack.
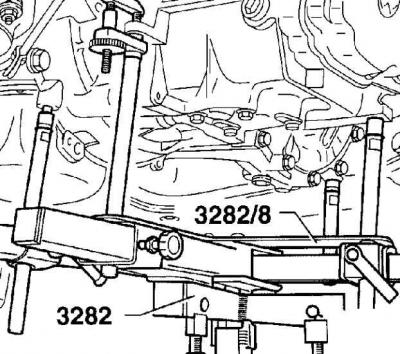
22. Support the gearbox with a VW 3282 hoist. Alternatively, you can support the gearbox with a car jack through a block of wood.
23. Unscrew the bottom bolts of fastening of a transmission to the engine.
24. Move the gearbox away from the engine and lower it down. When lowering the transmission, be careful not to damage the power steering system hoses.
Installation
1. When replacing the gearbox, install the speed sensor removed from the old gearbox and the selector and gear levers on the new gearbox.
2. Check the condition of the clutch.
3. Clean the transmission drive shaft spline and lubricate with a light coat of molybdenum disulphide grease. Check that the clutch disc moves smoothly on the transmission drive shaft.
4. Check that guide bushings are installed in the engine block to center the gearbox.
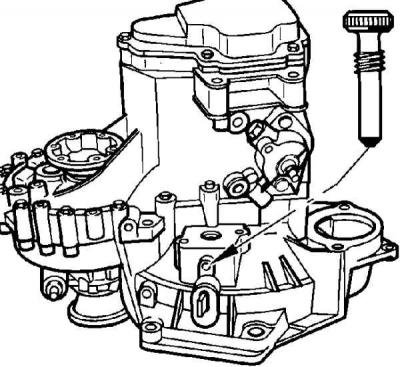
5. Move the clutch release lever to the gearbox housing and secure it in this position with the M 8x35 bolt. After installing the gearbox, unscrew the bolt.
6. In a horizontal plane, move the gearbox towards the engine, while the gearbox drive shaft should enter the clutch disc. If the drive shaft does not fit into the splines of the clutch disc, use the drive shaft flange to turn the gearbox shafts into the appropriate position.
7. While supporting the transmission with your hands, remove the transmission support.
8. Screw in the lower bolts of fastening of a transmission to the engine and bolts of fastening of a starter.
9. Unscrew the bolt M 8x35, fixing the clutch release lever in the gearbox housing. The bolt for the shift cable bracket is then screwed into the hole.
10. Screw in and tighten by hand the bolts of the left support of the power unit and use the lifting mechanism to transfer the power unit to the mounting position.
11. Tighten the bolts (A) fastening the left support of the power unit to the body with a torque of 25 Nm. Screw in new bolts (IN) fastenings of the left support of the power unit and tighten them by hand.
12. Screw in new pendulum support bolts and hand-tighten.
13. Remove the hoist supporting the engine.
14. Moving the power unit to the side, place it in the normal position on the power unit supports.
15. Tighten the power unit mounting bolts to the required torque, then tighten them 90°.
16. Connect the drive shafts to the gearbox.
17. Install the large and small driveshaft baffle.
18. Screw in the bolts of the pendulum support of the power unit and tighten them to a torque of 50 Nm.
19. Install starter.
20. Install the shift cable holder and screw it to the box, tightening the bolts to 25 Nm.
21. Screw the cable attachment to the gear lever and tighten the attachment bolt to 25 Nm.
22. Install the selector cable to the lever and secure it with a spring clip.
23. Adjust the shift rod.
24. Screw in the stop of the gear lever and tighten the fastening bolt to a torque of 25 Nm.
25. Connect electric sockets to a transmission.
26. Connect the wires to the starter.
27. Lubricate the clutch slave cylinder pushrod with molybdenum disulphide grease. Install the clutch slave cylinder and secure it with bolts, tightening them to a torque of 20 Nm.
28. Depress the clutch pedal several times and check clutch operation. If the clutch hydraulic circuit has been disconnected, bleed it.
29. Install the catalytic converter exhaust pipe with a new seal.
30. Install and screw the power steering bracket to the gearbox housing.
31. Check the condition of the oil in the gearbox.
32. Install the lower engine compartment mudguard.
33. Install the air filter housing.
34. Connect ground wire to battery.
| Bolted connection | Engines 1.8-/ 1.9-/ 2.3-I |
| Engine to holder | 60 Nm + 90° |
| Gearbox to holder | 50 Nm + 90° |
| holder to the body | 60 Nm + 90° |
| Support for gearbox | 40 Nm + 90° |
| Support to the body | 20 Nm + 90° |
Visitor comments