
English Русский
Български
Беларускі
Український
Српски
Hrvatski
Română
Polski
Slovenský
Magyar
  |  Articles  |  Sitemap  |  Contacts  |    |
Car maintenance Ford Car maintenance Hyundai Car maintenance Chevrolet Car maintenance BMW Car maintenance Audi Car maintenance Opel Car maintenance AvtoVAZ
VWmanual.ru


Main   Passat   Golf   Polo   Touareg   Tiguan   Sharan   Transporter   Others  
Golf 1 (1974-1984, diesel) Golf 1 (1974-1984, petrol) Golf 2 (1984-1993, petrol) Golf 2 (1984-1993) Golf 3 (1991-1997) Golf 4 (1997-2004) Golf 5 (2003-2008)

Setting the piston of the first cylinder to TDC (VW Golf 4)

  • Main
  • Golf
  • Golf 4
  • Power unit
  • Diesel engines
  • Setting the piston of the first cylinder to TDC
            0


1. Turn the engine crankshaft so that the piston of the first cylinder is at top dead center.

2. You can turn the engine crankshaft in the following ways:
  • raise the front of the car and secure it on stands. Put it in 5th gear and apply the handbrake. While holding one front wheel from turning, manually turn the other front wheel. This will cause the engine crankshaft to turn;
  • place the car on a flat horizontal surface, then engage 5th gear and manually move the car forward or backward;
  • set the gearbox to neutral and apply the handbrake. Using a wrench, turn the engine crankshaft by the crankshaft pulley mounting bolt.

Warning: Do not turn the engine crankshaft by the camshaft pulley mounting bolt, as this will place maximum load on the timing belt.


Manual transmission

3. Remove the plug in the clutch housing.
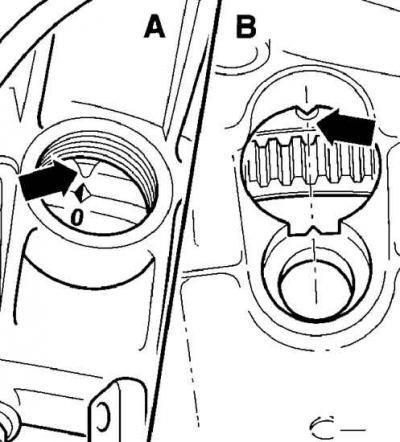
3. Remove the plug in the clutch housing.


4. Turn the engine crankshaft until the "0" mark on the flywheel aligns with the pointer on the clutch housing (arrow). When the marks align with the pointers, the piston of the first cylinder is at TDC in the compression stroke (A - AGP engine, B - AGR, AHF, ALH engines).

Automatic transmission
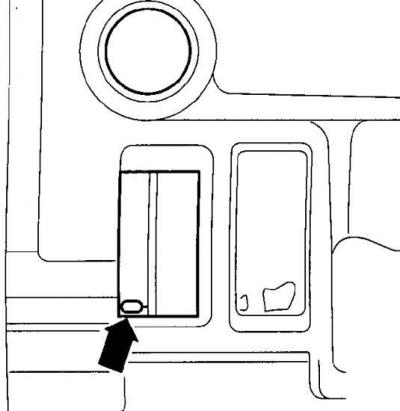


Automatic transmission


5. Turn the engine crankshaft until the "0" mark appears on the left in the torque converter window (arrow). In this case, the piston of the first cylinder is at TDC in the compression stroke.

SDI diesel engine

6. Remove the intake manifold.

7. Remove the upper timing belt cover and cylinder head cover.

8. If the timing belt is to be reinstalled, use a marker or paint to mark the direction of rotation of the timing belt. When viewed from the front of the engine, the engine pulleys rotate clockwise.
8. If the timing belt is to be reinstalled, use a marker or paint to mark the direction of rotation…


(View the original on this portal www.vwmanual.ru)

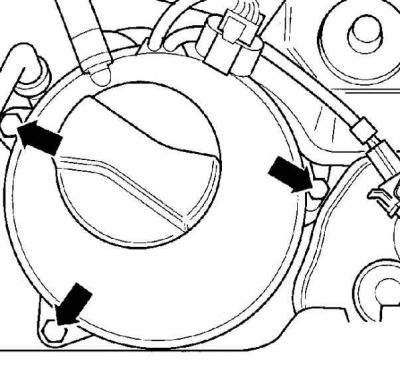
9. Unscrew the bolts (indicated by arrows), securing the expansion tank and the power steering refill tank and, without disconnecting the hoses from them, move them to the side.

9. Unscrew the bolts (indicated by arrows), securing the expansion tank and the power steering…


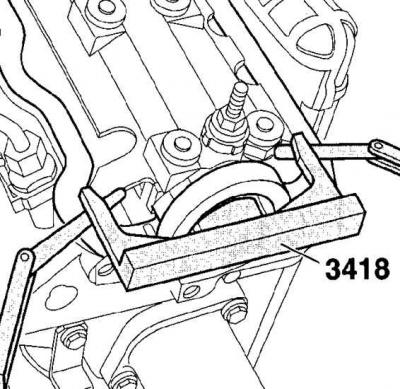
10. Install locking tool 3418 into the groove in the end of the camshaft.

11. With the locking tool installed in the camshaft, turn the camshaft (turning the crankshaft clockwise) so that one side of the locking tool is pressed against the surface of the cylinder head. Using the blade of the feeler gauge, measure the gap between the other end of the locking tool and the cylinder head. Turn the camshaft slightly back and install two feeler gauges on both sides between the locking tool and the cylinder head, the thickness of which is equal to half the previously measured gap.
11. With the locking tool installed in the camshaft, turn the camshaft (turning the crankshaft…


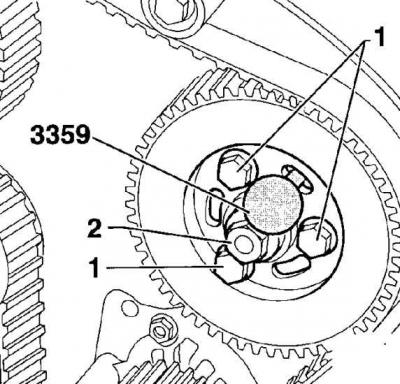
12. Lock the fuel pump pulley with the VW-3359 locking pin. Unscrew the bolts (1) from the fuel pump pulley and screw in new bolts in their place, tightening them by hand at this stage. Unscrew the bolts one by one, since the fuel pump pulley sections may shift. Do not unscrew the central nut (2) securing the fuel pump pulley, since this may cause the pulley to shift.
12. Lock the fuel pump pulley with the VW-3359 locking pin. Unscrew the bolts (1) from the fuel…


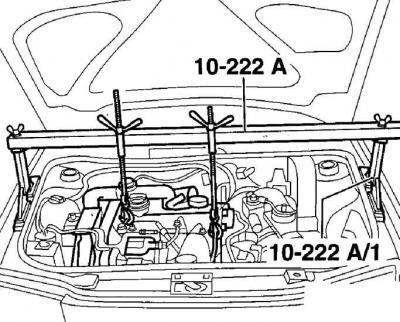
13. Since the right support of the power unit prevents the removal of the toothed belt, it is necessary to support the engine with a special device VW 10-222A and remove the right support of the power unit.

14. The engine can be supported from below using a jack through a wooden block.
14. The engine can be supported from below using a jack through a wooden block.


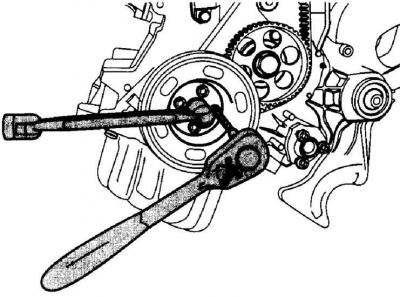
15. While holding the crankshaft pulley from turning, unscrew the four bolts securing the pulley to the crankshaft. Remove the crankshaft pulley.
15. While holding the crankshaft pulley from turning, unscrew the four bolts securing the pulley to…


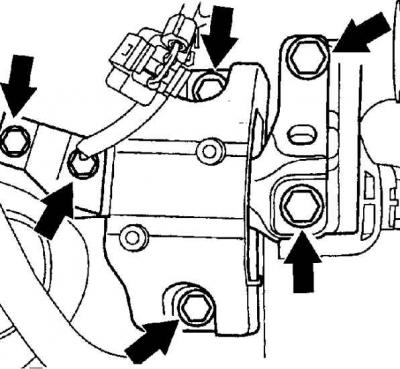
16. Unscrew the bolts (indicated by arrows), fastening the right support of the power unit to the body and the engine mount.
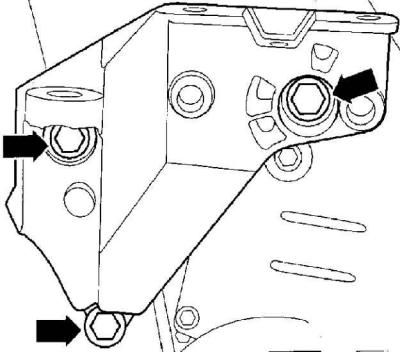
16. Unscrew the bolts (indicated by arrows), fastening the right support of the power unit to the…


17. Unscrew the bolts (indicated by arrows), securing the right powertrain support bracket to the engine.

18. Unscrew the timing belt tension roller mounting nut.

19. Remove the timing belt from the engine pulleys.

Warning: Do not sharply bend the toothed belt, as during operation the toothed belt may break at the sharp bend, which will lead to engine damage.


20. After removing the timing belt, do not change the position of the timing belt pulleys.

Warning: If the engine crankshaft is turned after the timing belt is removed, the pistons will collide with the valves, causing damage to the valves and requiring major engine repairs. Mark the position of the crankshaft pulley by making marks on the pulley and engine block with paint. If necessary, the engine crankshaft can be turned 90° clockwise or counterclockwise.


Warning: Check the timing belt for wear, delamination or oil contamination. If there is oil on the timing belt, find the source of the oil leak and repair it before installing a new belt.


Warning: Do not twist or bend the timing belt. Do not allow oil, coolant or fuel to come into contact with the timing belt.

This article is available at russian, bulgarian, belarusian, ukrainian, serbian, croatian, romanian, polish, slovak, hungarian
The text has been checked: Kolesnikov Artem

Share information:

Previous articles
Removal the timing belt
Toothed belt for TDI and SDI diesel engines
Removal and installation of the power unit
Technical characteristics of diesel engines
Diesel engines — general information
Next articles
Installing and tensioning the timing belt
Checking the Timing Belt Tensioner Roller
Removal and installation the cylinder head
Removal and installation the intake manifold of a diesel SDI engine
Checking the compression in the engine cylinders
Removal and installation a poly V-belt


Similar articles from other manuals for VW cars:
Checking pistons, piston rings and cylinder diameter Passat B6 (2005-2010)
Setting the engine crankshaft to the TDC ignition position for… Polo 4 (2001-2009)
Checking pistons, piston rings and cylinder diameter Touareg 1 (2002-2006)
Cylinder Block — Belt Drive Side Tiguan 1 (2007-2015)
Removal the cylinder head Sharan 1 (1995-2000)
Timing Belt Adjustment (4-Cylinder Petrol) Transporter T4 (1990-2003)
Parts and assemblies of the cylinder-piston and connecting… Caddy 3 (2003-2010)
Link to this page in different formats


Visitor comments


No comments yet


How much will 39 + 13 =


Golf 5 
  • General information
  • User manual
  • Maintenance
  • Troubleshooting
  • Power unit
  • Engine repair
  • Cooling and ventilation system
  • Fuel system
  • Ignition system
  • Transmission
  • Clutch
  • Mechanical gearbox
  • Automatic gearbox
  • Chassis
  • Brake system
  • Car suspension
  • Steering
  • Body
  • Interior (internal elements)
  • Exterior (external elements)
  • Doors and covers
  • Electrical equipment
  • Power devices
  • Washers and wipers
  • Lighting and appliances
  • Electrical circuits
Golf 4 
  • General information
  • User manual
  • Weekly checks
  • Maintenance
  • Power unit
  • Petrol engines
  • Diesel engines
  • Cooling system
  • Fuel system (petrol)
  • Control system (petrol)
  • Fuel system (diesel)
  • Exhaust system
  • Transmission
  • Clutch
  • Car gearbox
  • Drive shafts
  • Chassis
  • Car suspension
  • Steering
  • Wheels and tires
  • Brake system
  • Body
  • Exterior (external elements)
  • Interior (internal elements)
  • Ventilation and heating
  • Car doors and sunroof
  • Washers and glass cleaners
  • Electrical equipment
  • Power devices
  • Lighting and appliances
  • Electrical circuits
Golf 3 
  • Petrol engine
  • Engine repair
  • Lubrication system
  • Cooling system
  • Ignition system
  • Diesel engine
  • Engine repair
  • Diesel injection system
  • Pre-glow system
  • Transmission
  • Clutch
  • Gearbox and drive shafts
  • Chassis
  • Steering
  • Wheels and suspension
  • Brake system
  • Electrical equipment
  • Lighting and appliances
  • Electrical circuits
Golf 2 
  • General information
  • Introduction to guide
  • User manual
  • Petrol engines 1.3 l
  • Engine repair
  • Lubrication system
  • Cooling system
  • Carburetors
  • Supply system
  • Ignition system
  • Petrol engines 1.6/1.8 l
  • Engine repair
  • Supply system
  • Ignition system
  • Diesel engines
  • Engine repair
  • Lubrication system
  • Cooling system
  • Power and exhaust system
  • Transmission
  • Clutch
  • 4-speed gearbox 084
  • 5-speed gearbox 085
  • 4-speed gearbox 020/4R
  • 5-speed gearbox 020/4T
  • Automatic gearbox
  • Drive shafts
  • Chassis
  • Steering
  • Car suspension
  • Brake system
  • Body
  • Body elements
  • Doors, locks and windows
  • Electrical equipment
  • Equipment and devices
  • Power devices
Golf 2 (petrol) 
  • General information
  • Characteristics
  • Car care
  • Maintenance
  • Power unit
  • Engine repair
  • Engine 1.05/1.30
  • Engine 1.60/1.80
  • Cooling and lubrication system
  • Power and exhaust system
  • Transmission
  • Clutch
  • Car gearbox
  • Drive shafts
  • Chassis
  • Brake system
  • Steering
  • Suspension
  • Body
  • Body and equipment
  • Electrical equipment
  • Lighting and appliances
  • Electrical circuits
Golf 1 (petrol) 
  • General information
  • Characteristics
  • User manual
  • Maintenance
  • Power unit
  • Engine adjustment
  • Engine 1.1/1.3
  • Engine 1.5/1.6/1.8
  • Engine electrical equipment
  • Cooling system
  • Fuel system
  • Transmission
  • Clutch and manual gearbox
  • Automatic gearbox
  • Chassis
  • Steering
  • Front suspension
  • Rear suspension
  • Brake system
  • Electrical equipment
  • Lighting and appliances
  • Electrical circuits
  • Body
  • Body and equipment
  • Optional equipment
Golf 1 (diesel) 
  • General information
  • Specifications
  • Maintenance
  • Power unit
  • Engine repair
  • Exhaust and turbocharger
  • Cooling system
  • Fuel system
  • Fuel injection system
  • Transmission
  • Clutch and drive shafts
  • Car gearbox
  • Chassis
  • Suspension and wheels
  • Steering
  • Brake system
  • Wheels and tires
  • Body
  • Heating and ventilation
  • Exterior (external elements)
  • Interior (internal elements)
  • Doors and windows
  • Electrical equipment
  • Equipment and devices
  • Lighting system
  • Power devices
  • Electrical circuits
VWmanual.ru © 2016-2026 | Mobile version | News and articles | Sitemap: EN BG BY UA RS HR RO PL SK HU | Write message | Site search
Passat B2 • Passat B3 • Passat B4 • Passat B5 • Passat B6 • Golf 1, diesel • Golf 1, petrol • Golf 2, petrol • Golf 2 • Golf 3 • Golf 4 • Golf 5 • Polo 3 • Polo 4 • Touareg 1 • Tiguan 1 • Sharan 1 • Transporter T3 • Transporter T4 • LT 28 • LT 2D • Beetle • Caddy 3 •
Our website uses cookies to ensure functionality and convenience.