
English Русский
Български
Беларускі
Український
Српски
Hrvatski
Română
Polski
Slovenský
Magyar
  |  Articles  |  Sitemap  |  Contacts  |    |
Car maintenance Ford Car maintenance Hyundai Car maintenance Chevrolet Car maintenance BMW Car maintenance Audi Car maintenance Opel Car maintenance AvtoVAZ
VWmanual.ru


Main   Passat   Golf   Polo   Touareg   Tiguan   Sharan   Transporter   Others  
Golf 1 (1974-1984, diesel) Golf 1 (1974-1984, petrol) Golf 2 (1984-1993, petrol) Golf 2 (1984-1993) Golf 3 (1991-1997) Golf 4 (1997-2004) Golf 5 (2003-2008)

Installing rear brake pads on disc brakes (VW Golf 4)

  • Main
  • Golf
  • Golf 4
  • Chassis
  • Brake system
  • Installing rear brake pads on disc brakes
            0


Contents: Execution order ↓ Security Control Check ↓

Execution order


1. If the condition of the brake pads allows their further use, clean them using a wire brush and a clean cloth.

2. Before installing the pads, check that the guide pins move freely in the caliper holder and make sure that the rubber protective boots of the guide pins are not damaged.

3. Clean dust and dirt from the caliper and piston.

4. Check the condition of the dust seal around the piston.

5. Using a wire brush, clean the brake disc from traces of rust.

6. Measure the thickness of the brake disc.

7. When installing new brake pads, it is necessary to screw the piston into the caliper.

Warning: When screwing in the piston, brake fluid is forced out of the brake cylinder into the expansion tank, so constantly monitor the brake fluid level in the tank. If necessary, pump out the fluid from the tank.
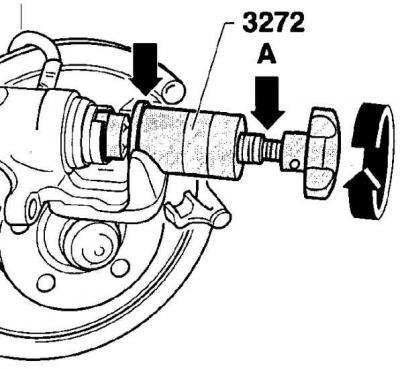

Warning: When screwing in the piston, brake fluid is forced out of the brake cylinder into the…


8. To screw the piston into the cylinder, use the VW 3272 tool. To screw in the piston, install the tool so that the tool flange fits into the piston grooves (A – location for installing the wrench).

9. Rotate the special tool body counterclockwise until it stops. Rotate the special tool handle clockwise to screw the piston into the caliper.


10. If screwing in the piston is difficult, place a 13 mm wrench on the slots at the base of the handle and use the wrench to screw in the piston.

11. If you don't have a special tool, screw the piston into the caliper using angled snap ring pliers.
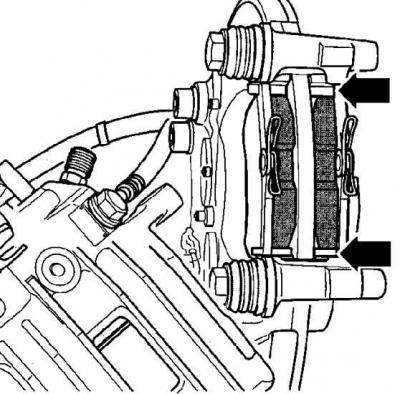
11. If you don't have a special tool, screw the piston into the caliper using angled snap ring…


12. Install new spring clips into the caliper.

13. Install the brake pads into the caliper holder.

14. If old brake pads are being installed, check that they are installed in their original position.

15. When installing new brake pads, remove the protective film from them.

16. Install the caliper and secure it with new bolts, tightening them to a torque of 35 Nm.
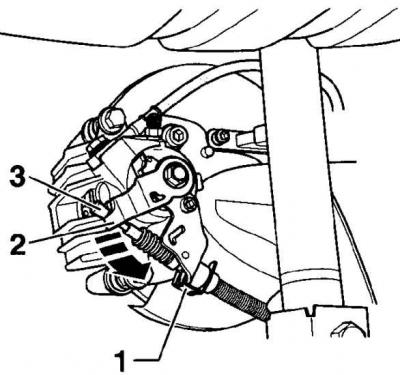
16. Install the caliper and secure it with new bolts, tightening them to a torque of 35 Nm.


17. Connect the handbrake cable (3) to the caliper by pressing the lever (2) in the direction of the arrow and connecting the handbrake cable to the lever. Secure the handbrake cable casing with the spring clip (1).


18. Adjust the handbrake operation.

19. Install the rear wheels, then lower the vehicle to the ground and tighten the wheel bolts.

20. Press the brake pedal several times to press the brake pads against the brake disc.

21. Check the brake fluid level in the reservoir and top it up if necessary.

Warning: Be careful to allow new brake pads to run in. To do this, at a speed of about 80 km/h, slow down several times to a speed of 40 km/h by lightly pressing the pedal. In between, allow the brake pads to cool slightly.


Warning: After installing new brake pads, avoid sudden braking during the first 200 km of vehicle travel.


Security Control Check


1. Check that the brake hoses are tightly tightened.

The article is posted on this website: VWMANUAL.ru

2. Check if the brake hose is secured in the holder.

3. Check that the bleed screws are securely tightened.

4. Check if the brake fluid level is sufficient.

5. Check with the engine running. Press the brake pedal with a force of 20–30 kg/m for about 10 seconds, but the pedal should not fall through.

6. Check the tightness of all listed connections.

This article is available at russian, bulgarian, belarusian, ukrainian, serbian, croatian, romanian, polish, slovak, hungarian
The text has been checked: Kolesnikov Artem

Share information:

Previous articles
Removal rear brake pads on disc brakes
Installing brake pads on the FN-3 caliper
Removal brake pads on FN-3 caliper
Installing front brake pads on FS-III caliper
Removal the front brake pads on the FS-III caliper
Brake system diagram
Next articles
Checking the brake disc
Removal and installation the brake disc
Adjusting the handbrake
Removal rear brake shoes on drum brakes
Installing rear brake shoes on drum brakes
Removal and installation the rear wheel cylinder


Similar articles from other manuals for VW cars:
Removal and installation rear disc brake pads Passat B3 (1988-1993)
Removal and installation rear disc brake pads Polo 4 (2001-2009)
Repair of rear wheel brakes, brake caliper FN 44 Touareg 1 (2002-2006)
Removal and installation rear brake pads CII41 Tiguan 1 (2007-2015)
Checking the thickness of the rear brake pads Sharan 1 (1995-2000)
Front disc brake pads (14-inch wheels) Transporter T4 (1990-2003)
Checking the thickness of disc brake pads Caddy 3 (2003-2010)
Link to this page in different formats


Visitor comments


No comments yet


How much will 10 + 11 =


Golf 5 
  • General information
  • User manual
  • Maintenance
  • Troubleshooting
  • Power unit
  • Engine repair
  • Cooling and ventilation system
  • Fuel system
  • Ignition system
  • Transmission
  • Clutch
  • Mechanical gearbox
  • Automatic gearbox
  • Chassis
  • Brake system
  • Car suspension
  • Steering
  • Body
  • Interior (internal elements)
  • Exterior (external elements)
  • Doors and covers
  • Electrical equipment
  • Power devices
  • Washers and wipers
  • Lighting and appliances
  • Electrical circuits
Golf 4 
  • General information
  • User manual
  • Weekly checks
  • Maintenance
  • Power unit
  • Petrol engines
  • Diesel engines
  • Cooling system
  • Fuel system (petrol)
  • Control system (petrol)
  • Fuel system (diesel)
  • Exhaust system
  • Transmission
  • Clutch
  • Car gearbox
  • Drive shafts
  • Chassis
  • Car suspension
  • Steering
  • Wheels and tires
  • Brake system
  • Body
  • Exterior (external elements)
  • Interior (internal elements)
  • Ventilation and heating
  • Car doors and sunroof
  • Washers and glass cleaners
  • Electrical equipment
  • Power devices
  • Lighting and appliances
  • Electrical circuits
Golf 3 
  • Petrol engine
  • Engine repair
  • Lubrication system
  • Cooling system
  • Ignition system
  • Diesel engine
  • Engine repair
  • Diesel injection system
  • Pre-glow system
  • Transmission
  • Clutch
  • Gearbox and drive shafts
  • Chassis
  • Steering
  • Wheels and suspension
  • Brake system
  • Electrical equipment
  • Lighting and appliances
  • Electrical circuits
Golf 2 
  • General information
  • Introduction to guide
  • User manual
  • Petrol engines 1.3 l
  • Engine repair
  • Lubrication system
  • Cooling system
  • Carburetors
  • Supply system
  • Ignition system
  • Petrol engines 1.6/1.8 l
  • Engine repair
  • Supply system
  • Ignition system
  • Diesel engines
  • Engine repair
  • Lubrication system
  • Cooling system
  • Power and exhaust system
  • Transmission
  • Clutch
  • 4-speed gearbox 084
  • 5-speed gearbox 085
  • 4-speed gearbox 020/4R
  • 5-speed gearbox 020/4T
  • Automatic gearbox
  • Drive shafts
  • Chassis
  • Steering
  • Car suspension
  • Brake system
  • Body
  • Body elements
  • Doors, locks and windows
  • Electrical equipment
  • Equipment and devices
  • Power devices
Golf 2 (petrol) 
  • General information
  • Characteristics
  • Car care
  • Maintenance
  • Power unit
  • Engine repair
  • Engine 1.05/1.30
  • Engine 1.60/1.80
  • Cooling and lubrication system
  • Power and exhaust system
  • Transmission
  • Clutch
  • Car gearbox
  • Drive shafts
  • Chassis
  • Brake system
  • Steering
  • Suspension
  • Body
  • Body and equipment
  • Electrical equipment
  • Lighting and appliances
  • Electrical circuits
Golf 1 (petrol) 
  • General information
  • Characteristics
  • User manual
  • Maintenance
  • Power unit
  • Engine adjustment
  • Engine 1.1/1.3
  • Engine 1.5/1.6/1.8
  • Engine electrical equipment
  • Cooling system
  • Fuel system
  • Transmission
  • Clutch and manual gearbox
  • Automatic gearbox
  • Chassis
  • Steering
  • Front suspension
  • Rear suspension
  • Brake system
  • Electrical equipment
  • Lighting and appliances
  • Electrical circuits
  • Body
  • Body and equipment
  • Optional equipment
Golf 1 (diesel) 
  • General information
  • Specifications
  • Maintenance
  • Power unit
  • Engine repair
  • Exhaust and turbocharger
  • Cooling system
  • Fuel system
  • Fuel injection system
  • Transmission
  • Clutch and drive shafts
  • Car gearbox
  • Chassis
  • Suspension and wheels
  • Steering
  • Brake system
  • Wheels and tires
  • Body
  • Heating and ventilation
  • Exterior (external elements)
  • Interior (internal elements)
  • Doors and windows
  • Electrical equipment
  • Equipment and devices
  • Lighting system
  • Power devices
  • Electrical circuits
VWmanual.ru © 2016-2026 | Mobile version | News and articles | Sitemap: EN BG BY UA RS HR RO PL SK HU | Write message | Site search
Passat B2 • Passat B3 • Passat B4 • Passat B5 • Passat B6 • Golf 1, diesel • Golf 1, petrol • Golf 2, petrol • Golf 2 • Golf 3 • Golf 4 • Golf 5 • Polo 3 • Polo 4 • Touareg 1 • Tiguan 1 • Sharan 1 • Transporter T3 • Transporter T4 • LT 28 • LT 2D • Beetle • Caddy 3 •
Our website uses cookies to ensure functionality and convenience.