



Note that you should not try to unscrew both axle suspension beams from the axle, since a certain angle of their location relative to the axle is adjusted during installation. If possible, unscrew both beams from the bottom of the car. If this is not possible, mark the relative position of the suspension beam and axle in the best possible way so that they are installed in their original position during installation.
Loosen the wheel nuts on both sides.
Place the rear of the car on jack stands and support it.
Unscrew the handbrake cables from the control lever and unscrew the brake hose where it connects to the brake wire.
From the inside of the trunk, remove the protective caps that protect the top of the shock absorbers. They are located directly under the seat belt loop.
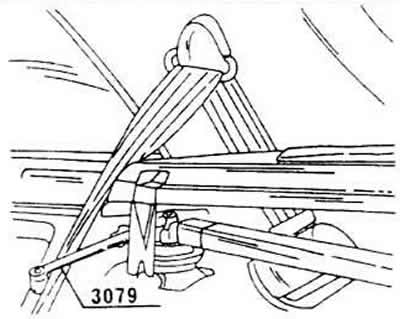
Unscrew the nuts on the ends of the piston rods of both shock absorbers (shock absorber struts). In this case, the rear axle must be supported with a jack to hold it in the same position for now. However, the unscrewing operation is not simple, since Volkswagen service workshops use a special key for this. After disconnecting the upper nut, remove the leaf disk and unscrew the second nut in the same way. Remove the underlay cover and the upper rubber bushing.
On vehicles with a brake pressure regulator, unhook the spring from the rear axle bracket.
If the bridge is removed together with the suspension beams, mark the beam outlines on the underbody of the vehicle; if the bridge is dismantled without beams, mark the position of both suspension beams on the bridge body (scratch it with a scriber) and unscrew the self-locking nuts from the outside of the beams. Carefully knock the screws inward.
Disconnect the exhaust system from the body in the appropriate manner or completely remove the rear section of the system.
Slowly lower the rear axle onto the jack and pull it out by pulling it backwards.
The assembly of the entire site is carried out in the reverse order of dismantling, however, it is necessary to pay attention to the following points.
Slowly raise the rear axle and simultaneously insert the piston rods into the holes in the trunk. The piston rods should already have the lower rubber bushings and leaf discs. Put on the upper bushing and leaf disc and tighten the nuts to a tightening torque of 25 Nm.
Put on the sheet disk and screw in the second nut. Tighten it to 15 Nm.
When installing the bridge on the body, proceed as follows depending on whether the suspension beams have been removed or not.
If the beams have not been unhooked from the axle, bring the axle to the underside of the vehicle, center the screw holes and tighten the screws. Tighten the flange screws to a torque of 70 Nm
If the beams have been disconnected from the axle, insert the rear axle with supports into the beams and center the axle body until the applied markings are again aligned. The axle body should form an angle of 12°±1° relative to the suspension beams. This ensures the correct pre-tension of the rubber mounts. Insert the screws and drive them in from the inside out: tighten the new self-locking nut (with welded washer) up to 80 Nm
If the suspension beams have been unscrewed from the axle and from the bottom of the car, first screw the beams to the axle to restore the original angular position. Screw both axle body screws to the axle, tightening to a torque of 80 Nm (new nut with weld washer). After this, manually tighten the mounting screws on both suspension beams and center the right beam so that the screws are located in the middle of the grooves. In this position, tighten the screws to 70 Nm. Now, on the left side, insert two tire levers between the suspension beam and the axle body and press the beam against the rubber-metal bushing. In this position, tighten the suspension beam screws to a torque of 70 Nm. This operation must be performed by two people (one manipulates the levers, and the other tightens the screws).
Connect the handbrake cables and brake hose and adjust the handbrake. Bleed the air from the brake system.
Visitor comments