



Contents: Dismantling ↓ Installation ↓
This section describes how to remove the entire shock absorber strut, including the lower control arm and drive shaft. In general, this work is only necessary if the vehicle has been in an accident. Some components of the shock absorber strut can be disconnected without removing the entire assembly.
Dismantling
If the shock absorber is to be disassembled, loosen the wheel and axle nuts while the wheels are on the ground.
Place the car on jack stands and remove the wheels.
Unscrew the brake seat and tie it with wire in a convenient place without unscrewing the seat from the hose.
Disconnect the self-locking nut of the swivel joint and push out the ball bolt with a puller.
Loosen the drive shaft flange screws on the inside. Use only the correct set of wrenches to do this, otherwise the screw heads will be damaged.
On the inside of the lower control arm, remove the screw located on the side of the front of the support. This screw goes into a threaded hole on the inside of the suspension cross member.
On the back of the wishbone, remove the lower screw.
Remove the anti-roll bar nut from the underside of the wishbone. To do this, unclip the nut and remove the leaf disc and rubber support. Pay attention to how both parts are mounted.
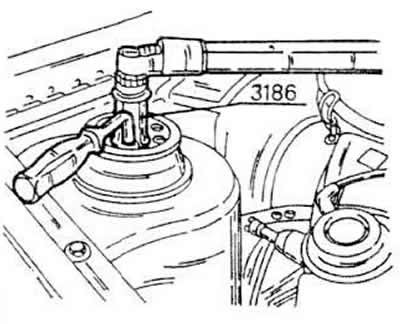
Now the shock absorber is secured to the inside of the engine section. You need to undo the nut located in the middle of the shock absorber rod. But since the piston rod can rotate, you need to hold it. Volkswagen repair shops use a special key (3186) for this, but you can try using a hex key and a socket wrench to unscrew the nuts. The shock absorber will then be released and can fall out.
Remove the shock absorber strut and remove the wishbone from the subframe.
Remove the panel from the top side
Installation
Insert the shock absorber into the upper suspension; tighten the nut manually for now.
Using the mounting flange, insert the front side of the control arm into the frame guide and slide the rear side of the control arm on.
Using a suitable drift, align the threaded channel on the inside of the crossmember and the crossmember bore; screw in the screw. Tighten the screw only by hand.
Insert the screw from the bottom into the rear wishbone support and tighten it by hand as well.
Tighten the piston rod nut into the engine section; the tightening torque is 60 Nm. In this case, the rod should be held from turning.
Attach the anti-roll bar.
Attach the drive shaft to the gearbox (together with reinforcing plates) and tighten the screws around to a tightening torque of 45 Nm using a suitable set of wrenches.
Attach the tie rod to the steering knuckle. Use new self-locking nuts. Tighten them to 35 Nm.
Lower the car onto its wheels. Since you need to think about securing the wishbone, place the front wheels on the ramp. There should be no additional weight in the car.
Both wishbone screws (lateral and lower) tighten to a torque of 130 Nm
Tighten the drive shaft nut to 265 Nm if the vehicle wheels are on the ground. Tighten the wheel bolts to 110 Nm.
Visitor comments