

1 - screw spring
2 - retaining ring (spring)
3 - nut, 15 Nm
4 - lining
5 - bottom rubber support
6 - spacer sleeve
7 - lower spring seat
8 - suspension strut support
9 - disk
10 - upper spring seat
11 - elastic rubber part
12 - shock absorber
13 - protective cuff
14 - protective cap
Remove the spacer sleeve, upper spring seat, disc, spring seat and spring itself, as well as the second spring seat and its lower seat from the shock absorber.
Remove the rubber stop, protective cap, circlip and second disc from the underside of the shock absorber.
The coil springs are provided with color markings; different models use different springs. In the described models, the springs are marked with three yellow stripes (two-door «Golf») or three yellow and one purple stripe. However, sometimes the markings are changed and springs supplied as spares may have different markings. Be sure to install a spring with the same color marking, in which, as already mentioned, there are three or four stripes of the color mentioned. Only the rear spring can be replaced without disturbing the balance of the rear suspension.
The shape of the rubber stop located on the upper side of the shock absorber can be different; when replacing it, be sure to install an emphasis of the same shape.
Test the shock absorber by extending the piston rod and reinserting it. During the entire working stroke, the reaction force must be the same, there should not be a free gap. Although the shock absorber should not be changed for small oil leaks, this is a sign that the shock absorber is working flawlessly. Shock absorbers are marked with colored markings. As in the case of springs, it is imperative to install a shock absorber with the same marking mark.
The suspension strut is assembled in the reverse order of the disassembly operation; the following points must be taken into account.
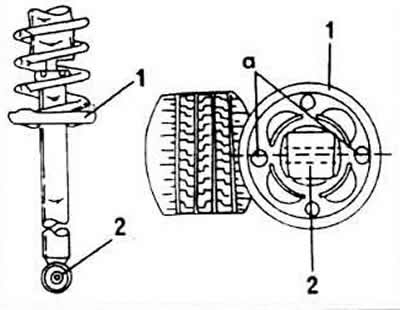
If the lower spring seat (placed on the shock absorber) has been dismantled, move the seat onto the piston rod and align. This means that the holes (A) located in line with the hole at the lower end of the shock absorber. If this is not observed, it could come into contact with the tire under extreme operating loads.
Slide the spring onto the shock absorber with the tapered end first.
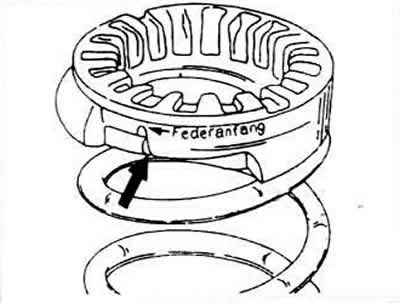
The spring seat is marked on one side with the word «Spring start» («Federanfang»). Bring this side to the end of the winding.
Tighten the nut on the top side to a torque of 15 Nm. Make sure the top and bottom ends of the spring are seated in their sockets.
Visitor comments