



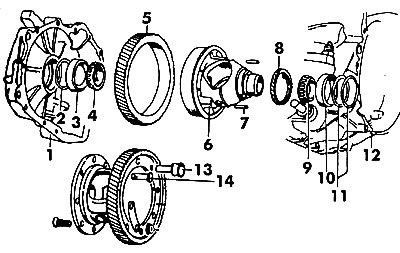
Figure 331. Main gear diagram: 1 - gearbox housing; 2, 11 - adjusting linings; 3, 10 - outer bearing races; 4, 9 - tapered bearings; 5 - toothed ring gear of the main transmission; 6 - differential housing; 7 - locking pin; 8 - speedometer drive worm wheel; 12 - gearbox housing on the clutch side; 13, 14 - rivets
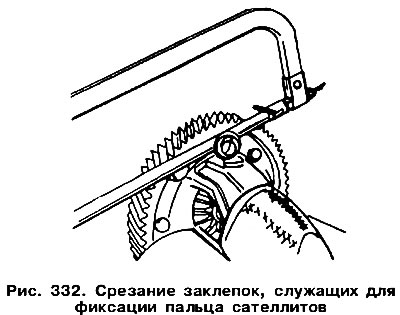
Knock out the satellite locking pins. In some versions with a riveted gear ring, clamp the housing in a vice and cut off the heads of the rivets 13 that secure the satellite pin (figure 332). During assembly, rivets should be replaced with bolts and nuts.
Remove the differential gears and the plastic collar. Unless the spherical nuts have any thread damage, they should not be removed from the axle gears.
The bearings can be removed using a double-arm puller.
If necessary, remove the worm gear of the speedometer.
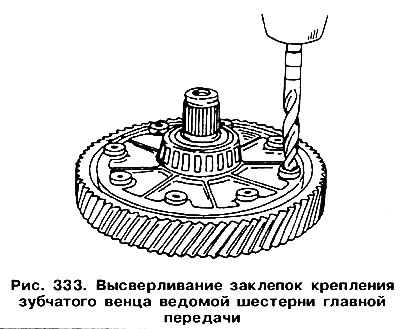
The toothed ring gear of the main transmission can be either pressed onto the differential housing or riveted to it (see figure 331). If replacing a riveted gear, remove the rivets by drilling out the heads with a 12mm drill (figure 333), and then knock out the rivet rods. Separate the toothed ring from the body, having previously cleaned it from metal filings.
If the ring gear is pressed on, it is necessary to heat the differential housing to 120°C before removing it.
The differential assembly is carried out in reverse order according to the following recommendations:
When starting assembly, insert both axle gears and the plastic collar into the differential housing.
If the drive shaft mounting bolt nuts need to be replaced (for example, due to stripped threads), they should be pushed out or knocked out from the outside and new nuts should be put in their place. Check if the nuts fit well to the gears along the entire contour (see figure 307).
Insert both drive shafts into the axle gears. Insert the satellite into the hole and turn it 180\ Then insert the second satellite and install it opposite the first. Having installed the holes of the satellites on one axis, install the pin of the satellites. Fix the pin with two pins. Lubricate all parts generously.
If the toothed ring of the driven gear is structurally pressed onto the differential housing, then to install it, do the following:
Clean the mating surface on the differential housing with a wire brush (but not with sandpaper), apply VW "D6" fixing compound to it.
Heat the ring gear to 150°C and quickly insert the differential housing into it (see figure 308). After installation, the press pressure should be maintained for 1-2 minutes until the parts cool down. The entire operation should be carried out as quickly as possible, without delays.
If the toothed crown was riveted to the differential housing, you need to use special bolts that are installed with washers instead of rivets. Install the toothed crown on the differential housing and screw it with bolts with locking washers and nuts.
Attention! The ring gear can be replaced without simultaneously replacing the secondary shaft in the gearbox housing. However, it should be noted that the ring gear is marked (the number 3 or its absence). The new ring gear must have the same marking as the one removed. A ring gear without marking is intended for a secondary shaft that does not have a groove.
Secure the differential housing in a vice and tighten the bolts one by one, diagonally, to a torque of 70 Nm.
The worm gear and bearing can be pressed together. In this case, the housing must be securely supported. The bearing preload is adjusted in the same way as in the case of a four-speed gearbox.
Visitor comments