
English Русский
Български
Беларускі
Український
Српски
Hrvatski
Română
Polski
Slovenský
Magyar
  |  Articles  |  Sitemap  |  Contacts  |    |
Car maintenance Ford Car maintenance Hyundai Car maintenance Chevrolet Car maintenance BMW Car maintenance Audi Car maintenance Opel Car maintenance AvtoVAZ
VWmanual.ru


Main   Passat   Golf   Polo   Touareg   Tiguan   Sharan   Transporter   Others  
Golf 1 (1974-1984, diesel) Golf 1 (1974-1984, petrol) Golf 2 (1984-1993, petrol) Golf 2 (1984-1993) Golf 3 (1991-1997) Golf 4 (1997-2004) Golf 5 (2003-2008)

Assembly of the main gear and differential (VW Golf 2)

  • Main
  • Golf
  • Golf 2
  • Transmission
  • 4-speed gearbox 084
  • Assembly of the main gear and differential
            0


The final drive and differential are assembled in the reverse order of disassembly. When doing so, follow these recommendations:

Place the satellites and plastic separator into the differential housing.

If it is necessary to replace the nuts of the drive shaft mounting bolts of the axle shafts (for example, in case of damage to their threads), it is necessary to knock out the old nuts from the outside and insert new ones from the inside in their place. Pay attention to the fact that the nuts are installed correctly - tightly and evenly - along the entire contour of the axle gear (figure 307).
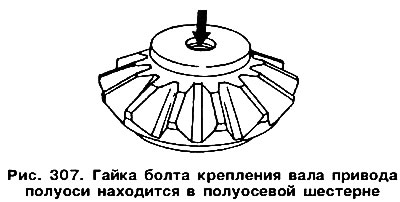
If it is necessary to replace the nuts of the drive shaft mounting bolts of the axle shafts (for…


Insert the drive shafts into the gears. Insert one satellite through the hole and turn it 1800. Insert the second satellite opposite the first. Install the satellites on the same axis with the holes in the differential housing for the pin and install the pin. Lock the pin with two pins. All internal parts must be well lubricated.

Before installing a new driven gear ring gear, the differential housing surface should be thoroughly cleaned with a wire brush (but not with sandpaper!) and cover with D6 sealant.


Heat the ring gear again (this time to 150°C) and quickly insert the differential housing into it (figure 308).
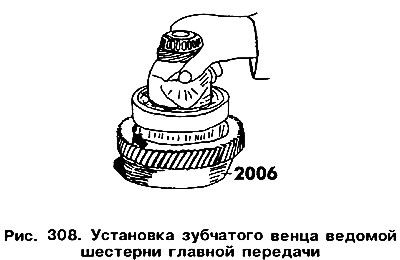
Heat the ring gear again (this time to 150°C) and quickly insert the differential housing into it…


The arrow in the figure points to the chamfer of the gear ring.

After assembly, you need to maintain the press pressure for 1-2 minutes until the crown cools down.

The housing bearing and the speedometer worm gear can only be removed or installed together. In both cases, the speedometer housing must be securely fastened.

After replacing one of the parts of the gearbox housing or the differential housing bearings, it is necessary to adjust the bearing play.

Insert the outer race of the bearing into the gearbox housing from the side of the main gear pinion ring gear together with a 1.0 mm thick adjusting washer. This washer should always be 1.0 mm thick and is designated as "S1".

Insert the outer bearing race from the other side, but without the adjusting washer.

[The original information is posted on the website: VWManual.ru]

The outer and inner bearing races cannot be replaced separately.

After installing the main gear, connect both parts of the gearbox housing. Before this, install the guide pins. Tighten the bolts with a torque of 25 Nm.


Place the VW 385/17 measuring plate on the differential housing (figure 309). This plate can be replaced with a regular, well-ground one that matches the diameter of the hole for the shaft flange.
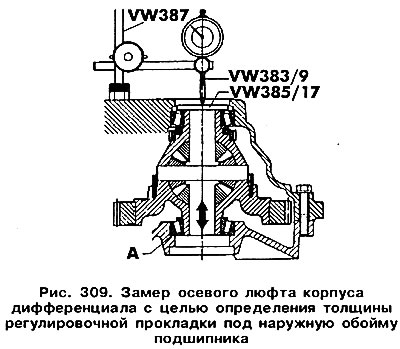
Place the VW 385/17 measuring plate on the differential housing (figure 309). This plate can be…


Place the VW 383/9 indicator rod against the plate and reset the indicator after the initial setting to 1.0 mm.

Move the main gear ring gear from top to bottom (by the arrow) and take readings.

The thickness of the second adjusting washer is determined by adding the obtained result and the value of 0.30 mm, which will provide preload of the bearing. If the obtained result is, for example, 1.50 mm, then the required thickness of the washer "S2" is: 1.50 mm + 0.3 mm = 1.8 mm.

There are twenty-one standard sizes of "S2" adjustment washers, with thickness differences of 0.05 mm.

Separate the two parts of the crankcase again and remove the bearing race without the adjusting washer. Insert a washer of the required thickness and reinstall the bearing race.

Attention! When replacing the toothed ring of the driven gear of the main transmission, it is not necessary to replace the secondary shaft of the gearbox. However, you should pay attention to the markings on the ring (numbers 1, 3 and 4) or its absence. The number corresponds to the number of grooves on the secondary shaft. The number (number of grooves) the secondary shaft and the ring gear must match.

This article is available at russian, bulgarian, belarusian, ukrainian, serbian, croatian, romanian, polish, slovak, hungarian
The text has been checked: Kolesnikov Artem

Share information:

Previous articles
Repair of the main gear and differential
Assembling the rod locking device
Installing the primary shaft
Installing the secondary shaft
Assembling the primary shaft
Secondary shaft assembly
Next articles
Gear selection mechanism repair


Similar articles from other manuals for VW cars:
Adjusting the distance between the end face of the main gear… Passat B2 (1981-1988)
Gearbox/Main gear Polo 4 (2001-2009)
Letter designations, gear ratios, filling volumes (main forward… Touareg 1 (2002-2006)
Parts and units of the subframe, main gear Tiguan 1 (2007-2015)
Gear shift mechanism Sharan 1 (1995-2000)
Main technical data of the gasoline engine Transporter T3 (1979-1992)
Disassembly and assembly of the main gear reducer LT 2D (1996-2003)
Link to this page in different formats


Visitor comments


No comments yet


How much will 39 + 27 =


Golf 5 
  • General information
  • User manual
  • Maintenance
  • Troubleshooting
  • Power unit
  • Engine repair
  • Cooling and ventilation system
  • Fuel system
  • Ignition system
  • Transmission
  • Clutch
  • Mechanical gearbox
  • Automatic gearbox
  • Chassis
  • Brake system
  • Car suspension
  • Steering
  • Body
  • Interior (internal elements)
  • Exterior (external elements)
  • Doors and covers
  • Electrical equipment
  • Power devices
  • Washers and wipers
  • Lighting and appliances
  • Electrical circuits
Golf 4 
  • General information
  • User manual
  • Weekly checks
  • Maintenance
  • Power unit
  • Petrol engines
  • Diesel engines
  • Cooling system
  • Fuel system (petrol)
  • Control system (petrol)
  • Fuel system (diesel)
  • Exhaust system
  • Transmission
  • Clutch
  • Car gearbox
  • Drive shafts
  • Chassis
  • Car suspension
  • Steering
  • Wheels and tires
  • Brake system
  • Body
  • Exterior (external elements)
  • Interior (internal elements)
  • Ventilation and heating
  • Car doors and sunroof
  • Washers and glass cleaners
  • Electrical equipment
  • Power devices
  • Lighting and appliances
  • Electrical circuits
Golf 3 
  • Petrol engine
  • Engine repair
  • Lubrication system
  • Cooling system
  • Ignition system
  • Diesel engine
  • Engine repair
  • Diesel injection system
  • Pre-glow system
  • Transmission
  • Clutch
  • Gearbox and drive shafts
  • Chassis
  • Steering
  • Wheels and suspension
  • Brake system
  • Electrical equipment
  • Lighting and appliances
  • Electrical circuits
Golf 2 
  • General information
  • Introduction to guide
  • User manual
  • Petrol engines 1.3 l
  • Engine repair
  • Lubrication system
  • Cooling system
  • Carburetors
  • Supply system
  • Ignition system
  • Petrol engines 1.6/1.8 l
  • Engine repair
  • Supply system
  • Ignition system
  • Diesel engines
  • Engine repair
  • Lubrication system
  • Cooling system
  • Power and exhaust system
  • Transmission
  • Clutch
  • 4-speed gearbox 084
  • 5-speed gearbox 085
  • 4-speed gearbox 020/4R
  • 5-speed gearbox 020/4T
  • Automatic gearbox
  • Drive shafts
  • Chassis
  • Steering
  • Car suspension
  • Brake system
  • Body
  • Body elements
  • Doors, locks and windows
  • Electrical equipment
  • Equipment and devices
  • Power devices
Golf 2 (petrol) 
  • General information
  • Characteristics
  • Car care
  • Maintenance
  • Power unit
  • Engine repair
  • Engine 1.05/1.30
  • Engine 1.60/1.80
  • Cooling and lubrication system
  • Power and exhaust system
  • Transmission
  • Clutch
  • Car gearbox
  • Drive shafts
  • Chassis
  • Brake system
  • Steering
  • Suspension
  • Body
  • Body and equipment
  • Electrical equipment
  • Lighting and appliances
  • Electrical circuits
Golf 1 (petrol) 
  • General information
  • Characteristics
  • User manual
  • Maintenance
  • Power unit
  • Engine adjustment
  • Engine 1.1/1.3
  • Engine 1.5/1.6/1.8
  • Engine electrical equipment
  • Cooling system
  • Fuel system
  • Transmission
  • Clutch and manual gearbox
  • Automatic gearbox
  • Chassis
  • Steering
  • Front suspension
  • Rear suspension
  • Brake system
  • Electrical equipment
  • Lighting and appliances
  • Electrical circuits
  • Body
  • Body and equipment
  • Optional equipment
Golf 1 (diesel) 
  • General information
  • Specifications
  • Maintenance
  • Power unit
  • Engine repair
  • Exhaust and turbocharger
  • Cooling system
  • Fuel system
  • Fuel injection system
  • Transmission
  • Clutch and drive shafts
  • Car gearbox
  • Chassis
  • Suspension and wheels
  • Steering
  • Brake system
  • Wheels and tires
  • Body
  • Heating and ventilation
  • Exterior (external elements)
  • Interior (internal elements)
  • Doors and windows
  • Electrical equipment
  • Equipment and devices
  • Lighting system
  • Power devices
  • Electrical circuits
VWmanual.ru © 2016-2026 | Mobile version | News and articles | Sitemap: EN BG BY UA RS HR RO PL SK HU | Write message | Site search
Passat B2 • Passat B3 • Passat B4 • Passat B5 • Passat B6 • Golf 1, diesel • Golf 1, petrol • Golf 2, petrol • Golf 2 • Golf 3 • Golf 4 • Golf 5 • Polo 3 • Polo 4 • Touareg 1 • Tiguan 1 • Sharan 1 • Transporter T3 • Transporter T4 • LT 28 • LT 2D • Beetle • Caddy 3 •
Our website uses cookies to ensure functionality and convenience.