
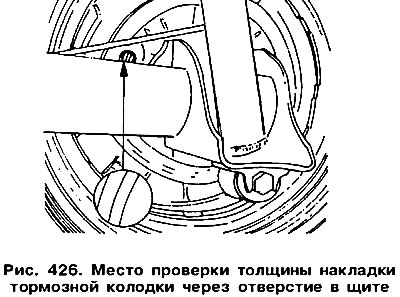
Raise the rear of the car and place on stands. Place wheel chocks under the front wheels. Loosen the pad wear compensation mechanism as the pads can hold the drum. To do this, the screwdriver is inserted through the threaded hole into the drum until it stops against the extended shoulder of the spacer bar 16 (pic. 427) and moves it up. The compensation mechanism is installed on the left side of the top of the brake drum.
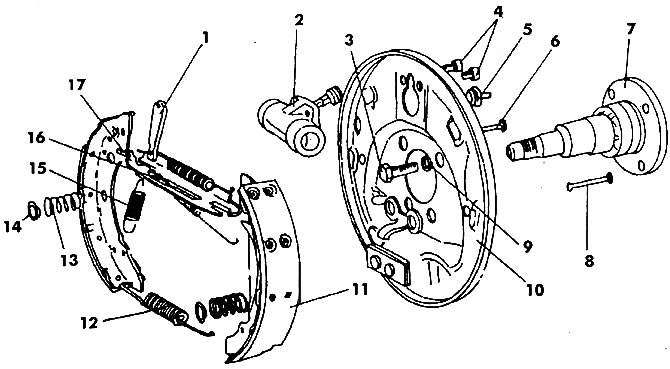
Pic. 427. Components of the rear brake mechanism: 1 - lever; 2 - brake cylinder; 3 - bolt (6 Nm); 4 - cylinder mounting bolts; 5 - plug; 6, 8 - guides of the clamps; 7 - trunnion of the hub; 9 - spring washer; 10 - brake shield; 11 - brake shoe; 12 - lower coupling spring; 13 - retainer spring; 14 - lock washer; 15 - spring of the adjusting device; 16 - lower coupling spring; 17 - spacer bar
Carefully remove the hub cap with a screwdriver. Remove the brake drum. Disconnect the block retainer, for which, pressing the latch guide with your finger, grab the latch washer from the front with tongs, press it and, turning, remove the washer from the latch guide. Remove the spring guide. Perform these steps for both pads.
Grasp one block from below with your hand and remove it from the bottom guide. Disconnect the released return spring. Disconnect the parking brake cable from the shoe. Disconnect the parking brake actuator spring and the upper coupling spring with pliers. Take out both pads with a spacer level of a drive of a parking brake. Fix the block with the spacer bar in a vise and disconnect the bar, and then the spring (pic. 428). Extend the extended shoulder, paying attention to its position.
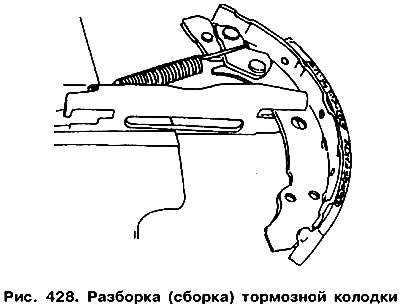
Thoroughly clean all parts. Carefully check up a condition of rubber anthers of the working cylinder. If traces of leakage are visible, the working cylinder must be repaired or replaced. Reattach the brake shoe in a vise (see fig. 428).
Attach the spring and insert the spacer bar into the block, slightly stretching the spring.
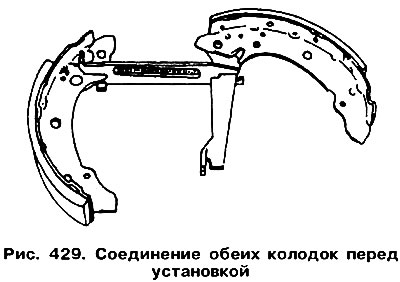
Install the spacer bar in its original place and connect both pads as shown in fig. 429.
Attach the shoes to the brake shield and attach the upper return spring. Connect the parking brake cable to the lever. Separate the pads from above and carefully insert the pistons into the brake cylinder without damaging the cuffs.
Install the lower return spring and insert the left shoe into the guide.
Install the adjuster spring and the second shoe into the spacer bar, using a screwdriver to help. Install the pad retainers.
Install the brake drum and adjust the bearing play.
Depress the brake pedal several times to activate the pad wear compensation mechanism.
When the brake pads and slave cylinder are removed, the brake shield can be replaced. To do this, unscrew the four bolts securing the shield to the trunnion flange (see fig. 427). These bolts also hold the trunnion and are tightened with a torque of 60 Nm. Place spring washers under the bolt heads.
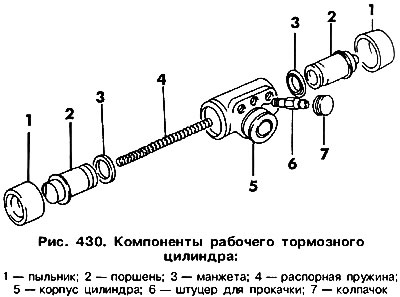
In cars of early releases, it was possible to repair the working brake cylinder after its dismantling (pic. 430). When ordering a repair kit, it was necessary to specify the model of the car, since not all cylinders had the same internal diameter. The manufacturer now recommends replacing the leaking cylinder assembly.
Visitor comments