
English Русский
Български
Беларускі
Український
Српски
Hrvatski
Română
Polski
Slovenský
Magyar
  |  Articles  |  Sitemap  |  Contacts  |    |
Car maintenance Ford Car maintenance Hyundai Car maintenance Chevrolet Car maintenance BMW Car maintenance Audi Car maintenance Opel Car maintenance AvtoVAZ
VWmanual.ru


Main   Passat   Golf   Polo   Touareg   Tiguan   Sharan   Transporter   Others  
Golf 1 (1974-1984, diesel) Golf 1 (1974-1984, petrol) Golf 2 (1984-1993, petrol) Golf 2 (1984-1993) Golf 3 (1991-1997) Golf 4 (1997-2004) Golf 5 (2003-2008)

Motor housing (VW Golf 2)

  • Main
  • Golf
  • Golf 2
  • Power unit
  • Engine repair
  • Motor housing
            0


1. Check the cylinder liner surface for signs of friction, scratches, cracks or corrosion. To eliminate minor scratches, it is sufficient to treat the surfaces with a very fine abrasive cloth.

2. Measure the piston clearance in the cylinder. If it exceeds the permissible value (0.15 mm), it is necessary to bore the cylinder to one of three increased diameters. The cylinder diameter should be measured at three heights perpendicular to each other.

After boring, the piston mounting clearance in the cylinder should be 0.03 mm.

3. If it becomes necessary to ream the housing, which was previously bored to the last repair size, it is necessary to transfer the housing sleeves. This operation should be carried out by a specialized enterprise.

4. It is necessary to check the cone and oval of the cylinder liners using a micrometer gauge (photo 1.150). The cylinder liner wears out most in the upper part, where the operating conditions are the most severe, i.e. the highest temperature, pressure and the worst lubrication. The first sealing ring reaches a distance of 5 mm from the upper edge of the cylinder liner. Below, a distinct threshold (barrier) will be felt. If it is large, this indicates engine wear. We also measure the liner diameter there.

The original text can be found at [www.VWManual.ru]
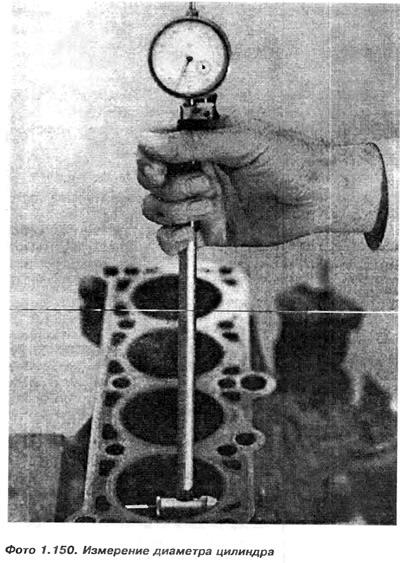
4. It is necessary to check the cone and oval of the cylinder liners using a micrometer gauge…


5. The diameter measured under the threshold should not differ from the diameter measured at the bottom of the sleeve (where it will wear out the least) more than 0.15 mm.


6. If new pistons are fitted to old bores, it is important that the cylinder walls are slightly roughened, this is done with fine-grained sandpaper. This will allow the piston rings to grind in properly.

7. It is necessary to carefully check for cracks and damage in the crankcase and cylinder block. If necessary, remove the plugs of the oil or water channels, clean them and blow them out with compressed air.

New plugs are usually driven in for the sealing fluid. If there is no doubt about the correctness of the plugs, you can check their tightness. To do this, we supply compressed air to the oil or water channels, and cover the plug with a layer of oil on the outside so that air bubbles are visible, if any. During the check, other channel outlets must be closed. In a similar way, we check for cracks in the housing. We plug all the outlets of the oil and water channels, except for one, through which we supply compressed air. Then we place the housing in water and determine the location of the leak. Since there are a lot of channel outlets on the contact surface of the head, especially water, of various shapes that are difficult to seal, we suggest fitting a piece of rubber and 4-5 mm thick tin. The rubber and tin should have an external shape and size copied from the old gasket from under the head. According to the gasket, it is necessary to redraw the holes for the bolts securing the head on the rubber and tin. Then we drill holes in the designated places and screw the tin with the rubber under it to the body. We seal all the upper holes in this way. If cracks are found, you can try to solder the body at a specialized enterprise.

8. Check the diameter of the holes in the main bearings.

This article is available at russian, bulgarian, belarusian, ukrainian, serbian, croatian, romanian, polish, slovak, hungarian
The text has been checked: Semenova Anna

Share information:

Previous articles
Engine technical data
Next articles
Crankcase air bleed system
Oil sump
Flywheel — removal, repair and installation
Engine assembly
Starting the engine after repair and adjustment
Engine fault tables


Similar articles from other manuals for VW cars:
Motor oil Passat B3 (1988-1993)
Removal and installation the camshaft housing Polo 3 (1995-2003)
Removal and installation sealing rings of the PTO/cardan shaft… Touareg 1 (2002-2006)
Motor oil Tiguan 1 (2007-2015)
Replacing the windshield wiper gear motor Sharan 1 (1995-2000)
Windscreen wiper motor — removal and installation Transporter T4 (1990-2003)
Air filter housing for engines with the BCA designation Caddy 3 (2003-2010)
Link to this page in different formats


Visitor comments


No comments yet


How much will 30 + 10 =


Golf 5 
  • General information
  • User manual
  • Maintenance
  • Troubleshooting
  • Power unit
  • Engine repair
  • Cooling and ventilation system
  • Fuel system
  • Ignition system
  • Transmission
  • Clutch
  • Mechanical gearbox
  • Automatic gearbox
  • Chassis
  • Brake system
  • Car suspension
  • Steering
  • Body
  • Interior (internal elements)
  • Exterior (external elements)
  • Doors and covers
  • Electrical equipment
  • Power devices
  • Washers and wipers
  • Lighting and appliances
  • Electrical circuits
Golf 4 
  • General information
  • User manual
  • Weekly checks
  • Maintenance
  • Power unit
  • Petrol engines
  • Diesel engines
  • Cooling system
  • Fuel system (petrol)
  • Control system (petrol)
  • Fuel system (diesel)
  • Exhaust system
  • Transmission
  • Clutch
  • Car gearbox
  • Drive shafts
  • Chassis
  • Car suspension
  • Steering
  • Wheels and tires
  • Brake system
  • Body
  • Exterior (external elements)
  • Interior (internal elements)
  • Ventilation and heating
  • Car doors and sunroof
  • Washers and glass cleaners
  • Electrical equipment
  • Power devices
  • Lighting and appliances
  • Electrical circuits
Golf 3 
  • Petrol engine
  • Engine repair
  • Lubrication system
  • Cooling system
  • Ignition system
  • Diesel engine
  • Engine repair
  • Diesel injection system
  • Pre-glow system
  • Transmission
  • Clutch
  • Gearbox and drive shafts
  • Chassis
  • Steering
  • Wheels and suspension
  • Brake system
  • Electrical equipment
  • Lighting and appliances
  • Electrical circuits
Golf 2 
  • General information
  • Introduction to guide
  • User manual
  • Petrol engines 1.3 l
  • Engine repair
  • Lubrication system
  • Cooling system
  • Carburetors
  • Supply system
  • Ignition system
  • Petrol engines 1.6/1.8 l
  • Engine repair
  • Supply system
  • Ignition system
  • Diesel engines
  • Engine repair
  • Lubrication system
  • Cooling system
  • Power and exhaust system
  • Transmission
  • Clutch
  • 4-speed gearbox 084
  • 5-speed gearbox 085
  • 4-speed gearbox 020/4R
  • 5-speed gearbox 020/4T
  • Automatic gearbox
  • Drive shafts
  • Chassis
  • Steering
  • Car suspension
  • Brake system
  • Body
  • Body elements
  • Doors, locks and windows
  • Electrical equipment
  • Equipment and devices
  • Power devices
Golf 2 (petrol) 
  • General information
  • Characteristics
  • Car care
  • Maintenance
  • Power unit
  • Engine repair
  • Engine 1.05/1.30
  • Engine 1.60/1.80
  • Cooling and lubrication system
  • Power and exhaust system
  • Transmission
  • Clutch
  • Car gearbox
  • Drive shafts
  • Chassis
  • Brake system
  • Steering
  • Suspension
  • Body
  • Body and equipment
  • Electrical equipment
  • Lighting and appliances
  • Electrical circuits
Golf 1 (petrol) 
  • General information
  • Characteristics
  • User manual
  • Maintenance
  • Power unit
  • Engine adjustment
  • Engine 1.1/1.3
  • Engine 1.5/1.6/1.8
  • Engine electrical equipment
  • Cooling system
  • Fuel system
  • Transmission
  • Clutch and manual gearbox
  • Automatic gearbox
  • Chassis
  • Steering
  • Front suspension
  • Rear suspension
  • Brake system
  • Electrical equipment
  • Lighting and appliances
  • Electrical circuits
  • Body
  • Body and equipment
  • Optional equipment
Golf 1 (diesel) 
  • General information
  • Specifications
  • Maintenance
  • Power unit
  • Engine repair
  • Exhaust and turbocharger
  • Cooling system
  • Fuel system
  • Fuel injection system
  • Transmission
  • Clutch and drive shafts
  • Car gearbox
  • Chassis
  • Suspension and wheels
  • Steering
  • Brake system
  • Wheels and tires
  • Body
  • Heating and ventilation
  • Exterior (external elements)
  • Interior (internal elements)
  • Doors and windows
  • Electrical equipment
  • Equipment and devices
  • Lighting system
  • Power devices
  • Electrical circuits
VWmanual.ru © 2016-2026 | Mobile version | News and articles | Sitemap: EN BG BY UA RS HR RO PL SK HU | Write message | Site search
Passat B2 • Passat B3 • Passat B4 • Passat B5 • Passat B6 • Golf 1, diesel • Golf 1, petrol • Golf 2, petrol • Golf 2 • Golf 3 • Golf 4 • Golf 5 • Polo 3 • Polo 4 • Touareg 1 • Tiguan 1 • Sharan 1 • Transporter T3 • Transporter T4 • LT 28 • LT 2D • Beetle • Caddy 3 •
Our website uses cookies to ensure functionality and convenience.