
Attention: If the wheel has a flat tire, move the car to the edge of the road at a safe distance. Stop the engine, turn on the hazard warning lights and use other warning devices.
Passengers should not be in the passenger compartment while the vehicle is being jacked up.
Before changing a wheel, make sure the ground on which your vehicle is standing is level and firm. Place a board under the jack if necessary.
To prevent the vehicle from moving unintentionally and possibly slipping off the jack, apply the parking brake and block the wheel diagonally opposite the wheel being changed. After one front wheel is off the ground, setting the automatic transmission switch to the "R" (parking) or setting the manual transmission into gear will not lock the vehicle from unintentional movement.
Stage 1
- Remove the jack, tools and spare wheel from the luggage compartment.
Stage 2
Wheel with small protective caps
- Using a screwdriver, unscrew the small protective caps of the hub and the wheel bolts.
Wheel with decorative cap
- Loosen the small Allen screw and remove the decorative cap.
Stage 3
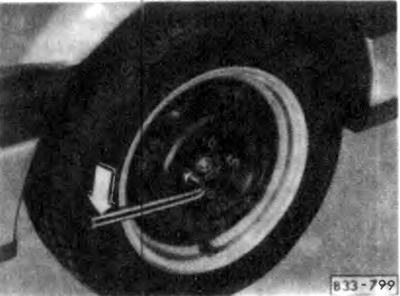
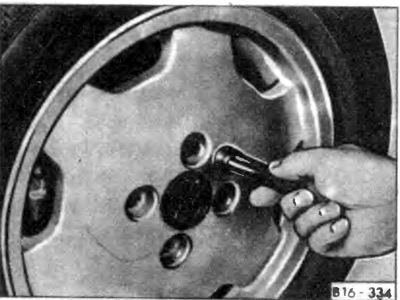
- Put a wrench with a handle on the wheel bolt without removing it, turn it to the left, holding the finger of the wrench handle - see illustration.
If the bolt cannot be removed, hit the end of the wrench handle. In this case, it is necessary to take a stable position, leaning on the car for support.
Loosen all mounting bolts about one turn. At this stage, do not unscrew the bolts to the end.
Attention: If your vehicle has BBS alloy wheels (unified wheels) never loosen the bolts that hold the two parts of the wheel together to prevent air from blowing out of the tire.
This can lead to loss of control of the vehicle while driving and injury to passengers!
Stage 4
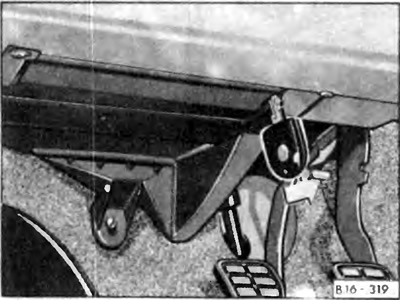
Installing a car jack
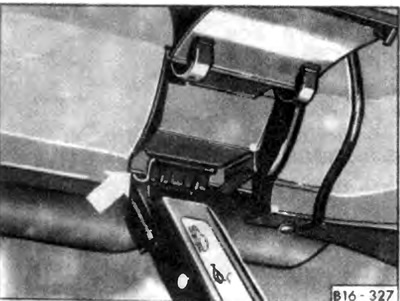
There are two flaps in the side element of the decorative panel. After opening the shutter, the vertical rib of the side element will be visible. This is the place where you need to install the jack.
Caution: Using the jack in any other location may result in vehicle damage and personal injury.
An unstable base under the jack can cause the vehicle to slide off the jack. The jack must be installed on a solid support. If necessary, place a board under it.
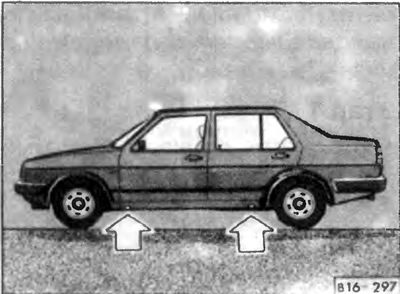
- Position the jack properly under the vehicle at the jacking point mentioned above closest to the wheel being changed.
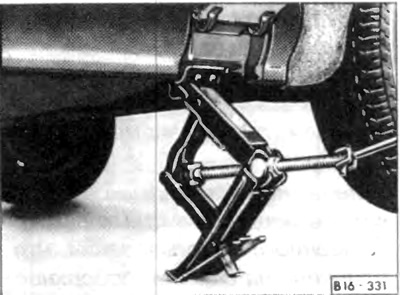
- While manually turning the T-shaped element of the jack, lift until the pointed protrusion of the jack enters into tight engagement with the vertical rib (indicated by an arrow) on the side piece to prevent the jack from slipping out when the vehicle is raised - see illustration.
- After making sure that the jack is in a stable position, install the jack handle (available in the toolbox) on the T-piece.
Stage 5
Caution: Do not raise the vehicle until you are sure that the jack is not firmly engaged.
Passengers should not be in the passenger compartment while the vehicle is being jacked up.
Turn the handle clockwise to raise the car.
- The vehicle must be raised to the minimum height to ensure that the wheel can be changed without hindrance.
Stage 6
- Loosen the wheel bolts completely and remove the wheel.
Note:The screwdriver handle from the tool kit has a hexagonal cavity at the end. After unscrewing the wheel mounting bolts, use this handle to remove and then install the mounting bolts. It will be more convenient to use such a handle if you first remove the screwdriver blade from it.
- Before installing a new wheel, remove any dirt or corrosion from the mounting surface of the wheel or vehicle. Position the spare wheel against the hub so that the bolt holes in the wheel align with the threaded holes in the hub.
- Insert mounting bolts. Before lowering the car, lightly wrap them in a crosswise pattern. Mounting bolts should be easy to tighten and clean - never apply grease or oil to the bolts.
Stage 7
- To lower the vehicle, turn the handle counterclockwise until the jack is completely disengaged from the vehicle.
Stage 8
- Then, using a wrench with a handle, fully tighten the wheel bolts crosswise.
Proper tightening of the mounting bolts is essential.
Bolts properly tightened must have a tightening torque of 110 Nm. Such a torque can be achieved by turning bolts with a wrench with a handle by any person of average strength. If you are unsure of the accuracy of the torque, check it using a torque wrench available from your dealer or workshop. If you find that the bolts are corroded and difficult to turn, replace them.
Stage 9
Reinstall the protective caps for the mounting bolts.
Stage 10
- Lower the car completely and remove the jack.
- Check the chamber pressure of the installed wheel. Air pressure in the spare wheel chamber (cold) should be 4.2 bar.
- Place the damaged wheel, trim cap, jack and tools in the luggage compartment and secure them securely.
- Repair and reinstall the damaged wheel as soon as possible.
Remember that the compact spare tire is for temporary use only!
Visitor comments