
Replacement
Check the exhaust system periodically for corrosion and exhaust leaks. Golf, Jetta and Scirocco models have a three-section exhaust system mounted on rubber suspensions (pic. Q:50). When ordering exhaust system parts, it is important to enter the correct vehicle identification number and engine code so that the part fits the specific model.
NOTE: A flexible hose is installed between the muffler downpipe and the middle section on some models and is attached to the rest of the system by two couplers.
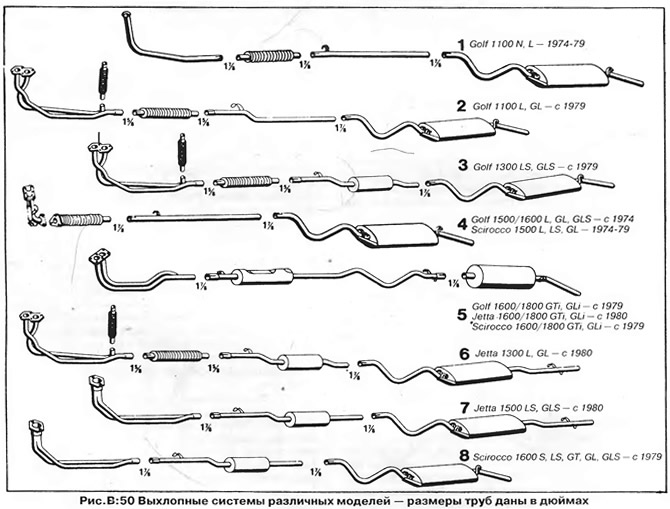
The exhaust systems of the various Golf, Jetta and Scirocco models are shown in fig. B.50.
Remember that the raised vehicle must be securely anchored before starting any work under it (see chapter "Basic rules for work").
The exhaust system is relatively easy to remove. Loosen the clamps and disconnect the flange connections holding the system sections together, then remove the rubber hangers that attach the system to the body and remove the exhaust system. Exhaust system sections can be replaced individually, but in this case, the entire system should be inspected for corrosion and the expected life of the remaining sections should be assessed to avoid unnecessary work in the future. Evaluate the strength of the pipe and muffler box by tapping it with a hammer, while it is very thin (due to corrosion) the section will easily collapse or break through. The exhaust system is subject to corrosion mainly from the inside, because. Exhaust gases attack the inner surface of the pipes aggressively, so the described test method is the best, even if there is no visible damage from the outside.
Rusted sections of the exhaust system can be difficult to separate, as its coupling joints are sometimes tight "coalesce". In this case, clean the connections with a wire brush and oil them liberally; sometimes it is required to heat the connection with a blowtorch and separate the sections from each other by tapping with a hammer through the wooden gasket on the end of the nearest muffler box. In extreme cases, you can unbend the coupling with a chisel and pull off the outer pipe of the connection. If only one of the sections being divided is being replaced, be careful not to deform the end of the remaining section.
Apply some lubricant to the inner tube of the connection and join the new sections together. Align both sections so that the clearance between any part of the system and the bottom of the vehicle is at least 25 mm. Avoid undue stress on joints and rubber hangers.
Tighten the clamps around the connections. Make sure that self-locking nuts are used or spring washers are placed under the nuts. Do not overtighten the nuts, as this may cause pipe deformation and exhaust leakage.
Always install new gaskets when assembling flange connections.
Replace rubber bushings that show signs of wear or cracking, as well as heavily rusted bolts, as otherwise there is a risk of part of the exhaust system separating from the body while driving.
Start the engine and check for exhaust leaks at the connections by covering the exhaust pipe with a gloved hand - this will make the leaks more noticeable. Remember that minor leaks in connections often stop on their own due to soot buildup inside the pipe.
Finally check the exhaust system by making a test drive. Make sure that there are no knocks that occur when the exhaust system contacts the bottom of the car.
Visitor comments