
English Русский
Български
Беларускі
Український
Српски
Hrvatski
Română
Polski
Slovenský
Magyar
  |  Articles  |  Sitemap  |  Contacts  |    |
Car maintenance Ford Car maintenance Hyundai Car maintenance Chevrolet Car maintenance BMW Car maintenance Audi Car maintenance Opel Car maintenance AvtoVAZ
VWmanual.ru


Main   Passat   Golf   Polo   Touareg   Tiguan   Sharan   Transporter   Others  
Golf 1 (1974-1984, diesel) Golf 1 (1974-1984, petrol) Golf 2 (1984-1993, petrol) Golf 2 (1984-1993) Golf 3 (1991-1997) Golf 4 (1997-2004) Golf 5 (2003-2008)

Carburetor adjustment (VW Golf 1)

  • Main
  • Golf
  • Golf 1
  • Power unit
  • Engine adjustment
  • Carburetor adjustment
            0


Contents: Adjustment - Prerequisites ↓ Carburetor adjustment ↓
NOTE: The carburetor should be adjusted last, after all other engine systems have been checked and adjusted.


To prevent unqualified intervention, plugs in the form of plastic or aluminum plugs or caps are installed on the mixture and idle speed adjustment screws. Before starting the adjustment, the plugs should be removed using a thin screwdriver or by screwing a self-tapping screw into the plug. It is not necessary to install new plugs unless this is required by the rules adopted in the country.

A gas analyzer is required for adjustment (device for measuring CO content in exhaust gases) and tachometer (if it is not provided on the vehicle's instrument panel).

Adjustment - Prerequisites


Before you begin adjusting the carburetor, please follow the conditions below. If you do not follow these conditions, the adjustment will be incorrect.
1. All engine systems (ignition, valve mechanism) must be adjusted correctly.

2. Make sure that there is no additional air leakage through the engine intake tract (intake manifold, carburetor mount, vacuum hoses, etc.).

3. Warm up the engine to operating temperature. To do this, it is recommended to drive a few kilometers or let the engine idle for at least 15 minutes (depending on the outside temperature).

4. The air filter must be installed and the air damper (carburetor models) — fully open. Air intake flap (if available) set it to "summer" ("summer").

5. Disconnect the crankcase ventilation hose from the air filter and plug it.


6. All electrical devices in the vehicle must be turned off.

7. Connect the gas analyzer in accordance with the manufacturer's instructions.

NOTE: All adjustments and checks should be made within three minutes after the engine has been set to idle speed. If the adjustment is not completed within three minutes, the engine should be allowed to run at medium speed for about half a minute, then set to idle speed again and continue the adjustment.


Carburetor adjustment


1. Let the engine run at high speed (3000 rpm) about half a minute, then set the idle speed and immediately take the tachometer readings.

NOTE: On models equipped with Transistorized Clutch Ignition (TCI-H) and Digital Idle Stabilizer (DIS), the TEST idle speed is reduced - see section "Technical data". When adjusting the idle speed, the DIS module should be disconnected and its wires connected to each other (figure B.21). The DIS module is located on a platform at the rear of the engine compartment. If the engine idle speed does not decrease by 100±50 rpm when the DIS module is disconnected, the module must be replaced.
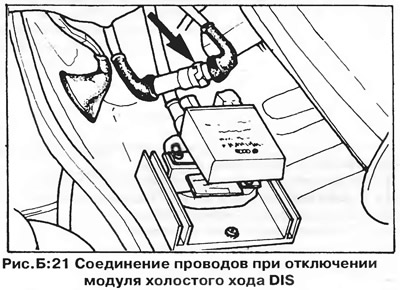

NOTE: On models equipped with Transistorized Clutch Ignition (TCI-H) and Digital Idle Stabilizer…


The idle speed module should also be disconnected during the initial adjustment of the mixture composition (cO content). For the second CO content check, the module must be connected again.


2. If the idle speed does not correspond to those specified in the section "Technical data", adjust them by turning the idle speed adjustment screw (A, Figure 5:22, 23, 24).
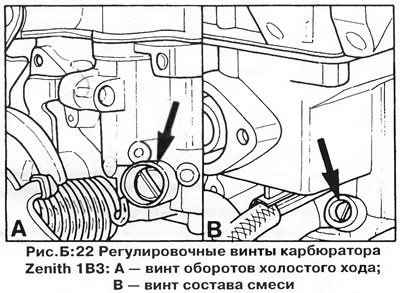
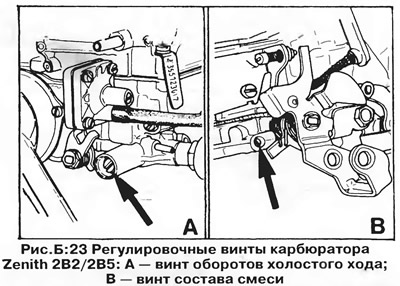
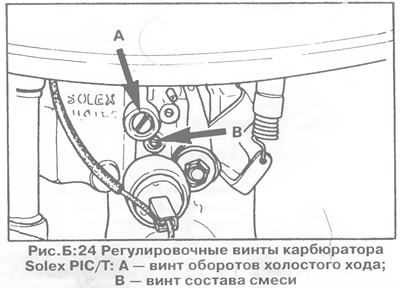
2. If the idle speed does not correspond to those specified in the section «Technical data», adjust…


2. If the idle speed does not correspond to those specified in the section «Technical data», adjust…


2. If the idle speed does not correspond to those specified in the section «Technical data», adjust…


NOTE: Normally, it is not necessary to adjust the mixture ratio during maintenance. However, if the engine cannot be idled at the required speed, or the CO content is higher than the permissible level (see section "Technical data"), check and adjust the mixture composition as follows:


3. Remove the plug from the mixture adjustment screw (B, Figure 5:22, 23, 24).

4. If you do not have a gas analyzer, proceed as follows:

Run the engine at high speed for about half a minute to remove excess fuel from the manifold, then set the idle speed to normal. Slowly turn the mixture adjustment screw, monitoring the engine operation. If the engine speed increases, continue to turn the screw in the same direction until you reach the highest speed. If the speed decreases or the engine begins to run unsteadily, turn the screw in the other direction until you reach the highest speed. If the idle speed is still higher than normal, adjust it with the idle speed adjusting screw. Run the engine at high speed again for half a minute and repeat the adjustment.

5. If you have a gas analyzer, check and adjust the mixture composition in the following order:

NOTE: If equipped with a Disable Idle Stabilizer (DIS) module, disable it as described above.


Remove the plug from the mixture adjustment screw (B, figure B:22, 23, 24) and connect the gas analyzer in accordance with the manufacturer's instructions. Let the engine run at high speed for about half a minute to remove excess fuel from the manifold, then set the normal idle speed and, turning the adjusting screw each time by a small angle and simultaneously observing the gas analyzer readings, achieve the required CO content in the exhaust gases. Adjust the idle speed. Repeat the adjustment if necessary.

Do not forget to reinstall the crankcase ventilation hose after completing the adjustment.

This article is available at russian, bulgarian, belarusian, ukrainian, serbian, croatian, romanian, polish, slovak, hungarian
The text has been checked: Tarasov Ivan

Share information:

Previous articles
Distributor and ignition timing
Thermal valve clearances
Compression check
Spark plugs
Tools and equipment
General information about engine tuning
Next articles
Fuel injection system (injector engine)


Similar articles from other manuals for VW cars:
Carburetor adjustment Passat B3 (1988-1993)
Seat adjustment Polo 3 (1995-2003)
Removal, installation and adjustment of the multi-function… Touareg 1 (2002-2006)
Damping adjustment key E387 Tiguan 1 (2007-2015)
Knock sensor. Knock adjustment Sharan 1 (1995-2000)
Carburetor adjustment 34 PICT Transporter T3 (1979-1992)
Carburetor adjustment Beetle (1960-1986)
Link to this page in different formats


Visitor comments


No comments yet


How much will 13 + 40 =


Golf 5 
  • General information
  • User manual
  • Maintenance
  • Troubleshooting
  • Power unit
  • Engine repair
  • Cooling and ventilation system
  • Fuel system
  • Ignition system
  • Transmission
  • Clutch
  • Mechanical gearbox
  • Automatic gearbox
  • Chassis
  • Brake system
  • Car suspension
  • Steering
  • Body
  • Interior (internal elements)
  • Exterior (external elements)
  • Doors and covers
  • Electrical equipment
  • Power devices
  • Washers and wipers
  • Lighting and appliances
  • Electrical circuits
Golf 4 
  • General information
  • User manual
  • Weekly checks
  • Maintenance
  • Power unit
  • Petrol engines
  • Diesel engines
  • Cooling system
  • Fuel system (petrol)
  • Control system (petrol)
  • Fuel system (diesel)
  • Exhaust system
  • Transmission
  • Clutch
  • Car gearbox
  • Drive shafts
  • Chassis
  • Car suspension
  • Steering
  • Wheels and tires
  • Brake system
  • Body
  • Exterior (external elements)
  • Interior (internal elements)
  • Ventilation and heating
  • Car doors and sunroof
  • Washers and glass cleaners
  • Electrical equipment
  • Power devices
  • Lighting and appliances
  • Electrical circuits
Golf 3 
  • Petrol engine
  • Engine repair
  • Lubrication system
  • Cooling system
  • Ignition system
  • Diesel engine
  • Engine repair
  • Diesel injection system
  • Pre-glow system
  • Transmission
  • Clutch
  • Gearbox and drive shafts
  • Chassis
  • Steering
  • Wheels and suspension
  • Brake system
  • Electrical equipment
  • Lighting and appliances
  • Electrical circuits
Golf 2 
  • General information
  • Introduction to guide
  • User manual
  • Petrol engines 1.3 l
  • Engine repair
  • Lubrication system
  • Cooling system
  • Carburetors
  • Supply system
  • Ignition system
  • Petrol engines 1.6/1.8 l
  • Engine repair
  • Supply system
  • Ignition system
  • Diesel engines
  • Engine repair
  • Lubrication system
  • Cooling system
  • Power and exhaust system
  • Transmission
  • Clutch
  • 4-speed gearbox 084
  • 5-speed gearbox 085
  • 4-speed gearbox 020/4R
  • 5-speed gearbox 020/4T
  • Automatic gearbox
  • Drive shafts
  • Chassis
  • Steering
  • Car suspension
  • Brake system
  • Body
  • Body elements
  • Doors, locks and windows
  • Electrical equipment
  • Equipment and devices
  • Power devices
Golf 2 (petrol) 
  • General information
  • Characteristics
  • Car care
  • Maintenance
  • Power unit
  • Engine repair
  • Engine 1.05/1.30
  • Engine 1.60/1.80
  • Cooling and lubrication system
  • Power and exhaust system
  • Transmission
  • Clutch
  • Car gearbox
  • Drive shafts
  • Chassis
  • Brake system
  • Steering
  • Suspension
  • Body
  • Body and equipment
  • Electrical equipment
  • Lighting and appliances
  • Electrical circuits
Golf 1 (petrol) 
  • General information
  • Characteristics
  • User manual
  • Maintenance
  • Power unit
  • Engine adjustment
  • Engine 1.1/1.3
  • Engine 1.5/1.6/1.8
  • Engine electrical equipment
  • Cooling system
  • Fuel system
  • Transmission
  • Clutch and manual gearbox
  • Automatic gearbox
  • Chassis
  • Steering
  • Front suspension
  • Rear suspension
  • Brake system
  • Electrical equipment
  • Lighting and appliances
  • Electrical circuits
  • Body
  • Body and equipment
  • Optional equipment
Golf 1 (diesel) 
  • General information
  • Specifications
  • Maintenance
  • Power unit
  • Engine repair
  • Exhaust and turbocharger
  • Cooling system
  • Fuel system
  • Fuel injection system
  • Transmission
  • Clutch and drive shafts
  • Car gearbox
  • Chassis
  • Suspension and wheels
  • Steering
  • Brake system
  • Wheels and tires
  • Body
  • Heating and ventilation
  • Exterior (external elements)
  • Interior (internal elements)
  • Doors and windows
  • Electrical equipment
  • Equipment and devices
  • Lighting system
  • Power devices
  • Electrical circuits
VWmanual.ru © 2016-2026 | Mobile version | News and articles | Sitemap: EN BG BY UA RS HR RO PL SK HU | Write message | Site search
Passat B2 • Passat B3 • Passat B4 • Passat B5 • Passat B6 • Golf 1, diesel • Golf 1, petrol • Golf 2, petrol • Golf 2 • Golf 3 • Golf 4 • Golf 5 • Polo 3 • Polo 4 • Touareg 1 • Tiguan 1 • Sharan 1 • Transporter T3 • Transporter T4 • LT 28 • LT 2D • Beetle • Caddy 3 •
Our website uses cookies to ensure functionality and convenience.