
English Русский
Български
Беларускі
Український
Српски
Hrvatski
Română
Polski
Slovenský
Magyar
  |  Articles  |  Sitemap  |  Contacts  |    |
Car maintenance Ford Car maintenance Hyundai Car maintenance Chevrolet Car maintenance BMW Car maintenance Audi Car maintenance Opel Car maintenance AvtoVAZ
VWmanual.ru


Main   Passat   Golf   Polo   Touareg   Tiguan   Sharan   Transporter   Others  
Golf 1 (1974-1984, diesel) Golf 1 (1974-1984, petrol) Golf 2 (1984-1993, petrol) Golf 2 (1984-1993) Golf 3 (1991-1997) Golf 4 (1997-2004) Golf 5 (2003-2008)

Windscreen wipers and washers (VW Golf 1)

  • Main
  • Golf
  • Golf 1
  • Electrical equipment
  • Lighting and appliances
  • Windscreen wipers and washers
            0


Contents: Windscreen wipers - troubleshooting ↓ Windshield Wiper Motor Replacement -…↓ Rear Wiper Motor - Replacement ↓ Windscreen wiper mechanism -…↓ Windscreen washers ↓

Windscreen wipers - troubleshooting


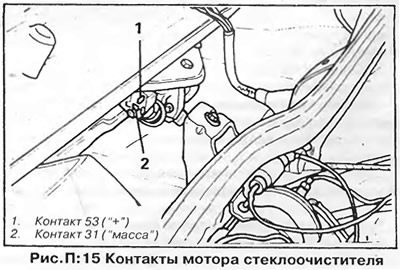
1. If the windshield wiper motor does not work, rotates jerkily or slowly, check the reliability of the connections, the condition of the electric motor brushes, the ease of movement of the lever mechanism, the general condition of the motor and the switch on the gear column.
1. If the windshield wiper motor does not work, rotates jerkily or slowly, check the reliability of…


2. If the brushes do not return to their original parking position when the windshield wiper is turned off, it may be due to incorrect installation of the motor crank, damage (breakage) of the wire connected to contact 53 of the electric motor, or a lack of connection between contacts 53 and 31.

3. If the wiper motor continues to operate even though the switch is turned off, replace the switch.

4. If the motor runs noisily or slowly, the gearbox housing may be incorrectly seated, there is no lubrication, or it may be heavily worn - in any case, the motor must be replaced.

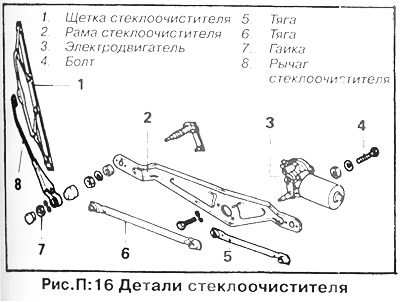
Windshield Wiper Motor Replacement - Dual Blade System (figure P:16).


(The information is posted on this resource: VWMANUAL)
Windshield Wiper Motor Replacement - Dual Blade System (figure P:16).


1. Disconnect the ground wire from the battery.

2. Press the plastic cap off the windshield wiper arm mounting nut, unscrew the nut and remove the arm.

3. Disconnect the electrical wire connector from the electric motor.

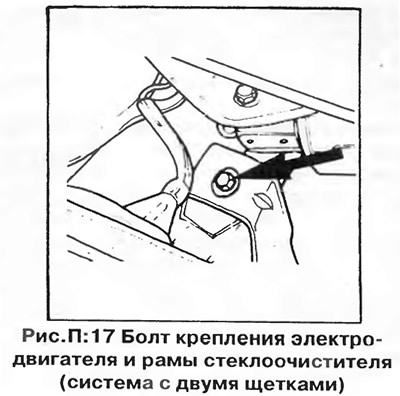
4. Remove the bolt that secures the windshield wiper frame and motor to the bracket on the engine compartment bulkhead (figure P:17).
4. Remove the bolt that secures the windshield wiper frame and motor to the bracket on the engine…


5. Separate the motor from the wiper frame by removing the two bolts.

6. Check the condition and reliability of the fastening of the levers and pins of the windshield wiper mechanism; replace worn parts if necessary.

7. If the motor does not require replacement, the crank should not be removed from the motor shaft.


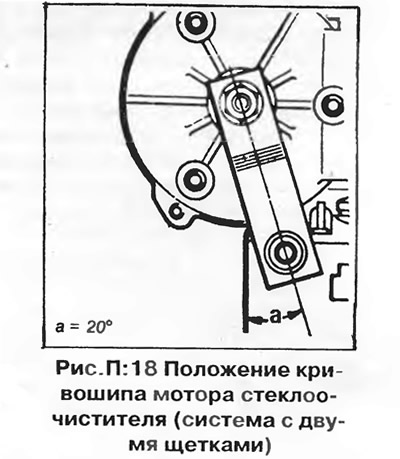
8. Before installing the new wiper motor, connect the battery, connect the wires to the electric motor (connect the connector) and turn it on with the windshield wiper switch on the steering column. Let the motor make at least two complete cycles and turn it off. The motor should stop in the original, parked position. Set the crank as shown in Figure P:18.
8. Before installing the new wiper motor, connect the battery, connect the wires to the electric…


9. Install the windshield wiper in reverse order.

Windshield Wiper Motor Replacement - Single Blade System


Scirocco models are equipped with a single-blade windscreen wiper.

1. Disconnect the ground wire from the battery.

2. Disconnect the wire connector from the electric motor.

3. Remove the three screws that secure the motor to the bracket.

4 Remove the wiper motor.

5. Reassemble in reverse order. Install the motor on the bracket and connect the wiring and turn on the wiper switch before attaching the crank to the motor. Let the motor complete at least two full cycles, then turn it off. The motor should stop in its original, parked position. Install the crank as shown in Figure P:19.
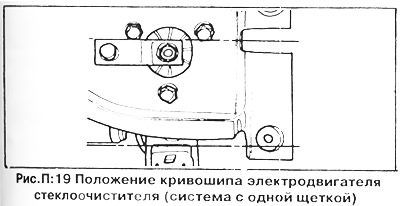
5. Reassemble in reverse order. Install the motor on the bracket and connect the wiring and turn on…


NOTE: Before assembly, lubricate the friction units of the mechanism with molybdenum grease.


Rear Wiper Motor - Replacement


1. Disconnect the ground wire from the battery.

2. Remove the inner trim of the tailgate.

3. Remove the wiper arm and mounting nuts together with the washers and gasket.

4. Remove the windshield wiper mounting bolts, pull the motor forward and disconnect the wire connector. Remove the motor from the tailgate.

5. Install the rear wiper motor in reverse order. Before attaching the crank, install the motor on the bracket, connect the wire connector to it, turn on the motor and let it make at least two complete cycles. The crank should stop in the position shown in Figure P:20.
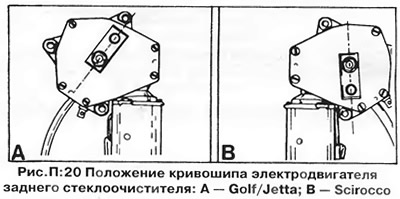
5. Install the rear wiper motor in reverse order. Before attaching the crank, install the motor on…


Windscreen wiper mechanism - replacement


1. Disconnect the ground wire from the battery.

2. Remove the wiper arms (see above).

3. Remove the cover that closes the compartment behind the partition, unscrew the bolts securing the windshield wiper bracket, disconnect the electrical wire connector from the electric motor and remove the windshield wiper (motor and lever mechanism) in assembly.

4. Disconnect the rods from the cranks and unscrew the motor mounting nuts.

5. Separate the motor with the bracket from the windshield wiper mechanism.

6. Assembly is carried out in reverse order.

Windscreen washers


Early models were equipped with a manual windshield washer pump. Such pumps rarely fail and are subject to replacement if they do.

Later models are equipped with washer reservoirs with built-in pumps (figure P:21). If the pump does not work, check for voltage at the positive pump lead with the ignition on and the wiper/washer switch in the appropriate position. Also check for proper ground connection at the negative pump lead. If the electrical circuit is OK, replace the pump.
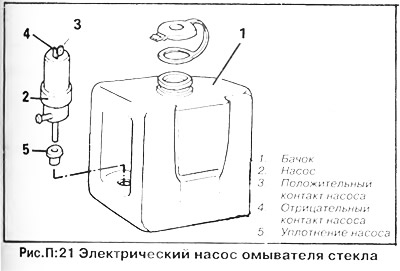
Later models are equipped with washer reservoirs with built-in pumps (figure P:21). If the pump…


To remove the pump, disconnect the wire connector and the windshield washer tube from it, then release the upper part of the pump from the reservoir and lift the pump upwards, making sure that the pump seal is correctly positioned in the opening of the reservoir. Install the pump in the reverse order. Fill the reservoir and check the adjustment of the washer nozzles.

This article is available at russian, bulgarian, belarusian, ukrainian, serbian, croatian, romanian, polish, slovak, hungarian
The text has been checked: Tarasov Ivan

Share information:

Previous articles
Switches and cigarette lighter
Ignition Switch/Steering Column Lock
Instrument cluster
Fuses, relays and turn signal switch
Replacing the lights
Replacing lamps
Next articles
Sound signal
Gear shift/fuel consumption indicator
Possible electrical equipment faults


Similar articles from other manuals for VW cars:
Windscreen wipers/washers (right steering column switch) Passat B3 (1988-1993)
Windscreen wipers and washers Polo 3 (1995-2003)
Windscreen wiper control Touareg 1 (2002-2006)
Adjusting the extreme position of the windshield wipers Tiguan 1 (2007-2015)
Windscreen wipers — design description Sharan 1 (1995-2000)
Windscreen Washer Jets — Removal, Installation and Adjustment Transporter T4 (1990-2003)
Windscreen wipers and washers LT 2D (1996-2003)
Link to this page in different formats


Visitor comments


No comments yet


How much will 33 + 42 =


Golf 5 
  • General information
  • User manual
  • Maintenance
  • Troubleshooting
  • Power unit
  • Engine repair
  • Cooling and ventilation system
  • Fuel system
  • Ignition system
  • Transmission
  • Clutch
  • Mechanical gearbox
  • Automatic gearbox
  • Chassis
  • Brake system
  • Car suspension
  • Steering
  • Body
  • Interior (internal elements)
  • Exterior (external elements)
  • Doors and covers
  • Electrical equipment
  • Power devices
  • Washers and wipers
  • Lighting and appliances
  • Electrical circuits
Golf 4 
  • General information
  • User manual
  • Weekly checks
  • Maintenance
  • Power unit
  • Petrol engines
  • Diesel engines
  • Cooling system
  • Fuel system (petrol)
  • Control system (petrol)
  • Fuel system (diesel)
  • Exhaust system
  • Transmission
  • Clutch
  • Car gearbox
  • Drive shafts
  • Chassis
  • Car suspension
  • Steering
  • Wheels and tires
  • Brake system
  • Body
  • Exterior (external elements)
  • Interior (internal elements)
  • Ventilation and heating
  • Car doors and sunroof
  • Washers and glass cleaners
  • Electrical equipment
  • Power devices
  • Lighting and appliances
  • Electrical circuits
Golf 3 
  • Petrol engine
  • Engine repair
  • Lubrication system
  • Cooling system
  • Ignition system
  • Diesel engine
  • Engine repair
  • Diesel injection system
  • Pre-glow system
  • Transmission
  • Clutch
  • Gearbox and drive shafts
  • Chassis
  • Steering
  • Wheels and suspension
  • Brake system
  • Electrical equipment
  • Lighting and appliances
  • Electrical circuits
Golf 2 
  • General information
  • Introduction to guide
  • User manual
  • Petrol engines 1.3 l
  • Engine repair
  • Lubrication system
  • Cooling system
  • Carburetors
  • Supply system
  • Ignition system
  • Petrol engines 1.6/1.8 l
  • Engine repair
  • Supply system
  • Ignition system
  • Diesel engines
  • Engine repair
  • Lubrication system
  • Cooling system
  • Power and exhaust system
  • Transmission
  • Clutch
  • 4-speed gearbox 084
  • 5-speed gearbox 085
  • 4-speed gearbox 020/4R
  • 5-speed gearbox 020/4T
  • Automatic gearbox
  • Drive shafts
  • Chassis
  • Steering
  • Car suspension
  • Brake system
  • Body
  • Body elements
  • Doors, locks and windows
  • Electrical equipment
  • Equipment and devices
  • Power devices
Golf 2 (petrol) 
  • General information
  • Characteristics
  • Car care
  • Maintenance
  • Power unit
  • Engine repair
  • Engine 1.05/1.30
  • Engine 1.60/1.80
  • Cooling and lubrication system
  • Power and exhaust system
  • Transmission
  • Clutch
  • Car gearbox
  • Drive shafts
  • Chassis
  • Brake system
  • Steering
  • Suspension
  • Body
  • Body and equipment
  • Electrical equipment
  • Lighting and appliances
  • Electrical circuits
Golf 1 (petrol) 
  • General information
  • Characteristics
  • User manual
  • Maintenance
  • Power unit
  • Engine adjustment
  • Engine 1.1/1.3
  • Engine 1.5/1.6/1.8
  • Engine electrical equipment
  • Cooling system
  • Fuel system
  • Transmission
  • Clutch and manual gearbox
  • Automatic gearbox
  • Chassis
  • Steering
  • Front suspension
  • Rear suspension
  • Brake system
  • Electrical equipment
  • Lighting and appliances
  • Electrical circuits
  • Body
  • Body and equipment
  • Optional equipment
Golf 1 (diesel) 
  • General information
  • Specifications
  • Maintenance
  • Power unit
  • Engine repair
  • Exhaust and turbocharger
  • Cooling system
  • Fuel system
  • Fuel injection system
  • Transmission
  • Clutch and drive shafts
  • Car gearbox
  • Chassis
  • Suspension and wheels
  • Steering
  • Brake system
  • Wheels and tires
  • Body
  • Heating and ventilation
  • Exterior (external elements)
  • Interior (internal elements)
  • Doors and windows
  • Electrical equipment
  • Equipment and devices
  • Lighting system
  • Power devices
  • Electrical circuits
VWmanual.ru © 2016-2026 | Mobile version | News and articles | Sitemap: EN BG BY UA RS HR RO PL SK HU | Write message | Site search
Passat B2 • Passat B3 • Passat B4 • Passat B5 • Passat B6 • Golf 1, diesel • Golf 1, petrol • Golf 2, petrol • Golf 2 • Golf 3 • Golf 4 • Golf 5 • Polo 3 • Polo 4 • Touareg 1 • Tiguan 1 • Sharan 1 • Transporter T3 • Transporter T4 • LT 28 • LT 2D • Beetle • Caddy 3 •
Our website uses cookies to ensure functionality and convenience.