
Single headlights - Tungsten and Halogen H4
1. The headlights are accessed from the engine compartment.
2. Remove the wire connector and waterproof cover from the back of the headlight (pic. P:1, P:2).
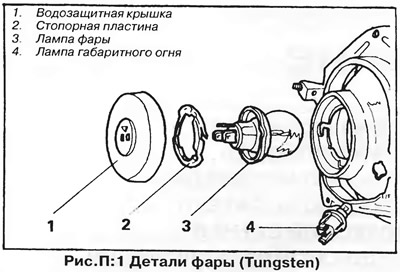
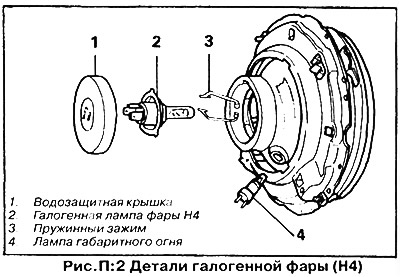
3. The lamp is attached to the reflector with a clip (Halogen H4) or lock plate (Tungsten). Bring the ends of the clamp together and turn it, or remove the plate by turning it counterclockwise.
4. Remove the lamp from the reflector.
5. Do not touch the glass of the lamp, as oily fingerprints evaporate when heated and deposited on the reflector, which reduces the brightness of the headlight.
6. Install a new lamp in the reflector, squeeze the ends of the clip and insert the clip into the tabs of the reflector, or install the retaining plate by pressing it against the reflector and locking by turning it clockwise.
7. Central (out of three) The lamp contact must be on top.
8. Install the waterproof cap and make sure it fits snugly on the reflector (cap prevents water from entering the headlight and damaging the reflector). Slide the wire connector onto the lamp contacts.
9. Check the operation of the headlights - their adjustment should remain intact. Headlight adjustment is described in detail in chapter "Vehicle maintenance work".
Twin headlights - Halogen H1 (pic. R:3)
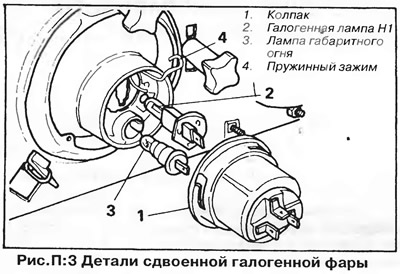
The same Halogen H1 bulbs are installed in the interior and exterior headlights. Outside headlights are low beam, internal headlights are high beam. The side lights are also integrated into the exterior headlights. The procedure for replacing H1 and H4 bulbs is the same as described above for single headlights.
Side lamps (pic. P:1, P:2)
The parking light bulbs are located on the underside of the headlight reflectors.
1. Remove the wire from the lamp contact.
2. Turn the lamp holder fully counterclockwise and pull the lamp out of the reflector.
3. Press the lamp into the lamp holder, turn it counterclockwise and remove it from the lamp holder.
4. Insert the new bulb into the holder and turn it clockwise.
5. Install the lamp holder in the reflector and turn it clockwise.
6. Attach a wire and check up operation of dimensional fires.
Front direction indicators - Golf
The front direction indicators are located in the front bumper (fig.P:4).
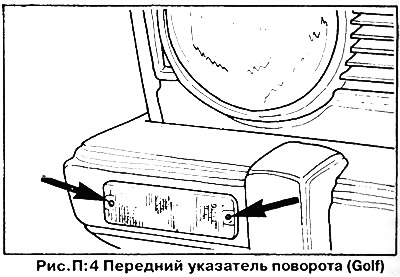
1. Remove the two screws and remove the diffuser.
2. Press the lamp into the holder, turn it counterclockwise and remove it from the holder.
3. Insert the new bulb into the holder and turn it clockwise.
4. Replace diffuser and secure with screws. Do not overtighten the screws.
Scirocco/Jetta
Access to the lamps of the front direction indicators opens from the engine compartment (pic. P:5).
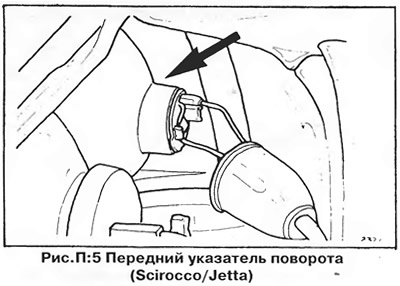
1. Remove the rubber waterproof cap.
2. Squeeze together the two tabs on the lamp holder and pull the lamp holder out of the lamp.
3. Press the bulb into the holder, turn it counterclockwise and remove it.
4. Insert the new bulb into the holder and turn it clockwise. Insert the lamp holder into the lamp body so that both tabs lock into place. Replace the rubber cap.
Rear lights
1. In the luggage compartment, press the inner tab on the lamp holder towards the middle of the vehicle and remove the lamp cover.
2. Press the outer tab aside and separate the lamp holder. On the left lamp, first disconnect the wiring harness, laid under the lamp.
3. Press the defective bulb into the holder, turn it counterclockwise and remove the bulb.
4. Insert the new bulb into the holder and turn it clockwise.
5. Replace the bulb holder by first inserting its edge under the tab of the inner retainer and then pushing the bulb holder into the lamp housing until the outer retainer clicks into place.
6. Insert the light cover under the tab of the outer holder (first check the location of the wires inside the cover). Press down on the cover until it locks into place.
7. Fix the wiring harness under the left lamp.
8. Check the operation of the lights.
License plate lamp
Turn out screws of fastening of a cover of a diffuser and remove a cover. Press on the bulb, turn it counterclockwise and remove the bulb from the socket. Installing the lamp is carried out in the reverse order.
Interior lamps
Carefully press the spring clip with a screwdriver and remove the lantern from the ceiling. Turn the lantern over and pull out the lamp "scalloped" type held by two spring clips. Installing the lamp is carried out in the reverse order.
Visitor comments