
The front fender is attached with ten bolts to the front end, inner fender panel and A-pillar. When replacing the fender, it is not necessary to remove the headlights or the door. To gain access to the underside of the fender, lift and jack up the vehicle and remove the front wheel,
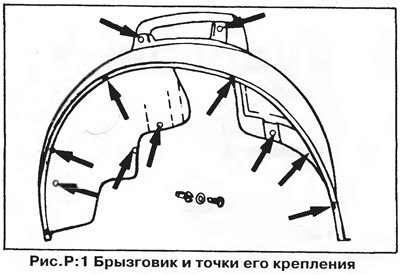
1. Remove the side bumper pads or the entire bumper as described below. Remove the mudguard located under the wing - it is attached with twelve self-tapping screws with spacers (pic. R:1). Carefully pull the mudguard out from under the fender and remove it from the vehicle.
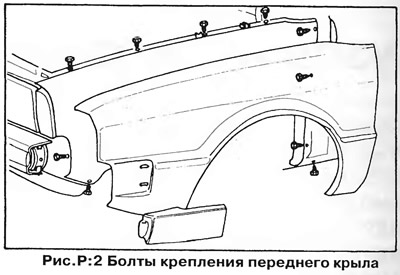
2. Turn out all screws of fastening of a wing (pic. R:2). If the screws are too tight or rusty, lubricate their threads with oil. The use of an impact screwdriver is undesirable as it may damage the inner wing panel. In extreme cases, grind off the screw heads and drill their remnants out of the nuts.
3. The fender is attached to the A-pillar with three screws that can be accessed from the back of the fender. These screws are covered with mastic that needs to be removed.
4. Remove all bolts, then pry the fender off the car body with a screwdriver or other lever. On early models, sealing tape is routed along the top edge of the inner fender panel and down along the A-pillar. If the fender has a radio antenna, loosen its top mount before removing the fender.
5. Clean the contact surfaces of the wing and body from the remnants of the sealing tape and anti-corrosion mastic with a wire brush. Treat corroded areas with a corrosion inhibitor. Treat all mating surfaces with an anti-corrosion primer.
6. On pre-1979 models, lay a strip of non-hardening sealant along the contact surface of the inner fender panel and front strut. Poke holes in the seal to prevent the sealing tape from biting into the threads of the fastening screws.
On later models, the mating surfaces have been redesigned so that there are raised pads at the attachment points, on which self-adhesive zinc foil is laid instead of sealing tape. If the foil falls off when removing the wing, put pieces of sealing tape in its place (sold in sets of 50 pieces, part no. AKL 381 035 50). Make a hole in a piece of tape and lay it on the wing.
7. Apply a thick layer of protective mastic to the back of the fender Do not apply mastic to the contact surfaces as this may make it difficult to align the new fender with other body panels.
8. Install the new fender in place and secure it with one screw on the inner fender panel side and another screw on the A-pillar. Close the hood and door, then check the gaps between the wing and adjacent body parts by comparing them with the gaps around the other wing. Install and tighten the remaining screws.
9. Apply a thick layer of mastic along the entire joint on the back of the wing. Smooth out the mastic with a brush. The thickest layer of mastic should be in the front and rear areas, which are most exposed to water and stones thrown from under the wheels. Install the mudguard (in the presence of).
10. Install the radio antenna on the right front fender (the new wing already has a corresponding hole). Make sure that the grommet of the antenna wire is properly installed in the inner panel of the wing - this is where water can enter and cause corrosion.
11. Reinstall the bumper side trim or the entire bumper (depending on the model).
Visitor comments