



Removal - Early Models with Separate Side Bumper Strips
The front bumper consists of three sections - a cross member and two sidewalls (pic. R:3). Remove the bumper from the car in the following order:
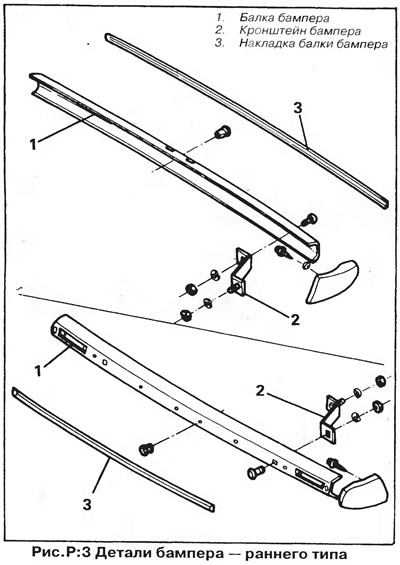
1. Remove the stud nuts that secure the bumper side plates to the fenders (on the inside of the front fenders) and to the crossbar.
2. Disconnect the wires from the front direction indicators (on Golf models).
3. Turn out bolts of fastening of a crossbeam to bumper brackets and remove a bumper.
Removal of the rear bumper is carried out in the same way, except that it is not necessary to disconnect the wiring.
Removal and Installation - Later Models with Solid Bumpers
On later models, the bumpers have a single plastic trim that runs along the entire bumper (pic. R:4). In case of minor damage, the cover plate can be replaced separately from the steel base (beams) bumper. To remove the plastic trim from the bumper, it is necessary to remove the entire bumper from the car, the beam of which is attached to the body with brackets. The bolts of the bumper to the brackets are covered with a plastic cover, so to remove the bumper, you need to unscrew the bolts of the brackets to the side members of the body. Before removing the bumper, separate the ends of the plastic trim from the fenders to which it is attached with clips.
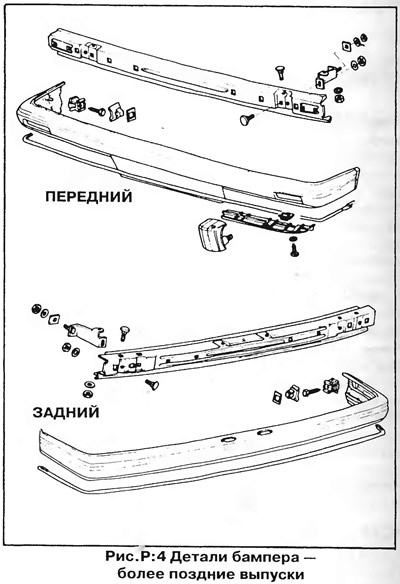
After removing the bumper from the car, disassemble it in the following order:
1. Remove the front license plate and its mounting plate.
2. Wring out a plastic slip from a bumper.
3. Before installing a new plastic lining on the bumper, fix new clips on its ends (pic. R:5).
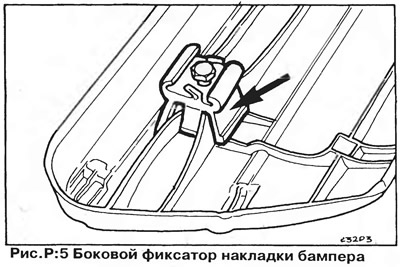
4. To facilitate the installation of the retainers, soak them in soapy water for five minutes, then screw in the bolts by 3-4 threads.
5. Insert the retainers into the stiffeners of the lining, pushing them into place with a plastic mallet. Strike only at the places indicated by the arrows in fig. R:5. While holding the clamp with a pipe wrench, tighten the bolt.
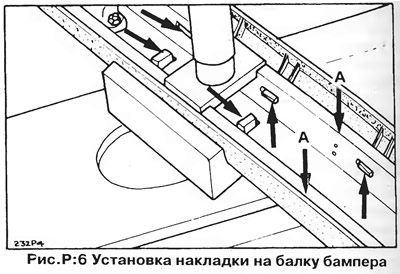
6. The plastic trim is attached to the bumper beam with the help of tongues included in the slots in the beam. It is desirable to press the trim onto the bumper beam using a hydraulic press, but it is possible to install it using a large clamp. Use wooden spacers to protect the outer surface of the lining during pressing.
7. Press an overlay to a bumper so that the plastic uvulas shown by shooters on fig. R:6, entered the slots on the bumper beam. Arrows "A" shows hidden clips that must be pressed into the rounded part of the bumper. Start installing the lining from the middle, alternately moving towards the ends of the bumper.
8. Install the license plate plate on the bumper.
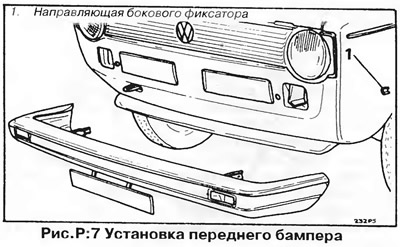
9. Bring the bumper to the place of its installation on the car and insert the side clips into the guides on the front fenders (pic. R:7). Align the bumper brackets with the body side members and install the mounting bolts.
10. Removal and installation of the rear bumper is carried out in the same way as the front bumper, but access to the bolts of the bumper brackets is from inside the luggage compartment.
Visitor comments