
Fastening elements of the front wing
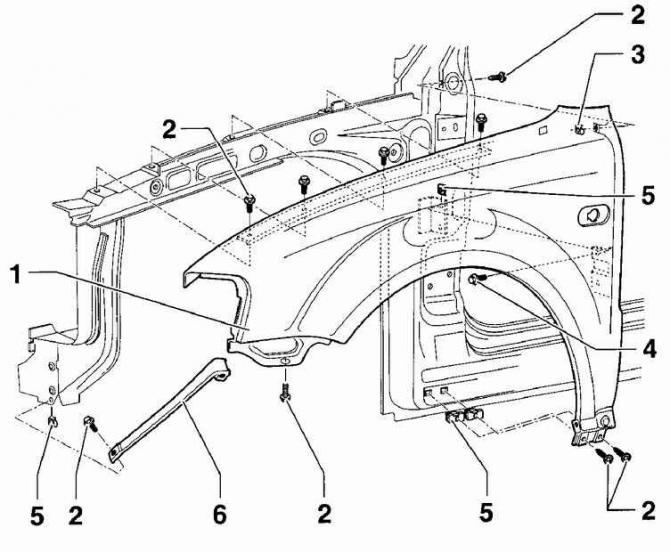
- 1 - front fender,
- 2 - screws 9 pcs.,
- 3 - nuts,
- 4 - Torx screws T25, 25 Nm,
- 5 - nuts 4 pcs.,
- 6 - bracket
Mudguard front fender
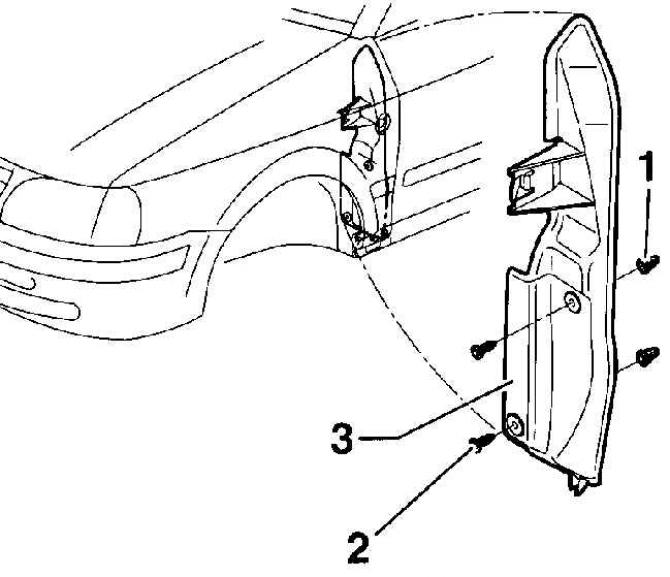
- 1 - plastic mudguard nut,
- 2 - the location of the plastic nut on the mudguard,
- 3 - wing mudguard
Removing
1. Remove the front bumper.
2. Remove side repeaters of turns.
3. Unscrew screws and remove facing of a niche of a forward wheel.
4. Unscrew the screws and remove the mudguard from under the wing (see fig. Mudguard front fender). If necessary, replace the plastic nuts in the mudguard.
5. Remove the screws securing the front fender.
Warning: To prevent damage to the paintwork, apply duct tape around the fender mounting screws.
6. The fender is mounted on a layer of protective mastic, so to separate the fender from the body, soften the protective mastic with a hair dryer. Put a flat nozzle on the hair dryer and, gradually warming up the mastic, remove the wing. In the absence of a hair dryer, remove the protective mastic with a sharp knife.
Consistently, starting from the rack, warm up the wing installation sites on the mastic and, being careful, remove the wing from the car.
Warning: The underbody of the vehicle is protected by a polyvinyl chloride film (PVC) and it can only be heated for a short time and not very strongly. When heated, the film changes its properties and bubbles. In this case, vapors that are harmful to health are released and hydrochloric acid is formed, which contributes to corrosion.
Installation
1. Before installing the fender in place, clean the mating surface and apply zinc paste at the fender attachment points on the wheel arch and A-pillar (VW AKL-381 035 50). This paste is used as an anti-corrosion protection.
2. In other places where the fender mates with the body, stick the sealing tape for the wings.
3. Fit the front fender to the vehicle, align the bolt holes and screw in the bolts to a torque of 5 Nm. When installing the wing, check that the gaps between the wing and the hood, as well as between the wing and the front door, are uniform along the entire length.
Clearances when installing the wing:
- Wing - hood - 3 mm.
- Wing - headlight and direction indicator - 1 mm.
- Wing - front door - 4 mm.
4. Tighten the wing mounting bolts with a torque of 5 Nm.
5. Apply a layer of anti-corrosion protection to the inner surface of the wing.
6. Install side repeaters.
7. Install and screw on the wing mudguard.
8. Install and screw on the wheel housing trim.
9. Install the front bumper.
Visitor comments