



Contents: Support points for jacking up a car ↓ Loosening wheel bolts ↓ Instructions for changing a wheel ↓ Wheel bolts-secrets ↓
Use only a jack designed for your specific vehicle.
Do not use other jacks. The car may fall off the jack.
Never start the engine when the vehicle is raised.
If it is necessary to work under the vehicle, the vehicle must be securely supported on suitable foundations.
If one of the wheels fails, the car should be parked as far away from the traffic flow as possible.
Apply the parking brake securely. Put the transmission in gear or place the selector lever in the "P" position, and place a stone or other object under the opposite wheel to prevent the vehicle from rolling.
If you have a trailer, you must first disconnect the trailer from the vehicle.
Remove the vehicle's tool kit and spare wheel from the vehicle.
Depending on the wheel design, remove the cap listed below that is installed on the wheel:
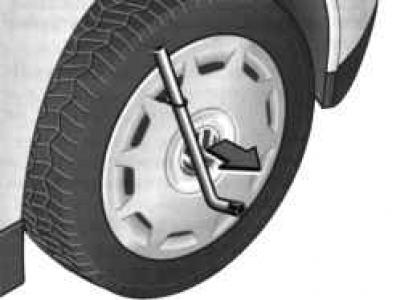
Fig. 1.85. Removing the decorative cap
Remove the full-size wheel cap using a wire puller and a wheel wrench. Hook the puller into one of the holes in the cap, insert the wheel wrench through the puller and pull the cap off (Fig. 1.85).
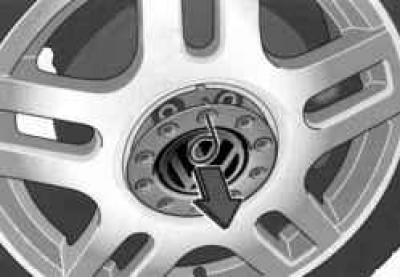
Fig. 1.86. Removing the central cap
Remove the central cap using a wire puller – see Figure 1.86.
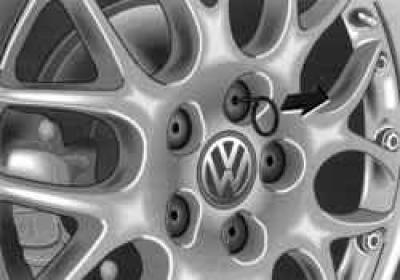
Fig. 1.87. Removing wheel bolt caps
Remove the wheel bolt caps – see Figure 1.87.
Slide the wheel wrench as shown in the figure until it stops on the head of the wheel bolt and turn the wrench counterclockwise. In doing so, press with your hand on the wrench handle as close to its end as possible.
If the wheel bolts do not loosen, you can, as a last resort, gently press the wheel wrench with your foot. Try not to lose your balance; you can lean on the car body for support.
The wheel bolts will loosen after one turn.
Caution: If there are discs with a screwed outer ring, do not loosen the special disc bolts under any circumstances. The discs will be significantly weakened - risk of accident.
Support points for jacking up a car
(View the original on this portal www.VWmanual.ru)
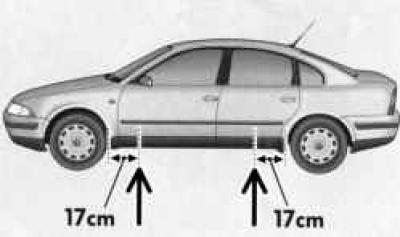
Fig. 1.88. Support points for the jack
Figure 1.88 shows the reference points (see arrows), under the middle of which the jack should be installed. On some car models these places are marked with special markings.
Caution: If the jack is not installed under the location marked on the vehicle or indicated here, the vehicle body may be damaged. In addition, there is a risk of injury.
Caution: When installing the jack on soft ground, the vehicle may fall off the jack.
Therefore, in this case, it is necessary to place the jack on a hard surface. If necessary, a stable and relatively large support should be used.
On slippery surfaces (for example, ceramic tiles) a non-slip lining should be used (for example, a rubber conric).
The place for the jack in front is covered by a lid, which should be folded upward.
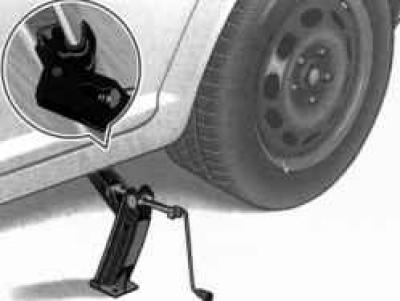
Fig. 1.89. Installing a jack under a car
Place a jack under the vehicle (Fig. 1.89).
- The jack must rest on the ground with its entire supporting surface.
- Align the jack and simultaneously lift the jack arm until it rests firmly against the vertical edge.
Note: The jack paw must tightly grip the vertical edge of the side member so that when lifting the car the jack cannot tip over – see Figure 1.89.
Loosening wheel bolts
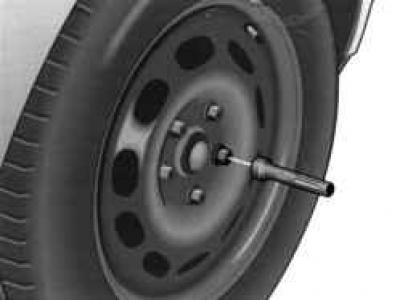
Fig. 1.90. Unscrewing wheel bolts
Raise the vehicle until the faulty wheel is about an inch off the ground.
Using the Allen key in the screwdriver handle, remove the loose wheel bolts and place them on a clean surface (wheel cap, piece of cloth, sheet of paper) next to the jack and remove the wheel.
Place the spare tire on and use the Allen key in the handle of a screwdriver to lightly tighten all wheel bolts.
Take a screwdriver and tighten the wheel bolts by hand.
To prevent rust, you can lightly lubricate the wheel rim in the area adjacent to the hub.
In this case, the grease should not get into the threaded holes of the hub.
Wheel bolts should be clean and easy to screw in; under no circumstances should they be lubricated with oil or any kind of lubricant.
Lower the vehicle and use a lug wrench to tighten the wheel bolts in a crisscross pattern.
On vehicles with a full-size spare tire, replace the hubcaps.
When installing a full-size hubcap, you should first press the hubcap into place where the tire valve is located and then secure the hubcap around the entire circumference.
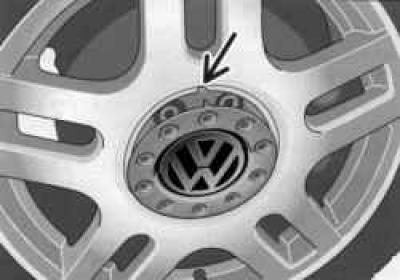
Fig. 1.91. Installing the central cap
On cars with alloy wheels, the central wheel cap may have a certain protrusion. Make sure that this protrusion falls into the recess intended for it - see arrow (Fig. 1.91).
Place the replaced wheel in the spare wheel well and secure it securely.
Instructions for changing a wheel
The internal hexagon in the screwdriver handle makes it easier to tighten the wheel bolts. In this case, the working element of the screwdriver must be removed.
Never use the Allen key on a screwdriver to loosen or tighten wheel bolts.
After changing the wheel, you need to do the following:
- check the air pressure in the installed spare tire immediately;
- at the first opportunity, check the tightening torque of the wheel bolts with a torque wrench: Tightening torque of the wheel bolts - 120 Nm.
If, when changing a wheel, it is discovered that the wheel bolts are corroded and difficult to remove and screw in, they should be replaced before checking the tightening torque.
Until this is done, you should move carefully and at a moderate speed.
A faulty wheel should be repaired as soon as possible.
Wheel bolts-secrets
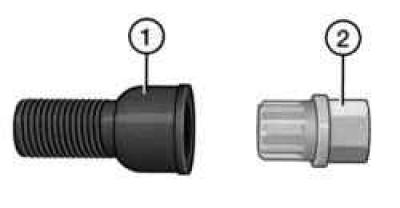
Fig. 1.92. Secret bolt: 1 – wheel bolt; 2 – Wheel bolt adapter
Loosening or tightening of a wheel bolt.
Insert adapter 2 into wheel bolt 1 as far as it will go.
Slide the wheel wrench from the on-board tool kit onto adapter 2 until it stops. Now you can loosen or tighten the wheel bolt.
After changing the wheel, pull the adapter out of the wheel bolt.
The secret code number is stamped on the end part of the adapter.
You should write down this code number and keep it carefully. Only on the basis of the code number can you order a spare adapter from a Volkswagen service center.
Visitor comments