



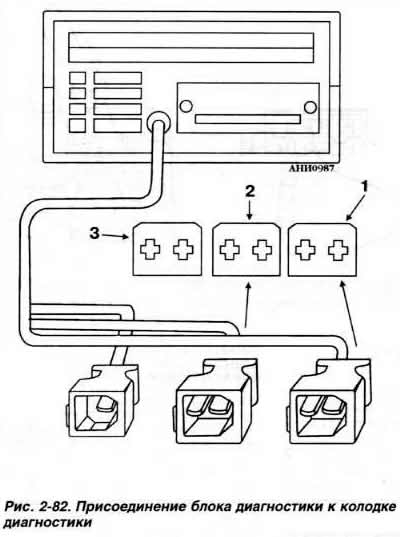
If the VAG 1551 diagnostic unit is used together with the printer, printed codes corresponding to the "flashing" codes are output. Make sure that fuse N9 21 is in good condition and that all engine ground connections are secure. To access the diagnostic connector located in front of the gearshift lever, slide the protective cover of the lever upwards. Connect the VAG 1551 diagnostic unit with the VAG 1551/1 cable to the connectors of the diagnostic connector (Fig. 2-82). The black connector of the connecting cable is connected to the black connector of the diagnostic connector, and the white connector of the cable is connected to the brown or white connector (connectors "1" and "2") of the diagnostic connector. The blue connector of the connecting cable is not used.
After the specified connection of the diagnostic unit, the following messages are displayed on its display one after the other: "Rapid data trans-mrssion" ("Fast data transfer") and "Flashing code output" ("Output of flashing codes").
Note: Additional testing instructions are provided when you press the "HELP" button.
The diagnostic program steps are performed by pressing the right arrow button.
Start the engine at idle speed.
Note: If the engine does not start within 6 seconds when the starter is turned on, do not attempt to start it any further and leave the ignition on.
Press button "1" of the diagnostic unit to display the message "Rapid data transmission" ("Fast data transfer"). When using a printing device, turn it on by pressing the button "PRINT" ("Print"). The indicator lamp of the "PRINT" button should light up. Press the "O" and "1" buttons of the diagnostic unit. The inscription "Engine electronics" ("Engine electronics"). Press the "O" button to confirm the command. Press the button with the right arrow. The display will show the number of detected faults or the inscription "No fault detected" ("No faults found").
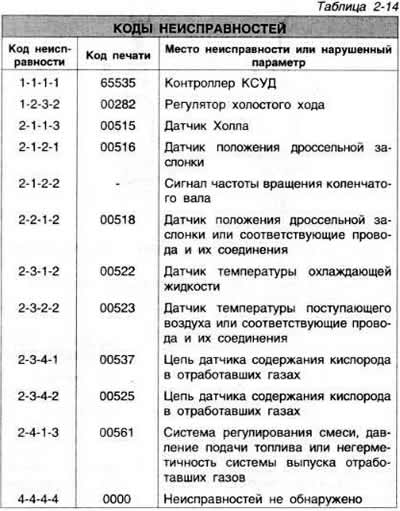
After this, the fault codes are displayed and printed. After displaying and printing the fault codes, press the button with the right arrow. Press the "O" and "6" buttons. The display should light up with the inscription "06 — End output" ("End of code output"). To confirm the command, click on the "O" button.
Clearing fault codes
Turn off the ignition.
Connect the VAG 1551 diagnostic unit with the VAG 1551/1 connecting cable. as described above. Turn on the ignition. Press button "1", then buttons "O" and "1" and confirm the command by pressing button "O". Press the button with the right arrow, then buttons "O" and "5". The display will show the message "Erase fault memory" ("Erasing fault codes"). Confirm the command by clicking on the "O" button.
The display shows the message "Fault memory is erased" ("Fault codes erased").
Press the right arrow button, then the "O" and "6" buttons.
The display shows the message "06 — End output" ("06 - End of code output"), Confirm the command by pressing the "O" button.
(View the original on this portal www.VWMANUAL.ru)
Turn off the ignition, disconnect the diagnostic unit.
Perform a test drive for at least 10 minutes and request the self-diagnosis system memory again.
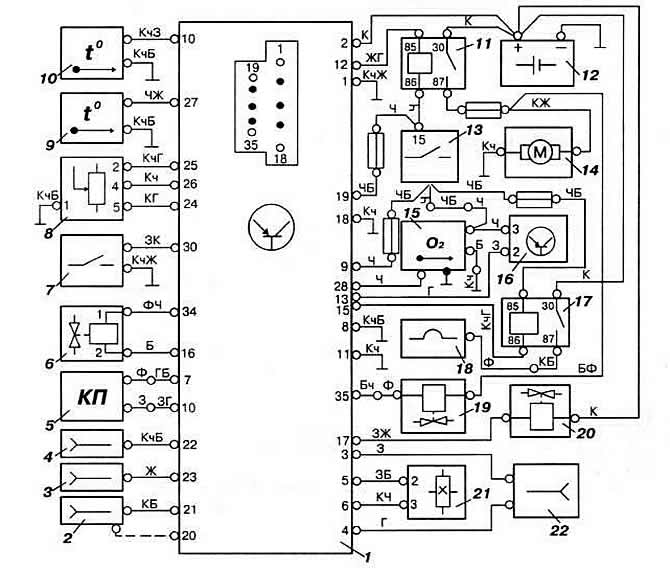
Fig. 2-83. Wiring diagram of the KSUD "Mono-Motronic" "RP" and "ABS" engines:
1 — controller
2, 3 — connecting connectors
4 — diagnostic connector
5 - instrument cluster
6 — idle speed controller
7 — throttle valve limit switch
8 — throttle position sensor
9 — intake air temperature sensor
10 - coolant temperature sensor
11 — fuel pump relay
12 — battery
13 - ignition switch
14 — fuel pump
15 - Exhaust gas oxygen sensor
16 — ignition unit
17 — intake manifold heating relay
18 — intake manifold heater
19 — nozzle
20 — purge solenoid valve of the adsorber
21 - Hall sensor
22 — air conditioner connector
Visitor comments