



Contents: Checking the engine idle speed ↓ Checking the throttle position sensor ↓ Checking and adjusting the throttle…↓ Checking the incoming air…↓ Checking the idle speed control valve ↓ Checking the purge solenoid valve of…↓ Checking the oxygen sensor in the…↓
Below is a description of only those checks and adjustments whose implementation methods differ from those described above for the SCV "Mono-Jetronic".
Checking the engine idle speed
Before checking the engine idle speed, you must do the following:
- warm up the engine (oil temperature not less than 80°C);
- check and, if necessary, adjust the ignition timing and the gap between the spark plug electrodes;
- make sure that the air filter element and the exhaust gas oxygen sensor are in good condition;
- turn off all auxiliary electrical equipment and air conditioning (if there is one).
During the check, the electric fan of the cooling system should not turn on.
Otherwise, checking the idle speed of the crankshaft and the CO content in the exhaust gases is carried out in the same way as for the SCV "Mono-Jetronic".
Checking the throttle position sensor
The throttle position sensor can be checked either with or without the diagnostic unit.
Checking with a diagnostic unit. Connect the VAG 1551 diagnostic unit to the diagnostic connector located in front of the gearshift lever (Fig. 2-76), connecting the black connector of the diagnostic unit to the black connector of the diagnostic connector, and the white connector of the diagnostic unit to the brown or white connector of the diagnostic connector.
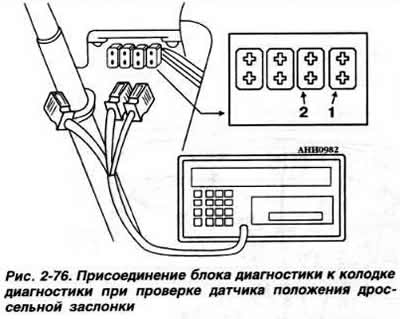
Turn on the ignition. Press button "1" on the diagnostic unit. On the diagnostic unit, enter the number 01 and press the "Q" button to enter it. Press the ">" button. Enter the number 04 and press the "Q" button to enter it. Enter "00" and enter it with the "Q" button. Slowly open the throttle valve fully. Note the readings in sector 2 of the diagnostic unit display. Make sure that the displayed value increases smoothly when the throttle valve is opened to ¼ of its travel, then remains constant. Make sure that the value shown in sector 3 of the display increases smoothly throughout the entire throttle valve travel from the idle position to the full throttle position. Press the ">" button. Enter the number 06 and enter it with the "O" button to complete the test cycle.
When replacing the automatic transmission control unit, the throttle position sensor must be matched to the new control unit using the VAG 1551 diagnostic unit, as indicated below.
Connect the VAG 1551 unit to the diagnostic socket as indicated above. Enter "02 Gearbox electronics". Perform the coordination until the message appears on the display "Select function XX". Press the "0" and "4" buttons and enter the entered number with the "O" button. Do not open the throttle valve. Enter the number "00" and enter it with the "Q" button. This completes the initial adjustment of the system. Press the accelerator pedal to fully open the throttle valve and hold the pedal in this position for 3 seconds. Press the ">" button. To end the indication, press the "0" and "6" buttons.
Checking without a diagnostic unit. Disconnect the air supply hose from the central injection unit. Disconnect the throttle position sensor connector (Fig. 2-77). Check the resistance between the terminals with an ohmmeter, which should be:
- "1" and "5": 520-1300 Ohm;
- "1" and "2": 600-3500 Ohm;
- "1" and "4": 600-6600 Ohm.
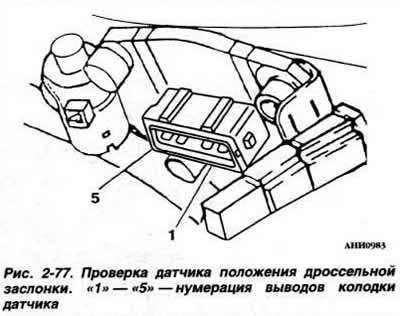
If the resistance does not match the required values, replace the throttle position sensor.
Checking and adjusting the throttle switch
Note: Adjusting the throttle switch is only necessary if the idle speed control valve or the lower part of the central injection unit is replaced.
Disconnect the air supply hose from the central injection unit. Switch off the ignition. Press the switch rod towards the idle speed regulator until it stops by hand and check the gap between the switch rod and the throttle opening limiting screw with a feeler gauge, which should be within 0.4-0.7 mm. If necessary, set the gap to 0.5 mm with this screw. Check the resistance on the lower contacts of the idle speed regulator block, which should be no more than 1.0 Ohm with the feeler gauge inserted into the gap and equal to "infinity" with the feeler gauge removed. After completing the adjustment, lock the throttle opening limiting screw with glue.
Checking the incoming air temperature sensor
Remove the air filter housing assembly. Disconnect the wiring harness from the sensor. Connect an ohmmeter to terminals "1" and "4" of the sensor and check the resistance, which:
- at a temperature of 0°C it should be within 5.0-6.2 kOhm,
- at 20°C - 2.0-3.0 kOhm
- at 30°C - 1.6-2.0 kOhm
- at 50°C — 700-900 Ohm
- at 80°C — 300-350 Ohm
- at 100°C - 175-225 Ohm.
If the resistance values go beyond the specified limits, replace the incoming air temperature sensor.
Checking the idle speed control valve
method 1. Disconnect the idle speed control connector. Connect a DC source with a voltage of no more than 6 V to terminals "1" and "2" of the idle speed control connector (Fig. 2-78). The idle speed switch rod should move to the fully retracted position. Disconnect the current source.
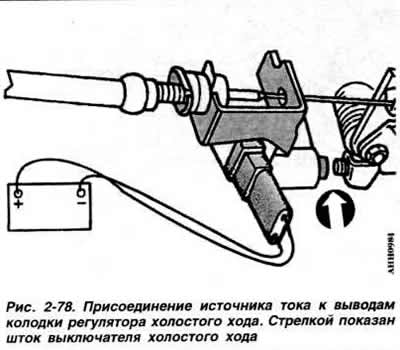
Warning: To avoid damaging the idle speed controller, do not connect a current source with a voltage greater than 6 V to it.
Connect an ohmmeter to terminals "3" and "4" of the regulator block (Fig. 2-79). Press the switch rod down by hand until it stops and check the gap between the end of the idle switch rod and the throttle opening limit screw with a feeler gauge, which should be within 0.4-0.7 mm. If necessary, set the gap to 0.5 mm with this screw. With the gap adjusted and the feeler gauge inserted into the gap, the resistance on the ohmmeter should be between 0 and 1 ohm. Remove the feeler gauge and make sure that the ohmmeter shows "infinity". Connect the regulator connector.
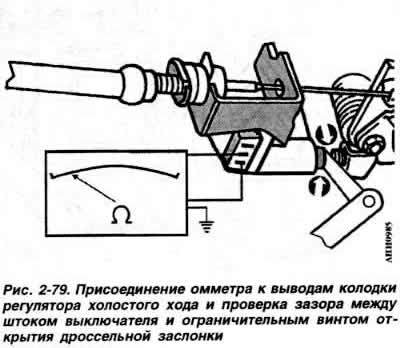
method 2.Disconnect the idle speed control connector. Connect an ohmmeter to terminals "1" and "2" of the idle speed control connector. The resistance should be 3-200 Ohms. Connect the ohmmeter to terminals "3" and "4" of the connector.
With the throttle valve open R=0 Ohm, with the throttle valve closed R=∞.
If the resistance does not match the specified values, replace the idle speed control valve.
Checking the purge solenoid valve of the adsorber
Disconnect the valve connector and measure the resistance of its winding, which at a temperature of 20°C should be 35-55 Ohm.
Checking the oxygen sensor in the exhaust gases
Make sure that the installed sensor type matches the vehicle configuration. Sensor 1 (Fig. 2-80) is installed on vehicles with a manual transmission, sensor 2 - on vehicles with an automatic transmission. On vehicles with a manual transmission, with the engine running and the sensor connector connected, its supply voltage should be 12 V. The output current is 0.5-3.0 A. To check the sensor supply voltage on vehicles with an automatic transmission, disconnect the sensor connector and connect the LED tester to the terminals of the sensor block (Fig. 2-81). Start the engine at idle speed. The LED tester should light up.
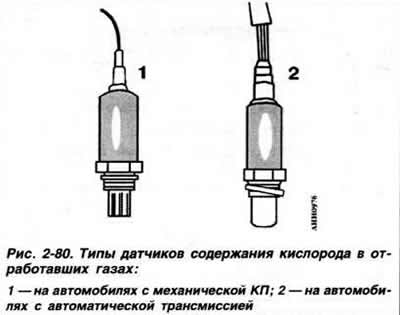
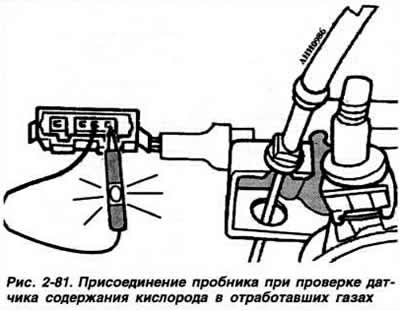
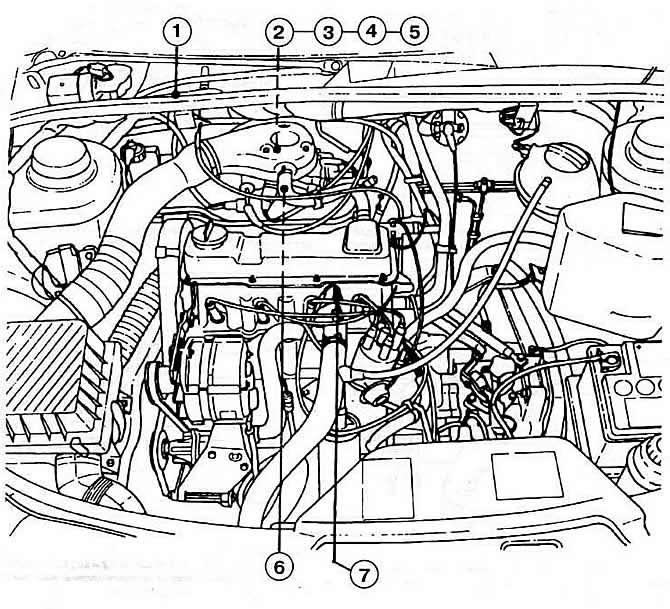
Figure 2-75. Placement of fuel injection control subsystem CSM nodes "Mono-Motronic" by car:
1 — controller;
2 — nozzle;
3 — central injection unit;
4 - idle speed controller;
5 - throttle position sensor;
6 — intake manifold heater;
7 — coolant temperature sensor.
Visitor comments