
Removing
Attention! This chapter covers 1.4 liter BCA, 2.0 liter AXW/BLR/BLX/BLY, 2.0 liter BDK diesel engines (see illustration 6.0). Differences inherent in other types of engines are listed separately at the end of this chapter.
1. Set the front cross member to service position, see relevant chapter.
2. Drain the coolant.
3. Remove the radiator fan, see the relevant chapter.
4. Disconnect the circulation and coolant hoses from the radiator. Before disconnecting, loosen the hose clamps and slide them onto the hoses. If necessary, loosen the hoses by removing the clamps.
5. Unscrew bolts of fastening of a radiator from the left and right sides.
6. Tilt the heatsink back a little, and then remove it by pushing it up.
Installation
The radiator is installed in the reverse order of removal. The bolts for fastening the radiator supports on the upper cross member of the front end are tightened with a force of 5 Nm.
Vehicles with 1.4-/1.6-litre FSI petrol engine and diesel engine
7. Disconnect the thermoswitch and radiator fan connector.
8. Remove the radiator together with the fan by lowering them down.
Vehicles with 1.6 liter BGU/BSE/BSF petrol engines
9. Remove a forward bumper, the corresponding chapter see.
10. Unscrew the radiator mounting bolts on the right and left sides through the holes in the bumper panel and remove the bumper from the engine compartment by lifting it up.
11. Disconnect the plug from the radiator fan.
12. Remove the heatsink along with the fan by pushing them up.
Cars with a 2.0 liter AXX TFSI gasoline engine
13. Disconnect the charge air hoses from below.
14. Remove the radiator by lowering it down.
Cars with air conditioning
Attention! Do not open the air conditioner refrigerant circuit. Skin contact with coolant causes frostbite. If refrigerant comes into contact with the skin, immediately rinse the skin with cold water for at least 15 minutes. The refrigerant is colorless, odorless and heavier than air. If a refrigerant leaks, people near the floor where the vehicle is parked or in rooms below the leak may suffocate.
To prevent damage to the compressor, as well as the pipes and hoses of the air conditioner, they must not be stretched, kinked or bent.
15. Remove collars of fastening of pipelines of the conditioner.
16. Disconnect the compressor from the radiator and secure it to the upper cross member of the bulkhead with wire.
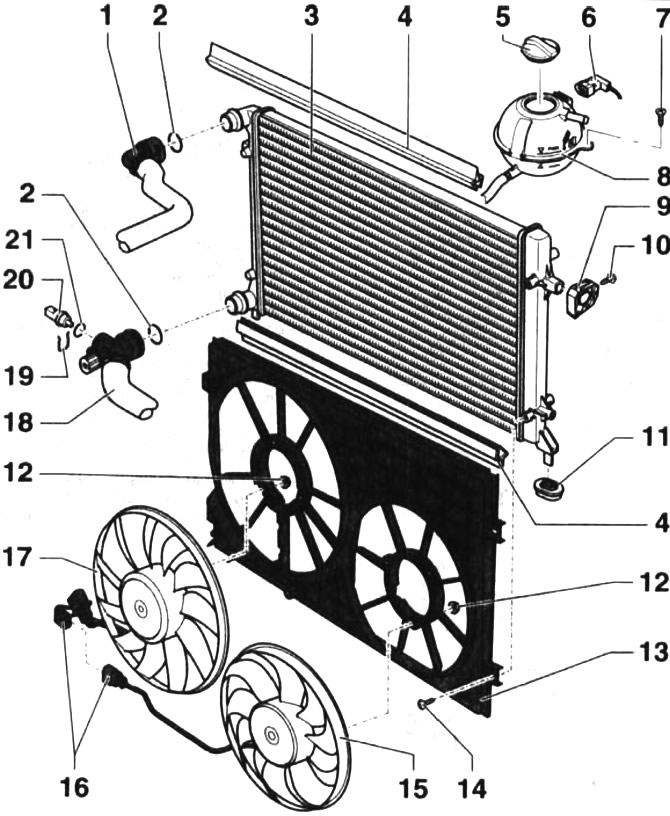
Radiator. 2.0 liter BDK petrol and diesel vehicles
1 - upper radiator hose. Attaches to the radiator hose with a clamp. When installing, make sure the clamp is firmly seated
2 - O-ring. To be replaced if damaged
3 - radiator
4 - sealing gasket. Not available on all models
5 - cover of the expansion tank with coolant. Tank pressure 1.4-1.6 bar
6 - plug
7 - bolt. Tightening torque 5 Nm
8 - expansion tank for coolant
9 - radiator mounting support
10 - bolt. Tightening torque 5 Nm
11 - fixing the lower radiator support
12 - nut. Tightening torque 10Nm
13 - diffuser
14 - bolt. Tightening torque 5 Nm
15 - fan 2
16 - plug
17 - fan 1 with control unit
18 - lower radiator hose. It is connected to the outlet pipe, in which the thermostat is located. The hose is attached to the nozzles with a clamp, the fit of which should be checked
19 - clamp, The strength of the fit should be checked
20 - coolant temperature indicator sensor. Located on the radiator inlet
21 - O-ring. To be replaced at every disassembly
Visitor comments