



Contents: Removal ↓ Installation ↓
Cars with 1.6 liter BGU/BSE/BSF petrol engine and diesel engine.
Removal
1. Drain the coolant.
2. Vehicles with diesel engine: Remove the generator, see the relevant chapter.
3. Disconnect the cooling system hose from the pipe 2 on the cylinder block by loosening the fastening clamp and moving it onto the hose (see illustration).
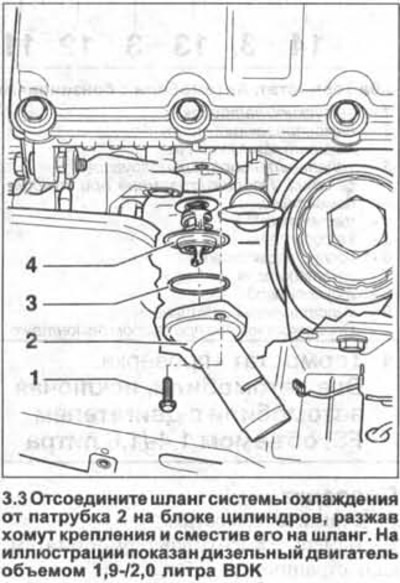
4. Unscrew the two bolts 1 securing the exhaust pipe 2 to the cylinder block and remove it together with the thermostat (see illustration 3.3).
5. Turn thermostat 4 by 90° (1/4 turn) to the left and remove it from the outlet pipe (see illustration 3.3).
6. Remove the O-ring 3 and replace it with a new one.
Installation
7. Moisten the new sealing ring 3 with coolant and install it in the outlet pipe 2 (see illustration 3.3).
8. Install thermostat 4 into place in the outlet pipe and turn it 90° (1/4 turn) to the right (see illustration 3.3).
Caution! The thermostat bracket must be positioned almost vertically.
9. Install the pipe and secure it with bolts with a tightening torque of 15 Nm.
10. Place the hose on the outlet pipe and secure it with a clamp.
11. Vehicles with diesel engines: Replace the generator.
12. Fill the reservoir with coolant.
13. Start the engine and let it run until the thermostat opens. The thermostat opening is indicated by the lower radiator hose becoming hot.
14. Inspect the outlet pipe and make sure that it and the hose are securely fastened and there is no coolant leakage.
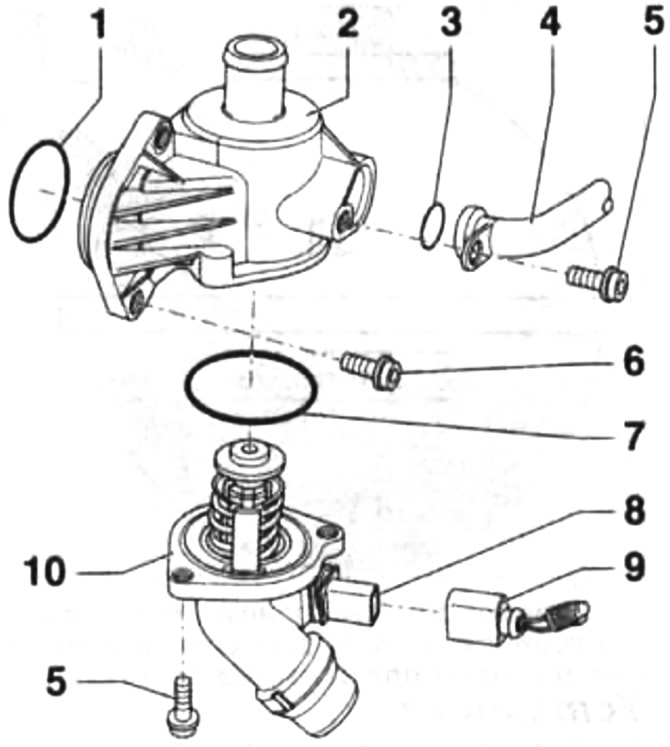
Thermostat. Cars with 2.0 litre FSI petrol engine AXW/BLR/BLX/BLY
1 - O-ring. Should be replaced each time the thermostat is removed
2 - thermostat housing
3 - O-ring. To be replaced at each dismantling.
4 - lower pipeline
5 - bolt. Tightening torque 10 Nm
6 - bolt. Tightening torque 10 Nm
7 - sealing ring. To be replaced at each dismantling
8 - heater connector
9 - plug
10 - thermostat. Controlled by a microprocessor. Begins to open at a coolant temperature of approximately +105°C
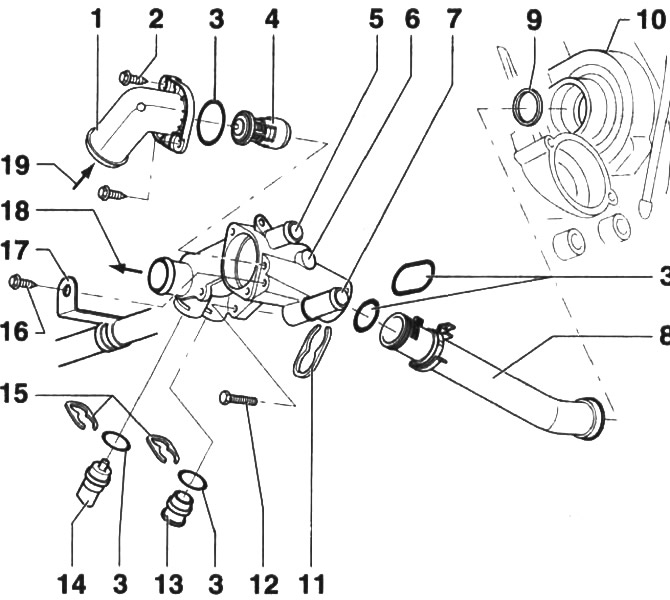
Thermostat. Cars with a 1.4-liter gasoline engine VSA
1 - outlet pipe
2 - self-tapping screw. Tightening torque 7 Nm
3 - O-ring. To be replaced at each dismantling.
4 - thermostat
5 - to the heater
6 - thermostat housing
7 - heater
8 - pipeline
9 - sealing ring. To be replaced at each dismantling
10 - water pump on the cylinder block
11 - Clamp. Make sure it fits tightly
12 - bolt. Tightening torque 10 Nm
13 - cork
14 - coolant temperature gauge sensor
15 - Clamp. Make sure it fits tightly
16 - self-tapping screw. Tightening torque 7 Nm
17 - connecting pipeline to the recirculation valve
18 - lower radiator hose branch pipe
19 - Upper radiator hose branch pipe
[View the original on the website vwmanual]
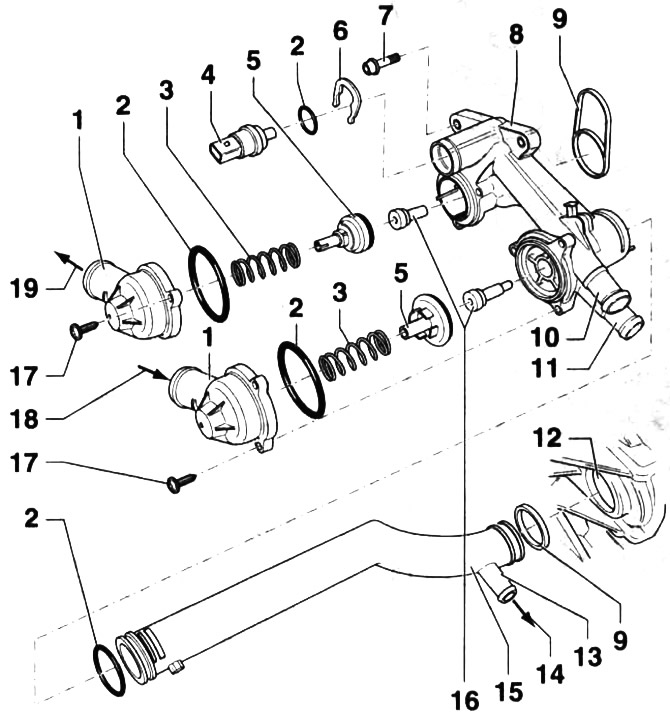
Thermostat. Cars with 1.4-/1.6-liter FSI petrol engine
1 - outlet pipe
2 - O-ring. To be replaced at each dismantling.
3 - expansion spring
4 - coolant temperature gauge sensor
5 - pusher (piston)
6 - Clamp. Make sure it fits tightly
7 - bolt. Tightening torque 10 Nm
8 - thermostat housing
9 - sealing ring. To be replaced at each dismantling
10 - to the heater
11 - from the heater
12 - water pump on the cylinder block
13 - outlet pipe
14 - to the expansion tank
15 - connecting pipeline
16 - thermostat. Start-end of opening: thermostat with long spring: +87°C...102°C thermostat with short spring; +103°C...120°C
17 - bolt. Tightening torque 5 Nm
18 - lower radiator hose branch pipe
19 - Upper radiator hose branch pipe
Visitor comments