
English Русский
Български
Беларускі
Український
Српски
Hrvatski
Română
Polski
Slovenský
Magyar
  |  Articles  |  Sitemap  |  Contacts  |    |
Car maintenance Ford Car maintenance Hyundai Car maintenance Chevrolet Car maintenance BMW Car maintenance Audi Car maintenance Opel Car maintenance AvtoVAZ
VWmanual.ru


Main   Passat   Golf   Polo   Touareg   Tiguan   Sharan   Transporter   Others  
Transporter T3 (1979-1992) Transporter T4 (1990-2003)

Coolant Thermostat — Removal, Checking and Installation (VW Transporter T4)

  • Main
  • Transporter
  • Transporter T4
  • Power unit
  • Cooling system
  • Coolant Thermostat — Removal, Checking and Installation
            0


Contents: Removal ↓ Examination ↓ Installation ↓

Water pump, coolant thermostat, oil cooler 4-cylinder petrol and diesel engine
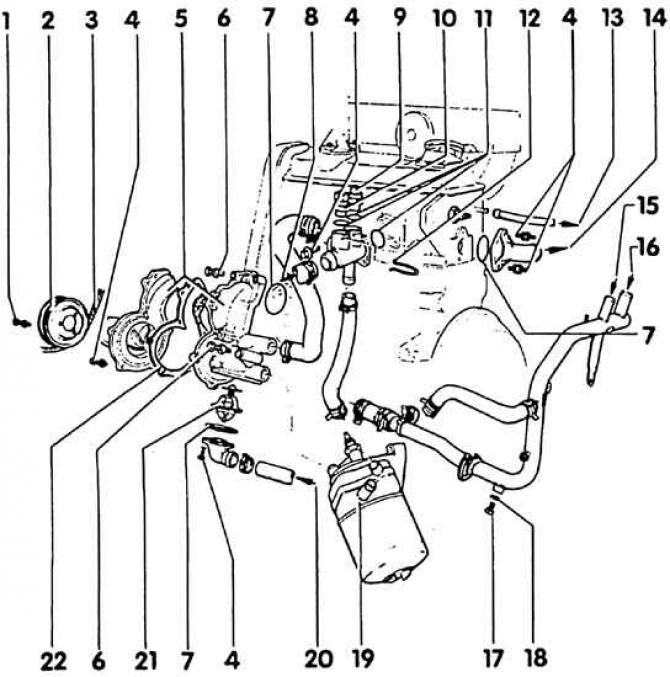


1. Bolt, 20 Nm; 2. Belt pulley; 3. V-belt of water pump and generator; 4. Bolt, 10 Nm; 5. Water…

1. Bolt, 20 Nm; 2. Belt pulley; 3. V-belt of water pump and generator; 4. Bolt, 10 Nm; 5. Water pump. Check the ease of rotation of the shaft; 6. Bolt, 20 Nm; 7. Ring; 8. Upper coolant hose; 9. Coolant temperature sensor 2-pole; 10. Thermostat and sensor 4-pole; 11. Ring; 12. Lock washer; 13. To the expansion tank tee; 14. To the heater radiator; 15. From the expansion tank tee; 16. From the heat exchanger; 17. Coolant drain screw, 10 Nm; 18. Sealing ring; 19. Oil radiator; 20. Lower coolant hose; 21. Coolant thermostat; 22. Gasket


Dimensions of cold and hot thermostat
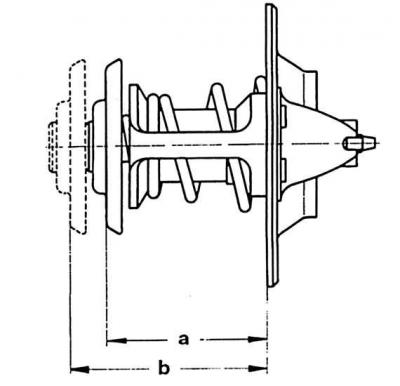


Dimensions of cold and hot thermostat


Removal


Attention! The designations of the parts refer to the cooling systems of a 4-cylinder engine. Removal and installation from a 5-cylinder engine is carried out similarly.


1. Place a suitable container under the coolant connection pipe.

2. Unscrew the bolts (4) of the coolant thermostat connecting pipe (21) (see fig. Water pump, coolant thermostat, oil cooler of 4-cylinder petrol and diesel engines).

3. Remove the sealing ring (7).

4. Remove the thermostat (21).

Examination


1. Measure the dimension "a" on the thermostat (see fig. Dimensions of cold and heated thermostat).

2. Warm up the thermostat in a water bath. The thermostat should not touch the walls of the vessel.
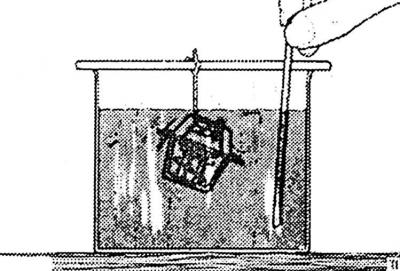
2. Warm up the thermostat in a water bath. The thermostat should not touch the walls of the vessel.


3. Monitor the temperature with a thermometer. The thermostat starts to open at about 87°C, and ends at about 102°C.

4. After heating the thermostat to approximately 100°C, dimension "b" should exceed dimension "a" by at least 7 mm.

Installation


1. Replace the sealing ring, install the thermostat and screw on the cover, fill with coolant.

2. Let the engine run until the thermostat opens. Check the cap and coolant hose for leaks.

This article is available at russian, bulgarian, belarusian, ukrainian, serbian, croatian, romanian, polish, slovak, hungarian
The text has been checked: Orlov Dmitry

Share information:

Previous articles
Replacing the coolant
Removal and installation the radiator
Radiator and antifreeze — design description
Coolant circulation
Checking the pressure in the engine cooling system
Next articles
Water pump — removal and installation
Electric Fan Temperature Sensor — Check
Coolant circulation temperature sensor
Diagnostics of cooling system faults


Similar articles from other manuals for VW cars:
Checking the additional coolant pump Passat B3 (1988-1993)
Checking and replacing the thermostat Golf 1 (1974-1984, petrol)
Checking the coolant temperature sensor Polo 3 (1995-2003)
Checking the condition of the poly V-belt Touareg 1 (2002-2006)
Coolant pump and thermostat Tiguan 1 (2007-2015)
Checking the coolant level Sharan 1 (1995-2000)
Checking the condition of antifreeze and coolant level Caddy 3 (2003-2010)
Link to this page in different formats


Visitor comments


No comments yet


How much will 29 + 12 =


Transporter T4 
  • General information
  • User manual
  • Maintenance
  • Power unit
  • Engine repair
  • Ignition system
  • Lubrication system
  • Cooling system
  • Fuel system (petrol)
  • Fuel system (diesel)
  • Injection system (petrol)
  • Exhaust system
  • Transmission
  • Clutch
  • Car gearbox
  • Chassis
  • Car suspension
  • Steering
  • Brake system
  • Wheels and tires
  • Body
  • Exterior
  • Interior
  • Doors and windows
  • Heating system
  • Electrical equipment
  • Equipment and devices
  • Lighting and signaling
  • Power devices
  • Electrical circuits
Transporter T3 
  • General information
  • Maintenance
  • Petrol engines
  • Engine repair
  • Lubrication system
  • Cooling system
  • Power and exhaust system
  • Carburetor 34 PICT
  • Carburetors 2E3 and 2E4
  • Fuel injection system
  • Ignition system
  • Diesel engines
  • Engine repair
  • Lubrication system
  • Cooling system
  • Power and exhaust system
  • Transmission
  • Clutch
  • Car gearbox
  • Chassis
  • Front suspension
  • Rear suspension
  • Steering
  • Brake system
  • Body
  • Body and interior elements
  • Doors, locks and windows
  • Electrical equipment
  • Lighting system
  • Equipment and devices
  • Power devices (diesel)
  • Power devices (petrol)
  • Wiring diagrams (diesel)
  • Wiring diagrams (petrol)
VWmanual.ru © 2016-2026 | Mobile version | News and articles | Sitemap: EN BG BY UA RS HR RO PL SK HU | Write message | Site search
Passat B2 • Passat B3 • Passat B4 • Passat B5 • Passat B6 • Golf 1, diesel • Golf 1, petrol • Golf 2, petrol • Golf 2 • Golf 3 • Golf 4 • Golf 5 • Polo 3 • Polo 4 • Touareg 1 • Tiguan 1 • Sharan 1 • Transporter T3 • Transporter T4 • LT 28 • LT 2D • Beetle • Caddy 3 •
Our website uses cookies to ensure functionality and convenience.