
Removing
1. Turn off the ignition and remove the key from the ignition switch.
2. Remove an upholstery of a door, the corresponding chapter see.
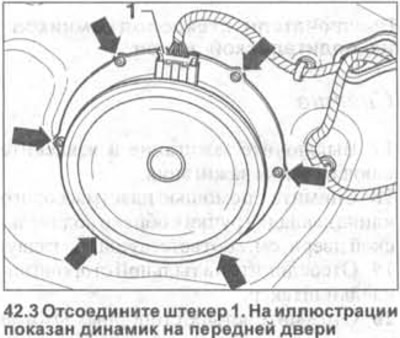
3. Disconnect plug 1 (see illustration).
4. Drill out the rivets with a suitable drill (see arrows in illustration 41.3) and remove the faulty speaker.
5. Remove all sawdust and repair any damage to the paintwork.
Installation
6. Install the new speaker and secure it with rivets or self-tapping screws.
7. Connect the plug to the loudspeaker and refit the door upholstery, see the relevant chapter.
Mid tone speaker
Removing
Attention! The mid-tone speaker is attached to the back of the front door upholstery.
8. Turn off the ignition and remove the key from the ignition.
9. Remove an upholstery of a door, the corresponding chapter see.
10. Disconnect the plug from the speaker.
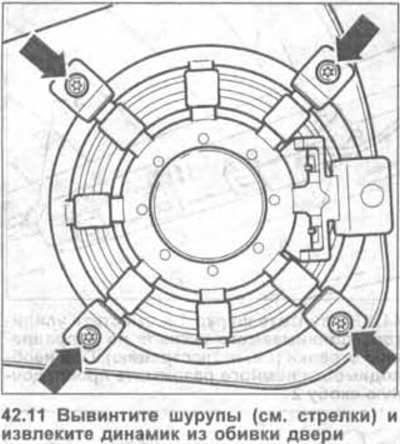
11. Remove the screws (see arrows in illustration) and remove the speaker from the door upholstery.
Installing the mid-tone speaker is performed in the reverse order of removal.
Front speaker to high tone
Removing
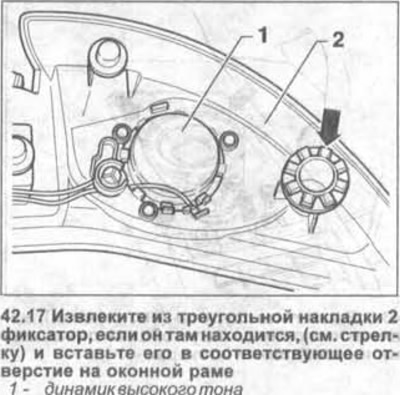
Attention! The tweeter is built into the triangular trim of the door window opening. If the speaker malfunctions, it should be replaced with a new one along with the overlay.
12. Turn off the ignition and remove the key from the ignition switch.
13. Remove an upholstery of a forward door, the corresponding chapter see.
14. Disconnect the plug from the tweeter.
15. Unscrew a screw of fastening of a triangular lining.
16. Remove the speaker together with the triangular pad by prying it out with a plastic wedge, eg HAZET 1965-20.
Installation
The tweeter is installed in the reverse order of removal.
17. Remove the retainer from the triangular pad 2, if it is there, (see arrow in illustration) and insert it into the corresponding hole on the window frame.
Rear tweeter. Four door cars
Removing
Attention! The tweeter is attached to the back of the rear side door upholstery.
18. Turn off the ignition and remove the key from the ignition switch.
19. Remove an upholstery of a door, the corresponding chapter see.
20. Disconnect the plug from the speaker.
21. Cut the welded clips around the perimeter of the speaker cover (see arrows in illustration).

Attention! The illustration shows the rear tweeter of a Golf. Golf Plus vehicles are equipped with speakers of a different shape, which are attached using four welded clamps.
22. Remove the trim along with the speaker.
Installation
23. Fasten the trim together with the tweeter on the door upholstery.
24. Solder the plastic retainers.
25. Connect the plug to the speaker.
26. Establish back an upholstery of a back lateral door, the corresponding chapter see.
Rear speakers. two-door cars
Removing
The tweeter is attached to the back side of the rear side trim.
The woofer is fixed on the side with rivets.
27. Turn off the ignition and remove the key from the ignition.
28. Remove an upholstery from a lateral wall of a back part of salon, the corresponding chapter see.
Attention! The connecting wire of the tweeter is very short and may be broken.
29. Disconnect plug 1 from the tweeter (see illustration).

30. Unlock the woofer plug and disconnect it.
31. Use a suitable drill to drill out the rivets that secure the woofer and remove it.
32. Trim the welded clips around the perimeter of the tweeter trim (see arrows in illustration 42.21).
33. Remove the pad along with the speaker from the upholstery of the side wall.
Installation
34. Fasten the pad together with a tweeter on the side upholstery of the passenger compartment and solder the plastic clips.
35. Secure the tweeter with rivets or self-tapping screws.
36. Connect the plugs to the speakers.
37. Reinstall the side upholstery, see the relevant chapter.
Visitor comments