



Contents: Removal ↓ Installation ↓ Headlight Axis Leveling Corrector ↓ Limit switches for doors, bonnet and…↓ Switch illumination ↓
Removal
1. Turn off the ignition and remove the key from the ignition switch.
2. Turn the handle A of the light switch to the "O" position (see illustration).
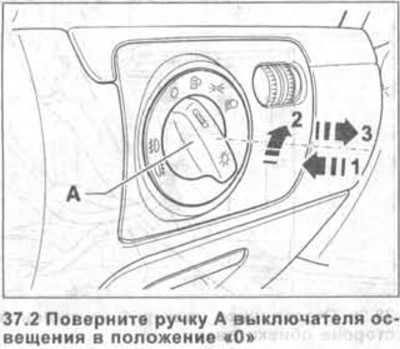
3. Press the handle A of the switch into the housing (see arrow 1 in illustration 37.2) and at the same time turn it a little to the right (see arrow 2). so that it takes a vertical position.
4. Hold the handle in this position and remove the switch from its seat by pulling it by the handle in the direction of arrow 3 (see illustration 37.2).
5. Disconnect the plug from the back of the switch.
Installation
6. Connect the power plug to the switch.
7. Press the switch handle into the switch housing while holding it firmly, and at the same time turn it slightly to the right. This will recess the locking tabs on the switch housing.
8. While holding the switch handle in this position, slide the switch into the mounting hole on the instrument panel and turn the handle to the "O" position.
9. Move the switch handle alternately to all positions to check the strength of its fit.
Headlight Axis Leveling Corrector
Removal
10. Turn off the ignition and remove the key from the ignition switch.
11. Remove the light switch.
12. Remove the lower instrument panel trim on the driver's side, see the relevant chapter.
13. Disconnect plug 1 of the headlight range adjuster on the back side of the panel trim (see illustration).
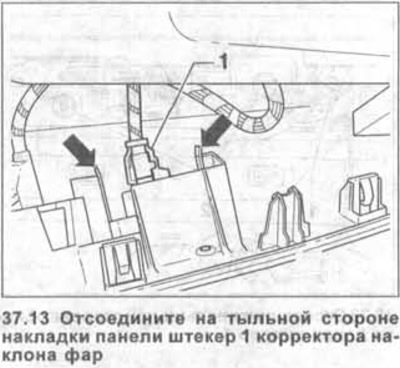
14. Squeeze the two leashes together (see arrows in illustration 37.13) and remove the headlight optical axis tilt angle corrector from the panel trim.
The corrector is installed in the reverse order of removal.
Limit switches for doors, bonnet and trunk lid
The contact switch is built into the corresponding lock. If it is damaged, the lock as a set must be replaced.
Switch illumination
The backlight bulbs are built into the corresponding switch or key. The backlight bulbs cannot be replaced separately. If they are defective, the corresponding switch as a set should be replaced.
(The original can be viewed on the portal VWManual.ru)
Visitor comments