
Removal and installation of the carburetor engine
Disconnect the battery and remove it from the vehicle.
It is possible to remove the hood for easier access to the power unit, although this is not necessary. If the hood is removed, it is recommended to trace the contour of the hinges on the surface of the hood with a pencil in order to install it in its place during assembly.
Remove the cap of the expansion tank of the cooling system, while the engine must be cold.
Remove the air filter and plug the holes in the carburetor with a clean, lint-free rag.
Place the vehicle on a lift, either over a pit, or raise the front of the vehicle just enough to allow access to the chassis from below. In the latter case, the rear of the car must be secured to the supports.
Drain the liquid from the cooling system. To do this, it is necessary to disconnect both inlet pipes, after loosening the fastening of the clamps. The heater cock must be open so that the fluid flows out of the heater. Coolant can be reused (if it has not been used for a very long time - its shelf life is 2 years).
Turn away bolts in a forward part of a body. Pressing on the crossbars, release the cover on the left side and remove it. Remove the air intake grille.
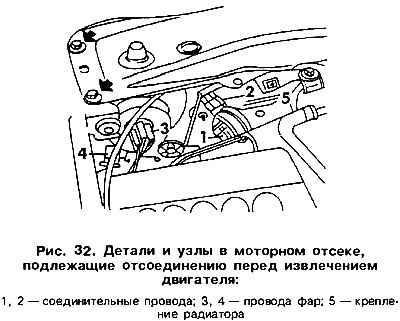
Disconnect the electrical wires from the back of the headlights (pic. 32). Loosen the top radiator mounting bolts.
Disconnect the rod from the hood lock and pull it into the passenger compartment through the hole in the shield of the engine compartment.
Unscrew the top and bottom (bottom of headlight unit) bolts. Remove the front panel along with the headlights. Remove all pipes of the cooling system.
Disconnect the electrical wires from the fan thermal switch screwed into the radiator, as well as from the fan itself.
Completely remove the radiator fasteners and remove the radiator together with the fan.
Remove the expansion tank.
Disconnect the electrical wires from the generator, oil pressure sensor, intake manifold heater switch, carburetor starter.
Disconnect the high-voltage wire from the cover of the ignition distributor sensor, as well as the plug from the Hall sensor connector located on the side of the distributor sensor housing.
Disconnect and plug the fuel hose to the fuel pump and the fuel return hose to the tank.
Disconnect the wire from the coolant temperature sensor screwed into the cylinder head.
Disconnect the wire from the gearbox «masses».
Disconnect the connector from the reversing light switch on the transaxle case. Disconnect the electrical wires going to the starter.
Disconnect the clutch cable from the gearbox. Turn away bolts of fastening of a transmission.
Disconnect the speedometer flexible shaft from the gearbox.
Disconnect all connections near the carburetor.
Disconnect the low pressure hose coming from the intake manifold.
Disconnect the fuel control cable fasteners from the carburetor.
Remove the three rear engine mount bolts.
Disconnect the wires from the reversing light switch.
Disconnect the drive shafts from the gearbox, remove the flange connection and hang it with a wire. To loosen the bolts, you must use a special 12-point wrench with a spanner size of 8. These bolts are tightened with a high torque, and without the use of a special wrench, the edges of the bolt heads can be damaged.
Disconnect the exhaust pipe from the exhaust manifold flange.
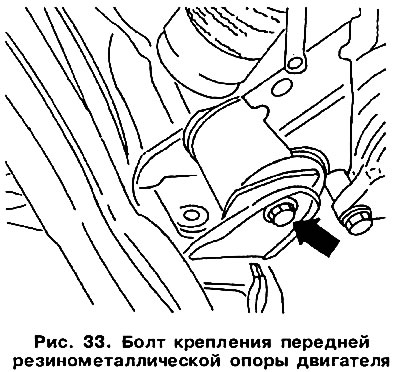
Grab the engine with a cable and pull it out of the engine compartment. In specialized workshops, a special device is used for this purpose - a traverse. As one of the cable attachment points, you can use the generator bracket, while the generator must first be removed. Fix the second branch of a cable from the opposite side of a head of the block of cylinders. Connect the cable to the hook of the lifting device and tension the cables. Loosen the front engine mount bolts (pic. 33).
Lift the power unit and turn it so that it is possible to remove it from the engine compartment. At the same time, pay attention to the fact that all connections are undocked and the power unit does not touch the body elements.
Disconnect the engine from the gearbox.
Engine installation operations are carried out in the reverse order of its removal, while paying attention to the following:
For the correct location of the power unit in the engine compartment, first tighten the bolts of the rear engine mount, and then the bolts of the gearbox cross member.
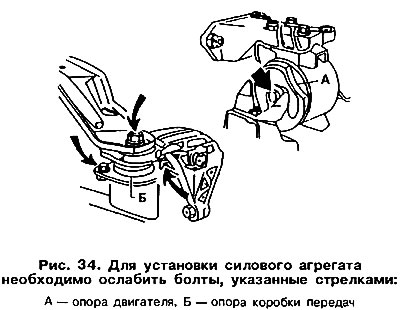 | 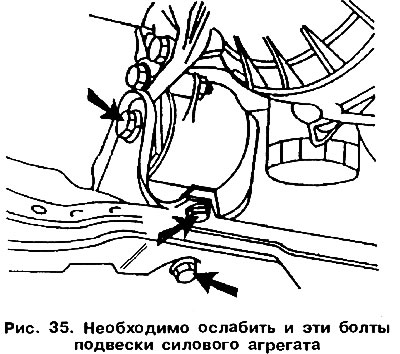 |
Loosen the engine and transmission mounts (pic. 34, 35), install the power unit, then screw the bolts into the rubber-metal support. Rock the power unit to eliminate stress in its supports. Finally tighten bolts of fastening of support of the power unit according to fig. 36.
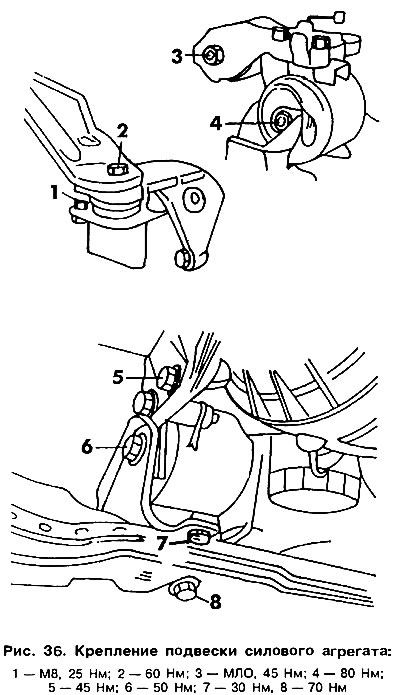
When connecting the drive shafts, it is necessary to tighten their bolts with a torque of 45 Nm.
Connect the intake pipe. Fix the rubber suspension ring only after the muffler and exhaust pipe have been correctly installed. If the ring stretches excessively after installation, you can slightly bend the brackets welded to the structural elements of the exhaust system. A heavily stretched ring may soon come off the bracket.
The cooling system is filled with the heater valve open. The expansion tank must be filled to the top mark, and then closed with a cap. To remove air pockets from the system, start the engine for a short time. After that, check the amount of coolant, top up if necessary.
Adjust the length of the clutch cable so that the free play of the clutch pedal is 15-20 mm.
Adjust the position of the fuel control cable as described in the appropriate section.
If necessary, adjust the ignition timing and engine idling speed (after warming up the engine).
Removal and installation of the engine with fuel injection system
The procedure for removing and installing an engine with an injection system is similar to that described in the previous subsection, with the only difference that it is necessary to disconnect all connections between the injection system assembly and the engine. Dismantling the intake system is more complicated and requires marking all the elements before removing it. Operations to adjust the devices of the engine power system described in section.
Separation of the gearbox from the engine
Remove the starter, and then unscrew the bolts securing the gearbox to the engine. Carefully move the gearbox away from the engine, making sure that the weight of the gearbox is not transferred to the gearbox input shaft or clutch housing. This operation must be carried out with assistants, and one of them must hold the engine.
When connecting the engine to the gearbox, make sure that the guide pins fit into the sockets of the engine block flange. The tightening torque for M10 bolts is 45 Nm and for M12 bolts is 75 Nm.
Visitor comments