
English Русский
Български
Беларускі
Український
Српски
Hrvatski
Română
Polski
Slovenský
Magyar
  |  Articles  |  Sitemap  |  Contacts  |    |
Car maintenance Ford Car maintenance Hyundai Car maintenance Chevrolet Car maintenance BMW Car maintenance Audi Car maintenance Opel Car maintenance AvtoVAZ
VWmanual.ru


Main   Passat   Golf   Polo   Touareg   Tiguan   Sharan   Transporter   Others  
Golf 1 (1974-1984, diesel) Golf 1 (1974-1984, petrol) Golf 2 (1984-1993, petrol) Golf 2 (1984-1993) Golf 3 (1991-1997) Golf 4 (1997-2004) Golf 5 (2003-2008)

Disassembling the outer hinge (VW Golf 2)

  • Main
  • Golf
  • Golf 2
  • Transmission
  • Drive shafts
  • Disassembling the outer hinge
            0


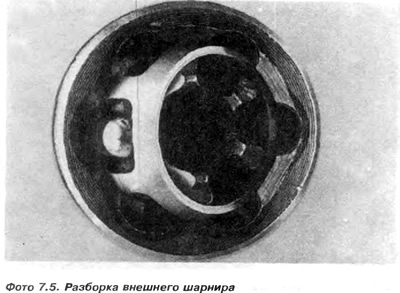
9. To disassemble the joint, you must first remove the balls, which are easily seated in the basket. Therefore, they can be pushed out without problems by inserting a screwdriver between the joint hub and the ball. It is necessary to tilt the hub together with the basket so that the groove in the basket and the ball are above the edge of the housing (photo 7.5).

9. To disassemble the joint, you must first remove the balls, which are easily seated in the…


Caution: When removing and installing the balls, the basket plane and the hub plane should be as parallel to each other as possible.


10. In the initial position, the planes of the hub, basket and body are mutually parallel.

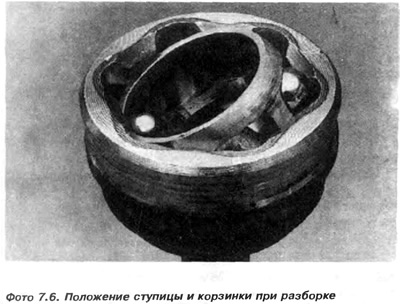
11. Tilt the hub with the basket so that one of the hinges is above the edge of the housing. When the ball is above the edge of the housing, you can insert a screwdriver under the ball and push it out (photo 7.6).
11. Tilt the hub with the basket so that one of the hinges is above the edge of the housing. When…


Note: To obtain a clearer photograph, the joint hub must be removed.


12. Then put the hub with the basket back in its original position.

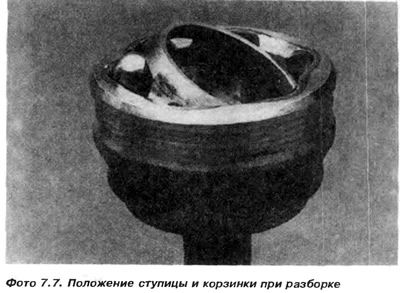
13. Then tilt the hub with the basket so that the next ball is above the edge of the body, and also push it out of the basket (photo 7.7).
13. Then tilt the hub with the basket so that the next ball is above the edge of the body, and also…


14. Return to the initial position. All other balls are removed in a similar manner. Returning to the initial position is necessary to prevent the hub with balls from jamming in the housing. In case of jamming, you can lightly tap the side surface of the bushing with a hammer. Align the surface of the hub with the surface of the basket and then install it in the initial position. Usually difficulties arise when removing and installing the first and last balls.

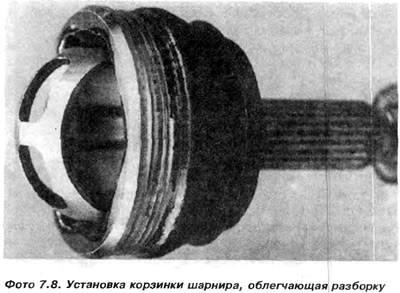
15. When all the balls have been removed, it is necessary to turn the basket with the hub perpendicular to the surface of the housing, as shown in photo 7.8. It is important to align the axis of symmetry of the basket with the axis of symmetry of the two opposite grooves in the housing.
15. When all the balls have been removed, it is necessary to turn the basket with the hub…


16. Turn the basket so that the ball sockets are in the indicated position (photo 7.8 and 7.9).
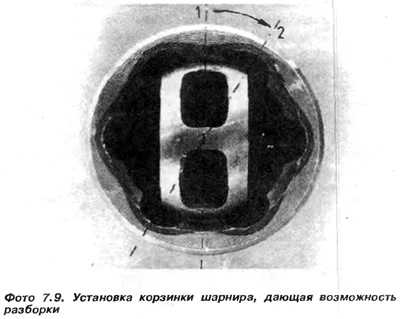

16. Turn the basket so that the ball sockets are in the indicated position (photo 7.8 and 7.9).


17. Then remove the basket from the body parallel to the axis.

18. To remove the hub from the basket, it is necessary to turn the hub perpendicular to the basket. Insert the projection of the hub 1 into the socket of the ball 2 in the basket and roll the hub out of the basket

19. Wash the elements in kerosene and check them for wear (photo 7.10).
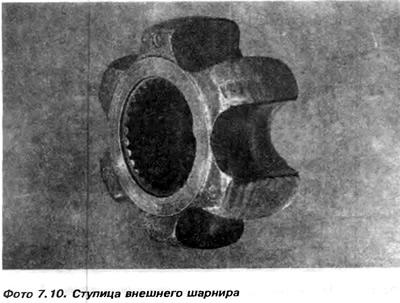
19. Wash the elements in kerosene and check them for wear (photo 7.10).


The surfaces of the outer and inner tracks on which the balls roll must not show any signs of peeling, friction or corrosion. The balls must not show any signs of deformation.

This article is available at russian, bulgarian, belarusian, ukrainian, serbian, croatian, romanian, polish, slovak, hungarian
The text has been checked: Semenova Anna

Share information:

Previous articles
Drive joints
Drive axle shaft — replacement
Drive axles: device
Technical data
Next articles
Assembling the outer hinge
Installing the outer joint on the axle shaft
Inner hinge
Disassembling the inner joint
Mounting the inner hinge
Inner Hinge — GTI Models


Similar articles from other manuals for VW cars:
Disassembling the outer constant velocity joint Passat B5 (1996-2005)
Disassembling the engine Polo 3 (1995-2003)
Disassembling the drive shaft Touareg 1 (2002-2006)
Disassembling the engine Tiguan 1 (2007-2015)
Disassembling the cylinder head Sharan 1 (1995-2000)
Disassembling the cardan shaft, replacing the protective casing… Transporter T3 (1979-1992)
Disassembling the gearbox Caddy 3 (2003-2010)
Link to this page in different formats


Visitor comments


No comments yet


How much will 23 + 42 =


Golf 5 
  • General information
  • User manual
  • Maintenance
  • Troubleshooting
  • Power unit
  • Engine repair
  • Cooling and ventilation system
  • Fuel system
  • Ignition system
  • Transmission
  • Clutch
  • Mechanical gearbox
  • Automatic gearbox
  • Chassis
  • Brake system
  • Car suspension
  • Steering
  • Body
  • Interior (internal elements)
  • Exterior (external elements)
  • Doors and covers
  • Electrical equipment
  • Power devices
  • Washers and wipers
  • Lighting and appliances
  • Electrical circuits
Golf 4 
  • General information
  • User manual
  • Weekly checks
  • Maintenance
  • Power unit
  • Petrol engines
  • Diesel engines
  • Cooling system
  • Fuel system (petrol)
  • Control system (petrol)
  • Fuel system (diesel)
  • Exhaust system
  • Transmission
  • Clutch
  • Car gearbox
  • Drive shafts
  • Chassis
  • Car suspension
  • Steering
  • Wheels and tires
  • Brake system
  • Body
  • Exterior (external elements)
  • Interior (internal elements)
  • Ventilation and heating
  • Car doors and sunroof
  • Washers and glass cleaners
  • Electrical equipment
  • Power devices
  • Lighting and appliances
  • Electrical circuits
Golf 3 
  • Petrol engine
  • Engine repair
  • Lubrication system
  • Cooling system
  • Ignition system
  • Diesel engine
  • Engine repair
  • Diesel injection system
  • Pre-glow system
  • Transmission
  • Clutch
  • Gearbox and drive shafts
  • Chassis
  • Steering
  • Wheels and suspension
  • Brake system
  • Electrical equipment
  • Lighting and appliances
  • Electrical circuits
Golf 2 
  • General information
  • Introduction to guide
  • User manual
  • Petrol engines 1.3 l
  • Engine repair
  • Lubrication system
  • Cooling system
  • Carburetors
  • Supply system
  • Ignition system
  • Petrol engines 1.6/1.8 l
  • Engine repair
  • Supply system
  • Ignition system
  • Diesel engines
  • Engine repair
  • Lubrication system
  • Cooling system
  • Power and exhaust system
  • Transmission
  • Clutch
  • 4-speed gearbox 084
  • 5-speed gearbox 085
  • 4-speed gearbox 020/4R
  • 5-speed gearbox 020/4T
  • Automatic gearbox
  • Drive shafts
  • Chassis
  • Steering
  • Car suspension
  • Brake system
  • Body
  • Body elements
  • Doors, locks and windows
  • Electrical equipment
  • Equipment and devices
  • Power devices
Golf 2 (petrol) 
  • General information
  • Characteristics
  • Car care
  • Maintenance
  • Power unit
  • Engine repair
  • Engine 1.05/1.30
  • Engine 1.60/1.80
  • Cooling and lubrication system
  • Power and exhaust system
  • Transmission
  • Clutch
  • Car gearbox
  • Drive shafts
  • Chassis
  • Brake system
  • Steering
  • Suspension
  • Body
  • Body and equipment
  • Electrical equipment
  • Lighting and appliances
  • Electrical circuits
Golf 1 (petrol) 
  • General information
  • Characteristics
  • User manual
  • Maintenance
  • Power unit
  • Engine adjustment
  • Engine 1.1/1.3
  • Engine 1.5/1.6/1.8
  • Engine electrical equipment
  • Cooling system
  • Fuel system
  • Transmission
  • Clutch and manual gearbox
  • Automatic gearbox
  • Chassis
  • Steering
  • Front suspension
  • Rear suspension
  • Brake system
  • Electrical equipment
  • Lighting and appliances
  • Electrical circuits
  • Body
  • Body and equipment
  • Optional equipment
Golf 1 (diesel) 
  • General information
  • Specifications
  • Maintenance
  • Power unit
  • Engine repair
  • Exhaust and turbocharger
  • Cooling system
  • Fuel system
  • Fuel injection system
  • Transmission
  • Clutch and drive shafts
  • Car gearbox
  • Chassis
  • Suspension and wheels
  • Steering
  • Brake system
  • Wheels and tires
  • Body
  • Heating and ventilation
  • Exterior (external elements)
  • Interior (internal elements)
  • Doors and windows
  • Electrical equipment
  • Equipment and devices
  • Lighting system
  • Power devices
  • Electrical circuits
VWmanual.ru © 2016-2026 | Mobile version | News and articles | Sitemap: EN BG BY UA RS HR RO PL SK HU | Write message | Site search
Passat B2 • Passat B3 • Passat B4 • Passat B5 • Passat B6 • Golf 1, diesel • Golf 1, petrol • Golf 2, petrol • Golf 2 • Golf 3 • Golf 4 • Golf 5 • Polo 3 • Polo 4 • Touareg 1 • Tiguan 1 • Sharan 1 • Transporter T3 • Transporter T4 • LT 28 • LT 2D • Beetle • Caddy 3 •
Our website uses cookies to ensure functionality and convenience.