
English Русский
Български
Беларускі
Український
Српски
Hrvatski
Română
Polski
Slovenský
Magyar
  |  Articles  |  Sitemap  |  Contacts  |    |
Car maintenance Ford Car maintenance Hyundai Car maintenance Chevrolet Car maintenance BMW Car maintenance Audi Car maintenance Opel Car maintenance AvtoVAZ
VWmanual.ru


Main   Passat   Golf   Polo   Touareg   Tiguan   Sharan   Transporter   Others  
Touareg 1 (2002-2006)

Disassembling the drive shaft (VW Touareg 1)

  • Main
  • Touareg
  • Touareg 1
  • Transmission
  • Cardan shaft
  • Disassembling the drive shaft
            0


Contents: Removal the outer hinge ↓ Removal the inner joint ↓ Checking the outer joint ↓ Removal ↓ Installation ↓

Removal the outer hinge


Remove both clamps from the joint boot.

Remove the boot from the outer joint.

Separate the outer joint from the drive shaft by hitting the joint hard with a plastic hammer (fig. 3.179).

(The original can be found at: vwmanual.ru)
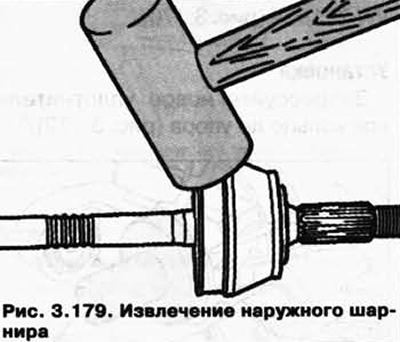
Separate the outer joint from the drive shaft by hitting the joint hard with a plastic hammer (fig.…


Removal the inner joint


Remove both clamps from the joint boot.

Remove the boot from the inner joint.

Separate the cover from the inner hinge (fig. 3.180).
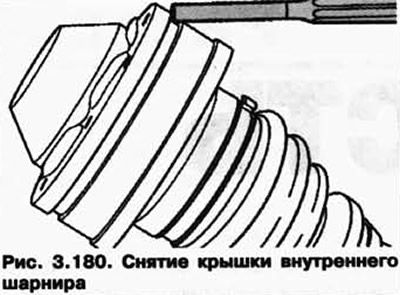
Separate the cover from the inner hinge (fig. 3.180).


Remove the snap ring using the VW 161 A snap ring collet.

Press the inner joint out of the drive shaft as shown in the picture. Hold the drive shaft firmly while doing this (fig. 3.181).
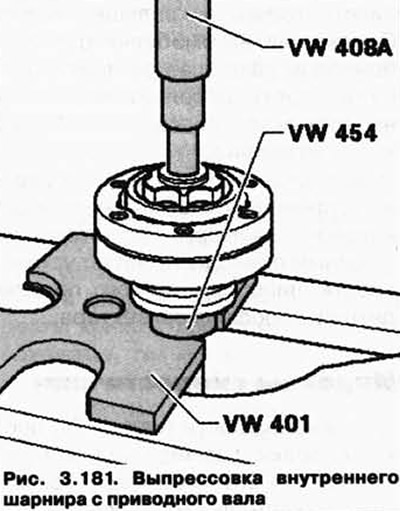


Press the inner joint out of the drive shaft as shown in the picture. Hold the drive shaft firmly…


NOTE: The inner joint cannot be disassembled for inspection.


Checking the outer joint


The joint should be disassembled to replace the grease if it is heavily contaminated, or if the ball raceways need to be checked for wear or damage.

Removal


Before disassembling, mark the position of the spherical bushing relative to the separator and housing using an electrograph or a finishing block.

Rotate the spherical bushing and separator.

Remove the balls one by one.

Remove the separator with the bushing (fig. 3.182).

Remove the separator with the bushing (fig. 3.182).


Turn the sleeve segment towards one of the separator windows (fig. 3.183).
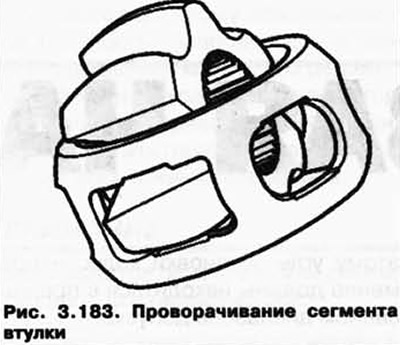
Turn the sleeve segment towards one of the separator windows (fig. 3.183).


Shake the bushing out of the separator.


the 6 balls of each joint belong to the same tolerance group. Check the axle journal, bushing, separator and balls for small depressions (surface defects) and scuffs. Too much lateral play in the joint can be noticed by beating when the load changes, in such cases the joint is subject to replacement. The presence of scuffs and ball races is not a reason to replace the joint.

Installation


Introduce half of the total amount of grease (60 grams) into the hinge housing.

Insert the separator with the bushing into the hinge housing.

Note the large chamfer on the inner diameter of the ball bushing and the large inner diameter of the separator, these should face towards the shaft when installed.

Insert the opposite balls one by one, while it is necessary to restore the previous position of the spherical bushing relative to the separator and the joint housing.

Spread the remaining grease into the sealing cuff.

This article is available at russian, bulgarian, belarusian, ukrainian, serbian, croatian, romanian, polish, slovak, hungarian
The text has been checked: Tarasov Ivan

Share information:

Previous articles
Removal and installation the drive shaft
Replacing the left flange shaft seal ring for vehicles with differential lock
Replacing the left flange shaft seal ring for vehicles without differential lock
Replacing the rubber-metal support of the front main gear
Replacing the shaft boot with flange
Replacing the sealing ring of the left shaft with flange
Next articles
Drive shaft assembly


Similar articles from other manuals for VW cars:
Drive shaft faults Passat B5 (1996-2005)
Disassembling the drive shaft Golf 1 (1974-1984, diesel)
Disassembling the cardan shaft Polo 4 (2001-2009)
Balance shaft drive chain Tiguan 1 (2007-2015)
Removal and installation the drive shaft (manual transmission) Sharan 1 (1995-2000)
Disassembling the cardan shaft, replacing the protective casing… Transporter T3 (1979-1992)
Disassembling the drive shaft Caddy 3 (2003-2010)
Link to this page in different formats


Visitor comments


No comments yet


How much will 11 + 19 =


Touareg 1 
  • General information
  • Vehicle device
  • Controls and instruments
  • Seats and safety
  • Maintenance and management
  • Power unit
  • Engine checks
  • Petrol engine 3.2L
  • Petrol engine 4.2L
  • Diesel engine 5.0L
  • Cooling system
  • Lubrication system
  • Injection system
  • Exhaust system
  • Fuel supply system
  • Transmission
  • Automatic gearbox 09D
  • Mechanical gearbox 08D
  • Cardan shaft
  • Chassis
  • Wheels and tires
  • Front suspension
  • Rear suspension
  • Steering gear
  • Brake system
  • Body
  • Outdoor elements
  • Electrical equipment
  • Battery
  • Generator and starter
  • Instruments and wipers
VWmanual.ru © 2016-2026 | Mobile version | News and articles | Sitemap: EN BG BY UA RS HR RO PL SK HU | Write message | Site search
Passat B2 • Passat B3 • Passat B4 • Passat B5 • Passat B6 • Golf 1, diesel • Golf 1, petrol • Golf 2, petrol • Golf 2 • Golf 3 • Golf 4 • Golf 5 • Polo 3 • Polo 4 • Touareg 1 • Tiguan 1 • Sharan 1 • Transporter T3 • Transporter T4 • LT 28 • LT 2D • Beetle • Caddy 3 •
Our website uses cookies to ensure functionality and convenience.