
Removing
1. The drive joints are bolted to the drive flanges near the box with socket head bolts, the unscrewing of which requires the use of special bar splines (photo 7.1).
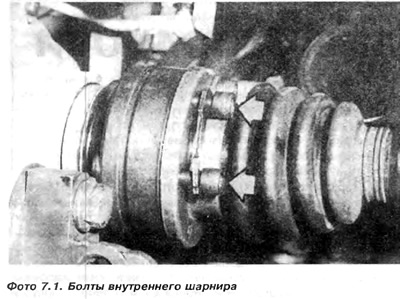
Caution: The use of a hex key will cause damage to the splines and serious problems when loosening, even with the correct wrench.
2. Remove the plug from the wheel hub. With the hand brake applied and wedges placed under the wheels, unscrew the drive axle nut (photo 7.2).
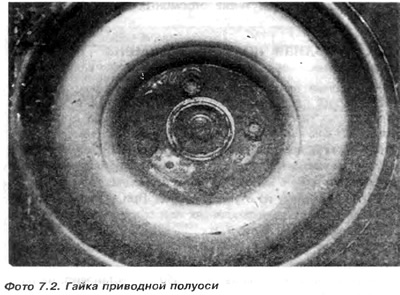
The nut is tightened to a high torque, so it may be necessary to extend the wrench
3. Raise the front of the car and place on stands. Remove wheels.
4. Using a slotted wrench, remove the socket head bolts securing the inner pivot to the drive flange.
5. After unscrewing the six bolts, the hinge can be disconnected from the flange, and the axle shaft can be removed from the wheel hub. If difficulties arise, it is necessary to disconnect the balancer arm from the return mechanism. Then the balancer can be deflected down, and the axle shaft is freely removed.
Attention: Do not roll the car on wheels if at least one axle shaft is removed, as the wheel bearings will break.
6. If the axle shaft or axle shafts are to be completely replaced, then the swing damper 4 attached to the right drive axle in the 16 and 1.8 liter petrol and 1.6 diesel models must be transferred to the new axle shaft. To remove the shock absorber, it is necessary to knock out one of the springy fastening pegs 37 using a punch. Then you can spread the shock absorber and remove it from the axle shaft. It is necessary to pay attention to the position of the shock absorber on the shaft - it must be installed in the same position and at the same distance from the end of the axle shaft as before.
7. Before installing the shock absorber, check whether the adhesive tape sticks to its inner surface. If necessary, replace the tape with a new one. We also recommend replacing the springy peg with a new one. After installing the shock absorber on the drive axle shaft, it is necessary to check its fastening.
Installation
8. Installation of the axle shaft in the car is carried out in the reverse order to dismantling. Hub and axle shaft splines should be clean and lubricated with a small amount of molybdenum disulphide grease. The inner surfaces of the flange and parallel joint must be clean. If necessary, replace the joint gasket located between the joint body and the flange face (if there was). Some models do not have this gasket.
9. Put a new nut on the short axle shaft of the hub and tighten it to the appropriate moment after lowering the car to the ground. Also tighten the other bolts unscrewed during disassembly with the appropriate moment.
Visitor comments