
English Русский
Български
Беларускі
Український
Српски
Hrvatski
Română
Polski
Slovenský
Magyar
  |  Articles  |  Sitemap  |  Contacts  |    |
Car maintenance Ford Car maintenance Hyundai Car maintenance Chevrolet Car maintenance BMW Car maintenance Audi Car maintenance Opel Car maintenance AvtoVAZ
VWmanual.ru


Main   Passat   Golf   Polo   Touareg   Tiguan   Sharan   Transporter   Others  
Golf 1 (1974-1984, diesel) Golf 1 (1974-1984, petrol) Golf 2 (1984-1993, petrol) Golf 2 (1984-1993) Golf 3 (1991-1997) Golf 4 (1997-2004) Golf 5 (2003-2008)

Clutch pedal — disassembly and assembly (VW Golf 2)

  • Main
  • Golf
  • Golf 2
  • Transmission
  • Clutch
  • Clutch pedal — disassembly and assembly
            0


1. Disconnect the clutch cable from the release arm on the clutch housing, and then from the clutch pedal as described in the previous paragraph.

2. On models with adjustable clutch, remove the pedal pin guard and then remove the pedal from the axle.

3. On models equipped with a self-adjusting clutch mechanism, you will need to disconnect the steering column and move it to the left side to allow the pedal to be removed. After moving the steering column to the left side, you will need to stretch the spring and keep it stretched while removing it. For this, you will need the appropriate spring tool.

4. With the spring stretched, remove the clamp, spring and hardware. Then remove the spring of the toothed segment (7a) holding the pedal assembly and remove it together with the toothed segment and the locking element (7b).

5. Check the pedal bearing shaft and bushings for wear and replace if necessary. The bearing bushing is pressed in and in order to remove and install it, you need to use a soft metal rod. Make sure that the end of the bushing matches the end of the pedal tube (so that they are in the same plane).

6. Before disassembling the toothed segment in the model with a self-adjusting clutch, it is necessary to pay attention to the installation of the segment and the spring of the locking element. Check the bearing sleeve of the locking element for wear and, if necessary, replace worn parts

Assembly


7. In both types of pedals, assembly occurs in the reverse order of disassembly. Lubricate the axle with universal grease, and in models with a self-adjusting clutch, also the bearing sleeve of the locking element.


8. For models with manual cable adjustment, check and adjust the cable as described in point 2. For models with self-adjusting clutch, adjust the cable by pressing the clutch pedal several times.
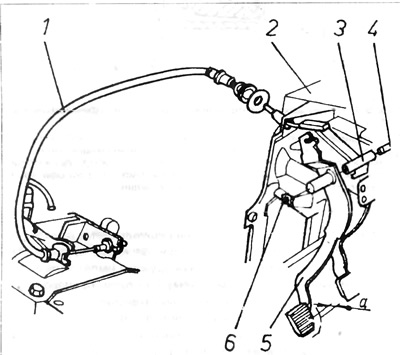
Figure 5.3. Measuring free play after clutch

1 - clutch cable; 2 - partition wall; 3 - clutch pedal bushing; 4 - clutch pedal pin; 5 - clutch pedal; 6 - kingpin protection.

This article is available at russian, bulgarian, belarusian, ukrainian, serbian, croatian, romanian, polish, slovak, hungarian
The text has been checked: Semenova Anna

Share information:

Previous articles
Clutch cable — replacement
Clutch — adjustment
Clutch device
Technical data
Next articles
Clutch — Gearbox 084
Clutch — 084 control
Clutch Release Mechanism — 084
Clutch 020 — disassembly and assembly
Clutch 020 — control
Clutch Release Mechanism 020


Similar articles from other manuals for VW cars:
Adjusting the free travel of the hydraulic clutch pedal Passat B2 (1981-1988)
Brake light switch, clutch pedal sensor (since 10.1999) Polo 3 (1995-2003)
Checking the free travel of the pedal parking brake lever Touareg 1 (2002-2006)
Clutch pedal assembly Tiguan 1 (2007-2015)
Clutch — design description Sharan 1 (1995-2000)
Clutch — design description Transporter T4 (1990-2003)
Adjusting the clutch pedal free play Beetle (1960-1986)
Link to this page in different formats


Visitor comments


No comments yet


How much will 10 + 42 =


Golf 5 
  • General information
  • User manual
  • Maintenance
  • Troubleshooting
  • Power unit
  • Engine repair
  • Cooling and ventilation system
  • Fuel system
  • Ignition system
  • Transmission
  • Clutch
  • Mechanical gearbox
  • Automatic gearbox
  • Chassis
  • Brake system
  • Car suspension
  • Steering
  • Body
  • Interior (internal elements)
  • Exterior (external elements)
  • Doors and covers
  • Electrical equipment
  • Power devices
  • Washers and wipers
  • Lighting and appliances
  • Electrical circuits
Golf 4 
  • General information
  • User manual
  • Weekly checks
  • Maintenance
  • Power unit
  • Petrol engines
  • Diesel engines
  • Cooling system
  • Fuel system (petrol)
  • Control system (petrol)
  • Fuel system (diesel)
  • Exhaust system
  • Transmission
  • Clutch
  • Car gearbox
  • Drive shafts
  • Chassis
  • Car suspension
  • Steering
  • Wheels and tires
  • Brake system
  • Body
  • Exterior (external elements)
  • Interior (internal elements)
  • Ventilation and heating
  • Car doors and sunroof
  • Washers and glass cleaners
  • Electrical equipment
  • Power devices
  • Lighting and appliances
  • Electrical circuits
Golf 3 
  • Petrol engine
  • Engine repair
  • Lubrication system
  • Cooling system
  • Ignition system
  • Diesel engine
  • Engine repair
  • Diesel injection system
  • Pre-glow system
  • Transmission
  • Clutch
  • Gearbox and drive shafts
  • Chassis
  • Steering
  • Wheels and suspension
  • Brake system
  • Electrical equipment
  • Lighting and appliances
  • Electrical circuits
Golf 2 
  • General information
  • Introduction to guide
  • User manual
  • Petrol engines 1.3 l
  • Engine repair
  • Lubrication system
  • Cooling system
  • Carburetors
  • Supply system
  • Ignition system
  • Petrol engines 1.6/1.8 l
  • Engine repair
  • Supply system
  • Ignition system
  • Diesel engines
  • Engine repair
  • Lubrication system
  • Cooling system
  • Power and exhaust system
  • Transmission
  • Clutch
  • 4-speed gearbox 084
  • 5-speed gearbox 085
  • 4-speed gearbox 020/4R
  • 5-speed gearbox 020/4T
  • Automatic gearbox
  • Drive shafts
  • Chassis
  • Steering
  • Car suspension
  • Brake system
  • Body
  • Body elements
  • Doors, locks and windows
  • Electrical equipment
  • Equipment and devices
  • Power devices
Golf 2 (petrol) 
  • General information
  • Characteristics
  • Car care
  • Maintenance
  • Power unit
  • Engine repair
  • Engine 1.05/1.30
  • Engine 1.60/1.80
  • Cooling and lubrication system
  • Power and exhaust system
  • Transmission
  • Clutch
  • Car gearbox
  • Drive shafts
  • Chassis
  • Brake system
  • Steering
  • Suspension
  • Body
  • Body and equipment
  • Electrical equipment
  • Lighting and appliances
  • Electrical circuits
Golf 1 (petrol) 
  • General information
  • Characteristics
  • User manual
  • Maintenance
  • Power unit
  • Engine adjustment
  • Engine 1.1/1.3
  • Engine 1.5/1.6/1.8
  • Engine electrical equipment
  • Cooling system
  • Fuel system
  • Transmission
  • Clutch and manual gearbox
  • Automatic gearbox
  • Chassis
  • Steering
  • Front suspension
  • Rear suspension
  • Brake system
  • Electrical equipment
  • Lighting and appliances
  • Electrical circuits
  • Body
  • Body and equipment
  • Optional equipment
Golf 1 (diesel) 
  • General information
  • Specifications
  • Maintenance
  • Power unit
  • Engine repair
  • Exhaust and turbocharger
  • Cooling system
  • Fuel system
  • Fuel injection system
  • Transmission
  • Clutch and drive shafts
  • Car gearbox
  • Chassis
  • Suspension and wheels
  • Steering
  • Brake system
  • Wheels and tires
  • Body
  • Heating and ventilation
  • Exterior (external elements)
  • Interior (internal elements)
  • Doors and windows
  • Electrical equipment
  • Equipment and devices
  • Lighting system
  • Power devices
  • Electrical circuits
VWmanual.ru © 2016-2026 | Mobile version | News and articles | Sitemap: EN BG BY UA RS HR RO PL SK HU | Write message | Site search
Passat B2 • Passat B3 • Passat B4 • Passat B5 • Passat B6 • Golf 1, diesel • Golf 1, petrol • Golf 2, petrol • Golf 2 • Golf 3 • Golf 4 • Golf 5 • Polo 3 • Polo 4 • Touareg 1 • Tiguan 1 • Sharan 1 • Transporter T3 • Transporter T4 • LT 28 • LT 2D • Beetle • Caddy 3 •
Our website uses cookies to ensure functionality and convenience.