



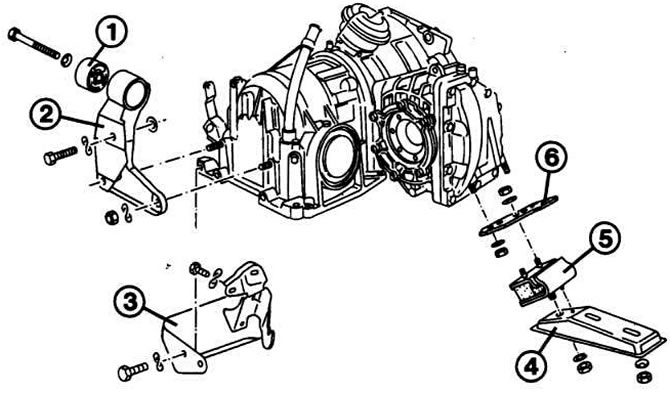
The automatic transmission has the following suspension parts: 1 - rubber-metal support; 2 - front support bracket; 3 - sheet cover for gearbox; 4 - rear support; 5 - rubber-metal support; 6 - reinforcement sheet
Disconnect the wires from the battery.
Unscrew the speedometer shaft near the gearbox.
Remove both upper bolts between the engine and gearbox. Remove the support at the rear from the gearbox and from the body.
Remove the axle shafts.
Remove the starter: The third bolt is located between the engine and the starter.
Remove the crankcase and protection cover)- torque converter coatings.
Unscrew the three torque converter bolts through the starter flange; to do this, turn the engine 1/3 of a turn.
Having set the position "P", disconnect the cable ends from the control lever.
Remove the cable support from the gearbox.
Remove the pedal rod and the gas rod without changing their installation.
Remove the gearbox support from the left side of the gearbox and from the body.
Remove the gearbox reaction rod.
Support the gearbox from below using a jack through a wooden spacer.
Remove the lower connecting bolt between the engine and gearbox.
Using the mounting lever, move the gearbox away from the engine.
Pull the gearbox forward in the direction of travel onto the jack, towards the engine flange and at the same time carefully lower it.
Secure the torque converter securely with a tie or cord to prevent it from falling out of the gearbox.
Before installing the gearbox, you should first insert the transformer correctly: rotate it slightly so that it sits all the way on the so-called freewheel support.
During installation, the same torques are prescribed as for a manual gearbox, see the tables "Tightening torques for threaded connections", chapter "Gearbox and final drive".
After assembly, the workshop must check the adjustment of the split gas rod, as well as the control lever rod.
Visitor comments