
English Русский
Български
Беларускі
Український
Српски
Hrvatski
Română
Polski
Slovenský
Magyar
  |  Articles  |  Sitemap  |  Contacts  |    |
Car maintenance Ford Car maintenance Hyundai Car maintenance Chevrolet Car maintenance BMW Car maintenance Audi Car maintenance Opel Car maintenance AvtoVAZ
VWmanual.ru


Main   Passat   Golf   Polo   Touareg   Tiguan   Sharan   Transporter   Others  
Golf 1 (1974-1984, diesel) Golf 1 (1974-1984, petrol) Golf 2 (1984-1993, petrol) Golf 2 (1984-1993) Golf 3 (1991-1997) Golf 4 (1997-2004) Golf 5 (2003-2008)

Replacing wheel bearings (VW Golf 1)

  • Main
  • Golf
  • Golf 1
  • Chassis
  • Front suspension
  • Replacing wheel bearings
            0


The front wheel bearings are non-adjustable, their axial play is determined by the design and condition of the bearings.

Before checking the bearing, make sure the hub nut is securely tightened (the tightening torque is specified in the section "Technical data").

Check the condition of the bearings by lifting each front wheel in turn so that it does not touch the ground (see chapter "Basic rules for carrying out work") and rotating it. Replace the bearings if the bearings are noisy or the wheel feels uneven (sticking), or if the wheel moves excessively when rocking it up and down.

The wheel bearing is sealed and has a lifetime supply of grease. When the hub is removed from the steering knuckle, the bearing is destroyed.

1. Loosen the hub nut at the end of the drive shaft (the car is on the ground).

2. Loosen the wheel mounting bolts, raise the corresponding side of the vehicle and remove the wheel.

3. Remove the two brake caliper mounting bolts, remove the caliper from the steering knuckle and hang it up (for example, on a suspension spring) using a wire hook. There is no need to disconnect the brake hose from the caliper.

4. Loosen the mounting screw and remove the brake disc.

5. Disconnect the steering rod from the steering knuckle arm using a ball joint puller (see chapter "Steering").

6. Remove the clamp bolt (and nut) securing the ball joint to the steering knuckle and separate the lower suspension arm from the knuckle (15, figure M:8).
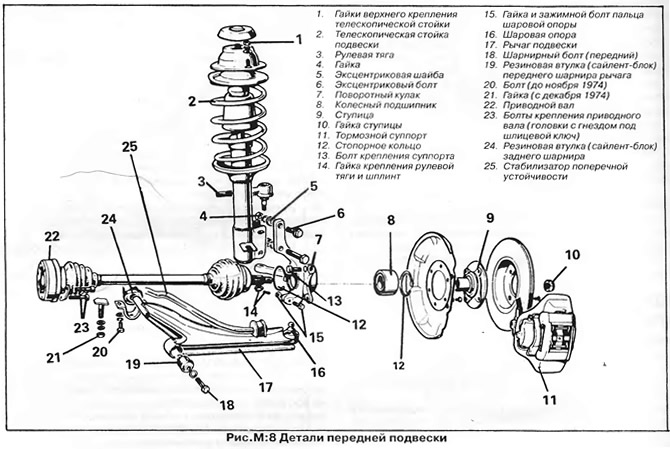
6. Remove the clamp bolt (and nut) securing the ball joint to the steering knuckle and separate the…


7. Remove the two bolts securing the steering knuckle to the telescopic strut. The top bolt is an eccentric bolt and is used to adjust the wheel camber; a puller will be required to remove this bolt. Mark the position of the eccentric bolt (figure M:2) to install it in the same position later. Also mark the position of the eccentric washer installed on the bolt (5, figure M:8).


8. Remove the hub nut and remove the steering knuckle together with the hub from the drive shaft.

9. Press the hub out of the steering knuckle using a drift (figure M:3 shows a special VW device, but if you don't have one, you can clamp the steering knuckle in a vice). The wheel bearing will be destroyed, and its inner ring will remain on the hub.
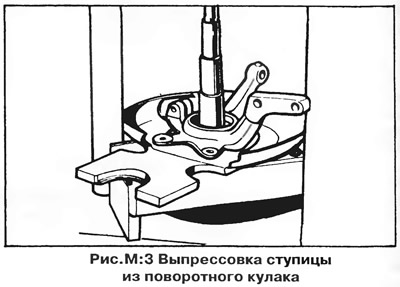
9. Press the hub out of the steering knuckle using a drift (figure M:3 shows a special VW device,…


10. Pull the inner bearing race off the hub using a puller (figure M:4). It may be necessary to sharpen the puller jaws.
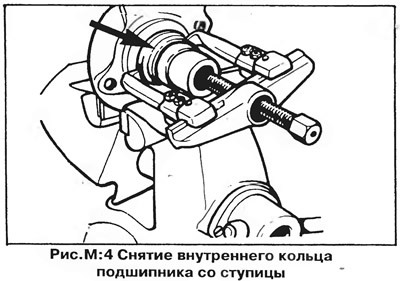
10. Pull the inner bearing race off the hub using a puller (figure M:4). It may be necessary to…


11. Remove the two large snap rings installed in the steering knuckle bore (one on each end) and press out the outer bearing ring - Figure M:5. If a socket head is used as a mandrel, make sure that it matches the bore diameter, as even minor damage to the bore walls will unacceptably weaken the bearing fit.
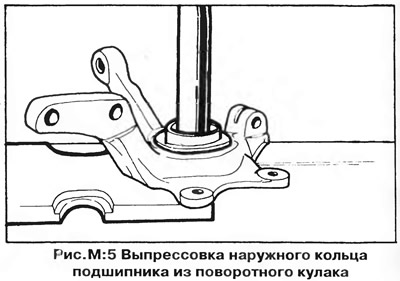

11. Remove the two large snap rings installed in the steering knuckle bore (one on each end) and…


12. Install the new snap ring from the outside edge of the hole, making sure it is fully seated in the groove.

13. Install the steering knuckle on the stand and press the new bearing into it from the back until it stops (figure M:6). The bearing should enter the hole evenly, without tilting. Install the second retaining ring.
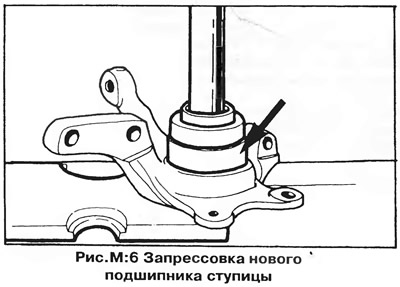
13. Install the steering knuckle on the stand and press the new bearing into it from the back until…


14. Press the wheel hub into the steering knuckle as shown in Figure M:7, using the mandrel only on the inner bearing ring.
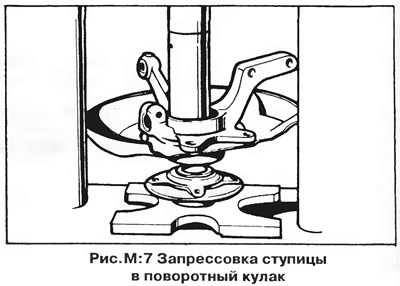
14. Press the wheel hub into the steering knuckle as shown in Figure M:7, using the mandrel only on…


15. Install the steering knuckle assembly onto the vehicle in the reverse order of removal.

16 When installing the eccentric bolt, align it with the mark made before disassembly. Do not forget to install the eccentric washer.

17. Tighten all mounting bolts and nuts to the torque specified in section "Technical data".

18. Install the wheel and lower the vehicle to the ground. Install the NEW hub nut and tighten it to 24.0 kg·m.

19. Check the wheel alignment and camber, adjust them if necessary.

This article is available at russian, bulgarian, belarusian, ukrainian, serbian, croatian, romanian, polish, slovak, hungarian
The text has been checked: Tarasov Ivan

Share information:

Previous articles
Tools and equipment
General information about the front suspension
Next articles
Telescopic strut shock absorbers
Replacing ball joints
Front suspension arms and bushings
Anti-roll bar
Drive shafts


Similar articles from other manuals for VW cars:
Replacing hub bearings Passat B2 (1981-1988)
Steering wheel height adjustment Polo 3 (1995-2003)
Controls on the multifunction steering wheel Touareg 1 (2002-2006)
Removal and installation the compressor (all-wheel drive… Tiguan 1 (2007-2015)
Replacing wheel bearings Sharan 1 (1995-2000)
Removal and installation the brake disc and wheel bearings Transporter T3 (1979-1992)
Replacing wheel hub bearing seals Beetle (1960-1986)
Link to this page in different formats


Visitor comments


No comments yet


How much will 33 + 13 =


Golf 5 
  • General information
  • User manual
  • Maintenance
  • Troubleshooting
  • Power unit
  • Engine repair
  • Cooling and ventilation system
  • Fuel system
  • Ignition system
  • Transmission
  • Clutch
  • Mechanical gearbox
  • Automatic gearbox
  • Chassis
  • Brake system
  • Car suspension
  • Steering
  • Body
  • Interior (internal elements)
  • Exterior (external elements)
  • Doors and covers
  • Electrical equipment
  • Power devices
  • Washers and wipers
  • Lighting and appliances
  • Electrical circuits
Golf 4 
  • General information
  • User manual
  • Weekly checks
  • Maintenance
  • Power unit
  • Petrol engines
  • Diesel engines
  • Cooling system
  • Fuel system (petrol)
  • Control system (petrol)
  • Fuel system (diesel)
  • Exhaust system
  • Transmission
  • Clutch
  • Car gearbox
  • Drive shafts
  • Chassis
  • Car suspension
  • Steering
  • Wheels and tires
  • Brake system
  • Body
  • Exterior (external elements)
  • Interior (internal elements)
  • Ventilation and heating
  • Car doors and sunroof
  • Washers and glass cleaners
  • Electrical equipment
  • Power devices
  • Lighting and appliances
  • Electrical circuits
Golf 3 
  • Petrol engine
  • Engine repair
  • Lubrication system
  • Cooling system
  • Ignition system
  • Diesel engine
  • Engine repair
  • Diesel injection system
  • Pre-glow system
  • Transmission
  • Clutch
  • Gearbox and drive shafts
  • Chassis
  • Steering
  • Wheels and suspension
  • Brake system
  • Electrical equipment
  • Lighting and appliances
  • Electrical circuits
Golf 2 
  • General information
  • Introduction to guide
  • User manual
  • Petrol engines 1.3 l
  • Engine repair
  • Lubrication system
  • Cooling system
  • Carburetors
  • Supply system
  • Ignition system
  • Petrol engines 1.6/1.8 l
  • Engine repair
  • Supply system
  • Ignition system
  • Diesel engines
  • Engine repair
  • Lubrication system
  • Cooling system
  • Power and exhaust system
  • Transmission
  • Clutch
  • 4-speed gearbox 084
  • 5-speed gearbox 085
  • 4-speed gearbox 020/4R
  • 5-speed gearbox 020/4T
  • Automatic gearbox
  • Drive shafts
  • Chassis
  • Steering
  • Car suspension
  • Brake system
  • Body
  • Body elements
  • Doors, locks and windows
  • Electrical equipment
  • Equipment and devices
  • Power devices
Golf 2 (petrol) 
  • General information
  • Characteristics
  • Car care
  • Maintenance
  • Power unit
  • Engine repair
  • Engine 1.05/1.30
  • Engine 1.60/1.80
  • Cooling and lubrication system
  • Power and exhaust system
  • Transmission
  • Clutch
  • Car gearbox
  • Drive shafts
  • Chassis
  • Brake system
  • Steering
  • Suspension
  • Body
  • Body and equipment
  • Electrical equipment
  • Lighting and appliances
  • Electrical circuits
Golf 1 (petrol) 
  • General information
  • Characteristics
  • User manual
  • Maintenance
  • Power unit
  • Engine adjustment
  • Engine 1.1/1.3
  • Engine 1.5/1.6/1.8
  • Engine electrical equipment
  • Cooling system
  • Fuel system
  • Transmission
  • Clutch and manual gearbox
  • Automatic gearbox
  • Chassis
  • Steering
  • Front suspension
  • Rear suspension
  • Brake system
  • Electrical equipment
  • Lighting and appliances
  • Electrical circuits
  • Body
  • Body and equipment
  • Optional equipment
Golf 1 (diesel) 
  • General information
  • Specifications
  • Maintenance
  • Power unit
  • Engine repair
  • Exhaust and turbocharger
  • Cooling system
  • Fuel system
  • Fuel injection system
  • Transmission
  • Clutch and drive shafts
  • Car gearbox
  • Chassis
  • Suspension and wheels
  • Steering
  • Brake system
  • Wheels and tires
  • Body
  • Heating and ventilation
  • Exterior (external elements)
  • Interior (internal elements)
  • Doors and windows
  • Electrical equipment
  • Equipment and devices
  • Lighting system
  • Power devices
  • Electrical circuits
VWmanual.ru © 2016-2026 | Mobile version | News and articles | Sitemap: EN BG BY UA RS HR RO PL SK HU | Write message | Site search
Passat B2 • Passat B3 • Passat B4 • Passat B5 • Passat B6 • Golf 1, diesel • Golf 1, petrol • Golf 2, petrol • Golf 2 • Golf 3 • Golf 4 • Golf 5 • Polo 3 • Polo 4 • Touareg 1 • Tiguan 1 • Sharan 1 • Transporter T3 • Transporter T4 • LT 28 • LT 2D • Beetle • Caddy 3 •
Our website uses cookies to ensure functionality and convenience.