
Examination (by car)
Inspect the body of each strut visually for leakage of shock absorber fluid. Very slight traces of fluid are acceptable, but excessive fluid loss will result in loss of cushioning action.
Check the stem of the telescopic strut - bumps and scuffs on its surface can damage the seals.
Check shock absorber performance (the stroke of the rod throughout must be smooth, with a constant force). Defective shock absorbers produce a characteristic knock when driving over bumps.
Press each corner of the car in turn and release it. When the shock absorber works well, the car will return to its original position under the action of the spring and stop. If the car continues to oscillate up and down for some time, then the corresponding shock absorber is defective.
Replace the strut if the shock absorber is defective. If there is an obvious defect, it is enough to replace one shock absorber - it is not necessary to change the second one.
Check the shock absorber in more detail by removing the strut from the car (see section "Checking - outside the car").
Replacement
1. Loosen the wheel bolts, lift and jack up the front of the vehicle. Remove the wheel.
2. Loosen the locknut and release the brake hose from the bracket on the strut body. Do not disconnect the brake hose from the system.
3. Turn out two bolts of fastening of a rotary fist to a telescopic rack of a suspension bracket. The top bolt is eccentric and serves to adjust the camber. A puller is required to remove this bolt. Mark the position of the eccentric bolt (rice. M:2). Also note the position of the eccentric washer mounted on the bolt (5, fig. M:8).
4. Open the hood and remove the two nuts securing the telescoping strut top support to the inner fender panel.
5. Press the suspension arm down to separate the knuckle from the telescoping strut and remove the telescopic strut from under the wing
6. Compress the spring with two spring compressors (pic. M:9).
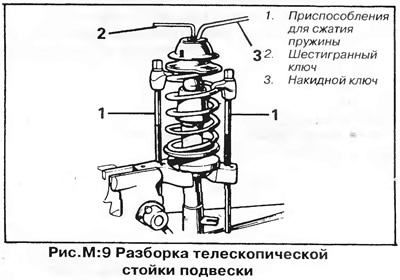
7. Loosen the telescopic pole stem self-locking nut while holding the stem with a 7mm hex wrench (pic. M:9).
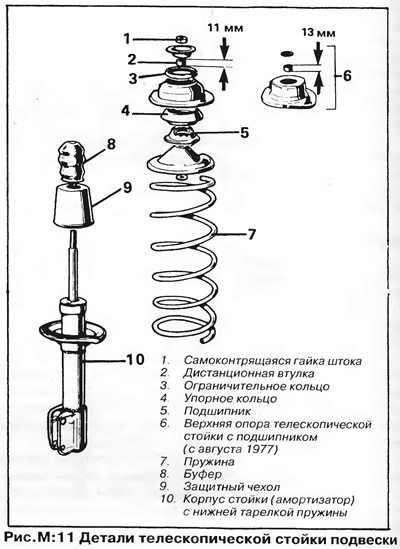
8. Remove the upper support from the rack with the bearing and the upper spring plate (pic. M:11), then remove the spring (compressed). Remove the buffer and protective rubber boot from the stem.
9. Move the removed parts to a new rack (shock absorber).
ATTENTION: Since 1978, the upper bearing has been installed with a new type of bearing. With the new bearing, a longer spacer and a new washer are installed. A new type of bearing can be installed on an old strut provided that a new washer and spacer are installed at the same time.
10. Tighten the self-locking stem nut to the torque specified in "Technical data", then release the spring from the compression tools.
11. Establish a telescopic rack on the car in an order, the return to removal.
12. When installing the eccentric bolt with washer, align it with the mark made before disassembly.
13. Tighten all nuts and bolts to the torque specified in section "Technical data".
14. Check and, if necessary, adjust the toe and camber of the front wheels.
Shock absorber check (outside the car)
Clamp the shock absorber vertically in a vise, then manually extend and retract the stem several times. Pull the stem all the way out and push it in again. The resistance to movement should be the same throughout the entire stroke of the rod, without jerking and jamming. A change or sudden loss of resistance is indicative of air in the shock absorber, loss of fluid, or valve failure.
If loss of resistance or feeling "elasticity" occur at the beginning of the stroke, this indicates the presence of air. Leave the shock upright for a few minutes to allow air bubbles to collect at the top of the shock, then make a few short strokes of the stem from the fully compressed position, then a few full strokes to purge air from the chamber. Repeat check.
If the resistance remains weak or uneven, replace the shock absorber.
Visitor comments