



Replacement
Ball joints are of several types. On early models, they were fastened with two M8 bolts, but from October 1974, ball joints began to be installed, secured with three 7 mm rivets. Only ball joints with three 7mm mounting holes are supplied as spares.
From February 1978, the diameter of the ball pin was increased from 15 mm to 17 mm, and the hole in the steering knuckle also increased accordingly. The clamping bolt diameter has also been increased (M10 instead of M8).
Only new type of steering knuckles are supplied as spare parts, therefore, when replacing the steering knuckle, a ball joint with a 17 mm pin must be installed.
Simultaneous installation of the right and left ball bearings with fingers of different diameters is allowed.
1. Loosen the wheel bolts, raise the car (see chapter "Basic rules for work") and remove the wheel.
2. Remove the clamp bolt and nut securing the ball joint pin to the steering knuckle and separate the ball joint.
3. Move the suspension strut to the side so that you can access the suspension arm.
4. If the ball joint is attached to the suspension arm with rivets, drill them out with a 6 mm drill (rivet heads have pilot holes), then chip off the rivet heads with a chisel and knock out the rivets. Remove the old ball joint from the lever.
5. If the ball joint is secured with bolts and nuts, remove the bolts and remove the ball joint.
6. Install the new ball joint and secure it to the arm with the three 7x22 bolts with nuts and spring washers included in the repair kit (pic. M:12). Torque tighten bolts (see section "Technical data").
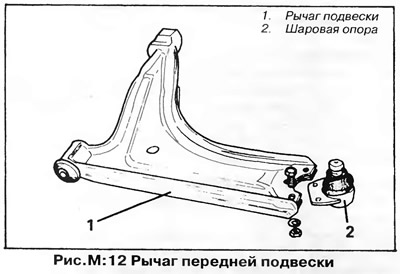
NOTE: If the old pole was secured with two bolts and the new pole has three mounting holes, ream the two outer holes on the new pole to 8.3mm diameter and secure the pole with two M8 bolts.
7. Insert the ball joint pin into the hole of the steering knuckle and secure it with the clamping bolt and nut. Tighten the M8 clamping bolt with a torque of 3.0 kGm, and the M10 bolt with a torque of 5.0 kGm.
8. Install the wheel and lower the vehicle to the ground.
NOTE: If only the ball joint was removed, front toe and camber adjustments are not necessary.
Visitor comments