
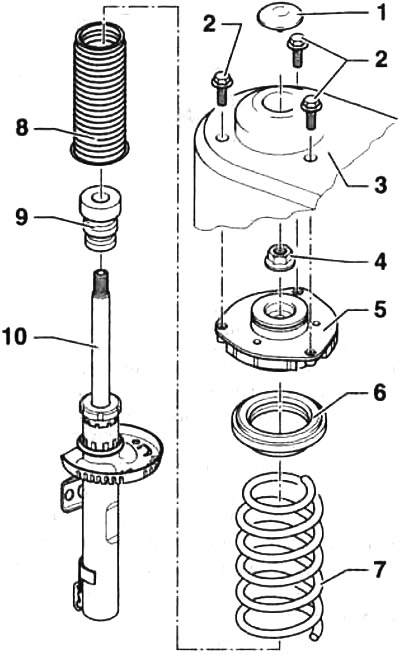
4.0. Suspension strut parts
1 - cover on the mudguard
2 - three bolts for fastening the upper suspension strut support to the mudguard. Tightening torque 15 Nm + 90°turn. The bolts are self-locking and must be replaced with new ones after each dismantling of the rack
3 - mudguard
4 - nut. Tightening torque 60 Nm. The nut is self-locking and must be replaced with a new one after each dismantling of the rack
5 - upper shock absorber support
6 - upper spring cup
7 - cylindrical spring shock absorber. When replacing, install a new spring with the same color marking as the old one. Be sure to change the springs of both racks. Both struts should have springs from the same manufacturer. The surfaces of the coils of the springs must not be damaged.
8 - corrugated cover (anther)
9 - compression stroke buffer
10 - shock absorber
Removing the suspension strut
1. Remove an amortization rack.
In order to remove the shock absorber, the damper strut coil spring must be fixed in a suitable clamp, because the spring is under significant compression in the strut.
Attention! Do not loosen the shock absorber nut without properly securing the shock strut spring in the clamp. Make sure that the coils of the spring are firmly seated in the clamping handles. Otherwise, the possibility of spring slippage cannot be ruled out. Do not use wire to tie the coils of the spring. It has a high degree of compression and incompetent handling can lead to injury.
2. Insert the suspension strut spring into the appropriate clamp 1, for example, HAZET 4900-2A with clamping handles 2 HAZET 4900-11 (see illustration).
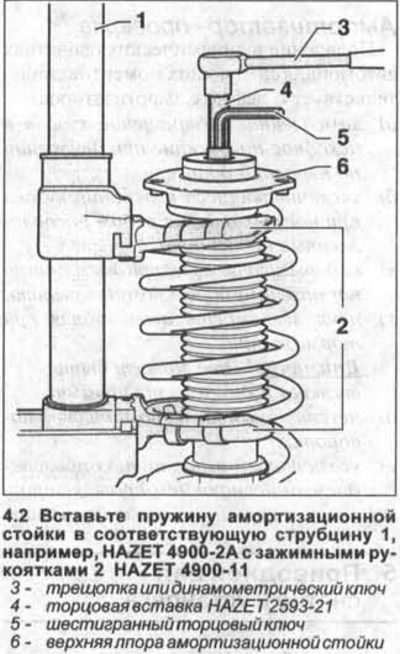
3. Fix the clamp with the clamped shock strut spring and the shock strut itself in a vise.
4. Insert the shock absorber spring into the handles 2 of the clamp 1 in such a way that at least three turns of the spring can be compressed. Make sure the springs in the clamping arms are correct (see arrow in illustration).

5. Compress the strut spring enough to unload its upper support cup 6 (see illustration 4.0).
6. Unscrew the shock absorber rod self-locking nut. At the same time, hold the shock absorber rod with a 5 x 7 mm hex socket wrench, eg HAZET -2593-1.
Wrench 4 HAZET -2593-21 is required to unscrew the shock absorber rod nut (see illustration 4.0).
Attention! Unscrew the upper shock strut nut, making sure that the spring is firmly fixed in the clamp.
7. Remove the top support of a rack, the top cup of a spring, anther and the buffer of a course of compression of the shock-absorber.
8. Release the clamp from the vise and remove it together with the spring from the shock absorber rod.
9. Check up operability of the shock-absorber.
10. Inspect all parts of the shock absorber for cracks, wear, corrosion, and aging of the material. Replace damaged or worn parts with new ones.
If it is necessary to install a new spring, slowly release the old one by loosening the position of the clamping handles.
Installation
Attention! It is recommended to replace the springs and shock absorbers of both suspension struts. When installing new strut springs, one should not forget that, depending on the configuration and model of the car, different springs are placed on the shock absorber struts. Both racks must be equipped with springs of the same type. The designation of the springs is painted on one of the coils.
Attention! The coils of the new springs are coated with a layer of protective varnish to prevent corrosion. Make sure this layer is not damaged and be careful not to damage it when installing.
11. Attach the clamp handles to the spring and compress the spring if it has loosened.
12. Install the clamp in a vise.
13. Install the compression stroke buffer and boot on the shock absorber rod.
14. Install the lower coil of the spring compressed in the clamp on the lower shock absorber cup. The end of the coil must be in contact with the stop lug (see arrow in illustration).
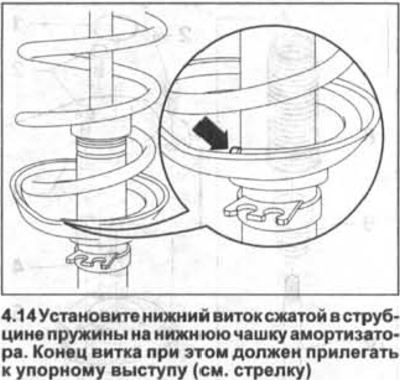
If necessary, turn the spring to ensure a snug fit of the end of the coil to the ledge.
15. Put on a spring the top cup and the top support of an amortization rack.
16. Screw a new self-locking nut onto the shock absorber rod and tighten it with a force of 60 Nm, while holding the shock absorber rod from turning with a socket wrench.
17. Slowly release the coil spring. When doing this, make sure that the ends of the upper and lower coils of the spring are correctly located in the support cups.
18. Remove the clamp from the spring strut.
19. Fasten the suspension strut to the mounting location.
Shock absorber - check
The appearance in the dynamic properties of the car of the following points indicates a defect in the shock absorbers:
- A) slow return of the body to its original position when driving on rough roads;
- b) increasing body vibrations when the wheels collide with adjacent road irregularities;
- V) wheel bouncing when driving on normal road surfaces;
- G) uncontrollability of the car when braking. Attention! This can be caused by other reasons as well;
- d) car instability when cornering;
- e) increased tire wear, accompanied by tread wear;
- and) knocks and creaks while driving.
Visitor comments