
English Русский
Български
Беларускі
Український
Српски
Hrvatski
Română
Polski
Slovenský
Magyar
  |  Articles  |  Sitemap  |  Contacts  |    |
Car maintenance Ford Car maintenance Hyundai Car maintenance Chevrolet Car maintenance BMW Car maintenance Audi Car maintenance Opel Car maintenance AvtoVAZ
VWmanual.ru


Main   Passat   Golf   Polo   Touareg   Tiguan   Sharan   Transporter   Others  
Passat B2 (1981-1988) Passat B3 (1988-1993) Passat B4 (1988-1996) Passat B5 (1996-2005) Passat B6 (2005-2010)

Front shock absorber strut repair (VW Passat B5)

  • Main
  • Passat
  • Passat B5
  • Chassis
  • Car suspension
  • Front shock absorber strut repair
            0


Contents: Disassembly ↓ Installation ↓

Shock absorber strut elements
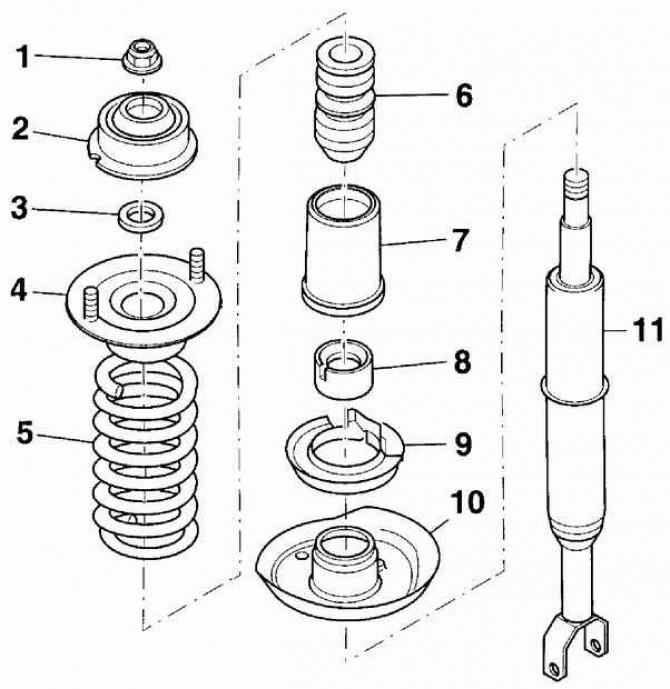


Shock absorber strut elements

  • 1 - flange nut 50 Nm,
  • 2 - bearing,
  • 3 - washer,
  • 4 - upper spring plate,
  • 5 - cylindrical coil spring,
  • 6 - stop. Installed in the upper spring plate,
  • 7 - protective cover,
  • 8 - protective cover,
  • 9 - spring support,
  • 10 - lower spring plate,
  • 11 - shock absorber

Shock absorber spring compressor


The original text is available on the website: VWMANUAL.ru
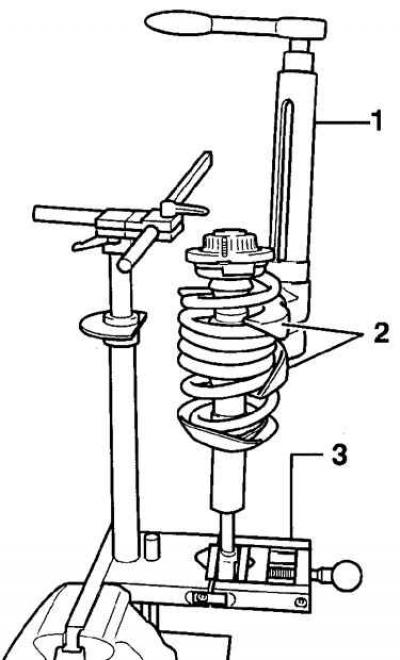
Shock absorber spring compressor

  • 1 - spring compression device,
  • 2 - fixture grips,
  • 3 - device for fastening the shock absorber strut

Disassembly


1. Secure the front shock absorber strut in a vice with soft jaws and, using a special device, compress the spring so that it moves away from the top of the strut, see Fig. Device for compressing the shock absorber spring.


When using a special device for compressing springs, make sure that the spring coils are securely gripped and that the spring is compressed from opposite sides. The spring has a very high compression force, so use only a very reliable tool. Never tie the spring with wire.
When using a special device for compressing springs, make sure that the spring coils are securely…


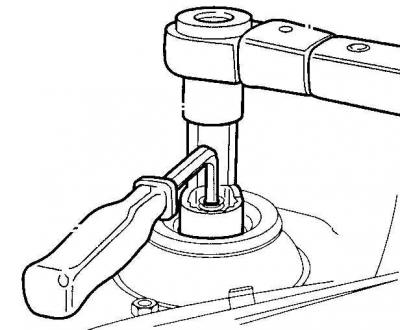
2. Secure the shock absorber rod with a wrench to prevent it from turning and, using a second open-end wrench, unscrew the central nut securing the shock absorber rod.

3. Remove the bearing, washer and upper spring plate from the shock absorber rod.

4. Remove the spring together with the spring compressor.
4. Remove the spring together with the spring compressor.


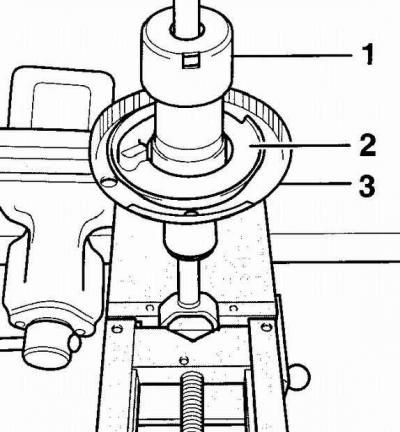
5. Remove the protective cover (1) and spring support (2). Using a plastic hammer, knock the lower spring plate (3) upwards.


Installation


Correct hole position (arrow) when installing the lower spring plate on the shock absorber
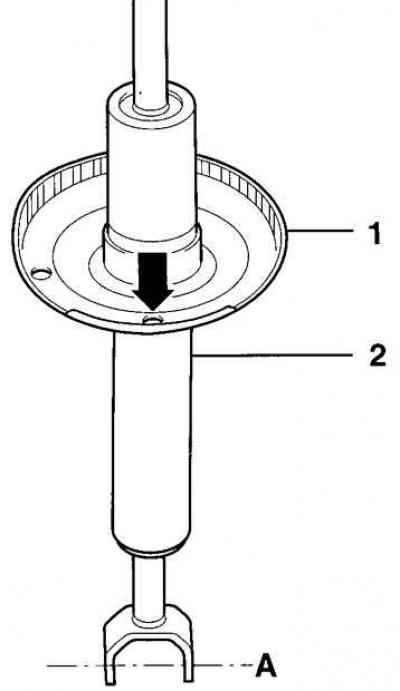


Correct hole position (arrow) when installing the lower spring plate on the shock absorber

  • 1 - lower spring plate,
  • 2 - shock absorber,
  • A - axle of the lower shock absorber mount fork

Correct positioning of the upper spring plate
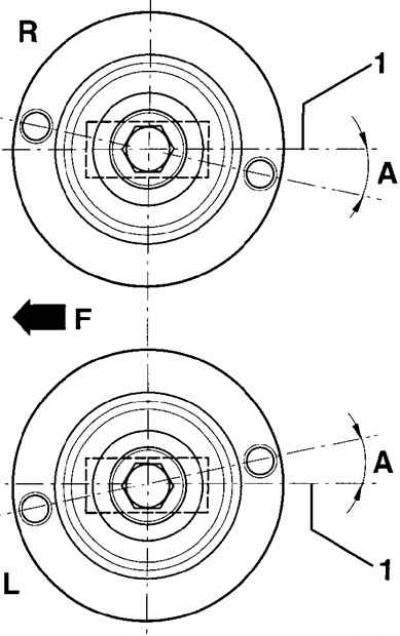


Correct positioning of the upper spring plate

  • F - front of the car,
  • R - right shock absorber strut,
  • L - left shock absorber strut,
  • A - 11° ±2 minutes,
  • 1 - lower shock absorber mounting axle

Tightening the shock absorber rod mounting nut
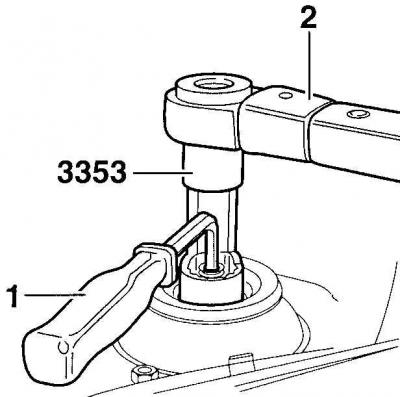


Tightening the shock absorber rod mounting nut

  • 1 - key to hold the shock absorber rod from turning,
  • 2 - torque wrench for tightening the shock absorber rod mounting nut

Warning: When installing, it is necessary to use springs with the same technical characteristics on one axle of the vehicle (with the same color marking).


1. Check the shock absorber for signs of fluid leaks. Check the entire length of the shock absorber rod for pitting. Check the shock absorber body for mechanical damage. Set the shock absorber in a vertical position and check its operation by moving the shock absorber rod through its full stroke. Also check the operation of the shock absorber by moving the shock absorber rod up and down a distance of 50-100 mm. In all cases, the shock absorber rod should move smoothly with noticeable resistance. If the shock absorber rod moves jerkily or there is mechanical damage, the shock absorber must be replaced.

2. Secure the shock absorber in a vice with soft jaws.

3. Install the lower spring plate on the shock absorber, with the hole in the spring plate perpendicular to the hole in the fork of the lower shock absorber mount (see Fig. Correct position of the hole (arrow) when installing the lower spring plate on the shock absorber). The deviation of the hole in the lower spring plate from the perpendicular position should be no more than ±2°.

4. Install the support spring and protective cover.
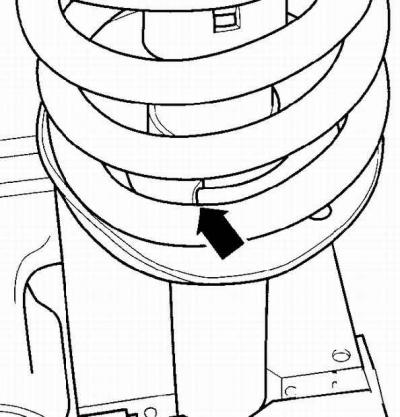
4. Install the support spring and protective cover.


5. Install the coil spring so that its lower end is correctly positioned in the lower spring plate.

6. Install the upper spring plate so that the axis passing through the mounting threaded holes is at an angle of 11° relative to the axis of the lower shock absorber mount (see fig. Correct positioning of the upper spring plate). Please note that the upper spring plate mount for the left and right shock absorbers is different.

7. While holding the shock absorber rod from turning, screw on a new shock absorber rod mounting nut with a flange and tighten it to a torque of 50 Nm, see Fig. Tightening the shock absorber rod mounting nut.

8. Carefully remove the spring compressor.
8. Carefully remove the spring compressor.


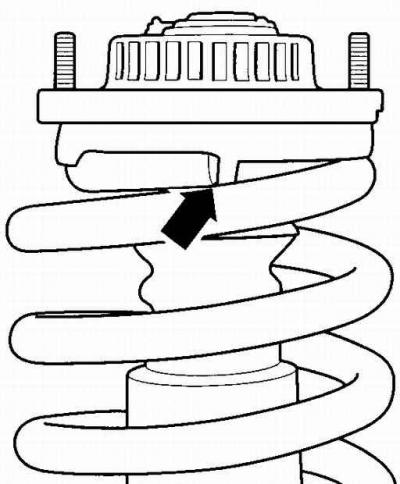
9. Check that the top coil of the spring is correctly positioned on the top spring plate.

10. Install the shock absorber strut into the vehicle.

This article is available at russian, bulgarian, belarusian, ukrainian, serbian, croatian, romanian, polish, slovak, hungarian
The text has been checked: Tarasov Ivan

Share information:

Previous articles
Front suspension shock absorber
Front suspension device
Next articles
Rear suspension device
Unscrewing the upper mount of the rear shock absorber
Removal and installation the shock absorber and rear suspension spring
Removal and installation rear wheel bearings/hubs
Shock absorber strut of rear suspension of all-wheel drive vehicles
Repair of the rear suspension shock absorber


Similar articles from other manuals for VW cars:
Repair of shock absorber strut Golf 3 (1991-1997)
Shock absorber strut Polo 3 (1995-2003)
Removal and installation the shock absorber strut Touareg 1 (2002-2006)
Repair of shock absorber of adaptive chassis control system DCC… Tiguan 1 (2007-2015)
Front suspension repair Sharan 1 (1995-2000)
Throttle body Shock Absorber Transporter T4 (1990-2003)
Front suspension brake components on shock absorber struts Beetle (1960-1986)
Link to this page in different formats


Visitor comments


No comments yet


How much will 41 + 25 =


Passat B6 
  • General information
  • User manual
  • Maintenance
  • Petrol engine 1.6L
  • Engine repair
  • Cooling and lubrication system
  • Fuel injection system
  • Petrol engine 2.0L
  • Engine repair
  • Lubrication system
  • Cooling system
  • Fuel and exhaust systems
  • Diesel engine 2.0L
  • Engine repair
  • Cooling and lubrication system
  • Fuel and exhaust systems
  • Transmission
  • Clutch
  • Mechanical gearbox
  • Automatic gearbox
  • Drive shafts
  • Chassis
  • Wheels and tires
  • Car suspension
  • Steering
  • Brake system
  • Body
  • Exterior (external elements)
  • Electrical equipment
  • Power devices
  • Lighting and appliances
  • Electrical circuits
Passat B5 
  • General information
  • User manual
  • Weekly checks
  • Maintenance
  • Power unit
  • Engine repair
  • Cooling system
  • Fuel system (petrol)
  • Fuel system (diesel)
  • Engine management
  • Exhaust system
  • Transmission
  • Clutch
  • Car gearbox
  • Drive shafts
  • Chassis
  • Car suspension
  • Wheels and tires
  • Steering
  • Brake system
  • Body
  • Exterior (external elements)
  • Interior (internal elements)
  • Doors and covers
  • Ventilation and heating
  • Electrical equipment
  • Power devices
  • Lighting and appliances
  • Electrical circuits
Passat B4 
  • General information
  • User manual
  • Maintenance
  • Technical data
  • 8-valve engine
  • Engine repair
  • Cooling and lubrication system
  • Supply system
  • Ignition system
  • Fuel injection «Mono-Jetronic»
  • Control system «Mono-Motronic»
  • Control system «Digifant»
  • Control system «Simos»
  • 16-valve engine
  • Engine repair
  • Cooling and lubrication system
  • Fuel injection «K-Jetronic»
  • Control system «KE-Motronic»
  • Control system «Digifant»
  • Diesel engine
  • Engine repair
  • Cooling and lubrication system
  • Power and control system
  • Turbocharging system
  • Digital control system
  • Transmission
  • Clutch
  • Manual gearbox
  • Hydromechanical gearbox
  • Front wheel drive
  • Chassis
  • Car suspension
  • Steering
  • Brake system
  • Body
  • Body elements
  • Electrical equipment
  • Power devices
  • Lighting and appliances
  • Electrical circuits
Passat B3 
  • General information
  • User manual
  • Driving Tips
  • Maintenance instructions
  • Technical data
  • Power unit
  • Engine repair
  • Ignition system
  • Lubrication system
  • Cooling system
  • Supply system
  • Petrol injection system
  • Diesel engine
  • Exhaust system
  • Transmission
  • Clutch
  • Car gearbox
  • Chassis
  • Suspension
  • Steering
  • Brake system
  • Wheels and tires
  • Body
  • Exterior
  • Interior
  • Heating system
  • Electrical equipment
  • Power devices
  • Lighting system
  • Equipment and devices
  • Wiper system
  • Electrical circuits
Passat B2 
  • General information
  • Introduction to instructions
  • User manual
  • Power unit
  • Engines 4-cylinder FZ
  • Engines 4-cylinder
  • Engines 5-cylinder
  • Transmission
  • Clutch
  • Four-speed gearbox
  • Five-speed gearbox
  • Hydromechanical gearbox
  • Front wheel drive
  • Chassis
  • Front suspension
  • Rear suspension
  • Steering
  • Brake system
  • Body
  • Body elements
  • Electrical equipment
  • Equipment and devices
  • Electrical circuits
VWmanual.ru © 2016-2026 | Mobile version | News and articles | Sitemap: EN BG BY UA RS HR RO PL SK HU | Write message | Site search
Passat B2 • Passat B3 • Passat B4 • Passat B5 • Passat B6 • Golf 1, diesel • Golf 1, petrol • Golf 2, petrol • Golf 2 • Golf 3 • Golf 4 • Golf 5 • Polo 3 • Polo 4 • Touareg 1 • Tiguan 1 • Sharan 1 • Transporter T3 • Transporter T4 • LT 28 • LT 2D • Beetle • Caddy 3 •
Our website uses cookies to ensure functionality and convenience.