
Remove the spacer, top spring cup, washer, rubber bushing and spring, then the bottom washer and spring cup (pic. 410).
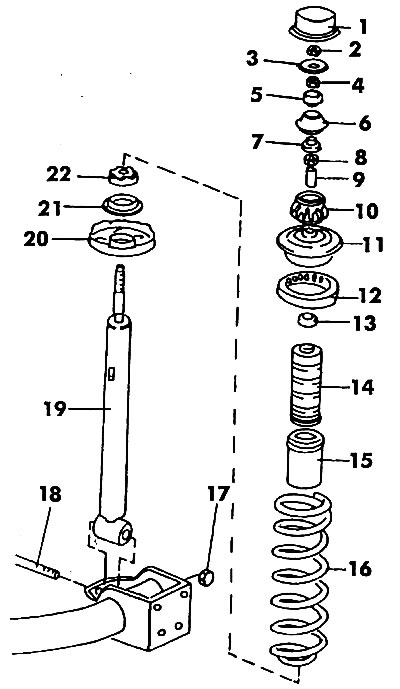
Pic. 410. Elements of the rear spring rack: 1 - cap; 2, 4, 8, 17 - M10 nuts; 3 - washer; 5 - buffer; 6 - upper rubber ring; 7 - compression buffer; 9 - spacer sleeve; 10 - lower rubber ring; 11 - upper spring cup; 12 - upper rubber insert; 13 - retaining ring; 14 - rubber cover; 15 - cap; 16 - twisted spring; 18 - M10 bolt; 19 - shock absorber; 20 - lower spring cup; 21 - lower rubber bushing of the spring; 22 - safety nozzle
If necessary, remove the rubber holder and bottom cover.
Coil springs are marked with different colors and cannot be set arbitrarily. They are marked with one or two belts of the corresponding color. When replacing, use springs with the same designation.
The upper rubber pad of the shock mount may have a different shape, which must be retained during replacement.
Check the operation of the shock absorber by sinking and pulling out the rod. In the entire range, the shock absorber rod should move with the same resistance. Small oil leaks do not require replacement of the shock absorber if it is in good condition.
Install the shock absorber and spring in the reverse order of disassembly. The spring is put on the shock absorber with a conical end down. The top fastening nuts are tightened with a torque of 15 Nm. Care should be taken to ensure that the spring is correctly installed in the upper and lower cups. First you need to fix the lower end of the rod into the hole in the body. Pay attention to the correct tightening torques for threaded connections (see table. 4).
Visitor comments