
English Русский
Български
Беларускі
Український
Српски
Hrvatski
Română
Polski
Slovenský
Magyar
  |  Articles  |  Sitemap  |  Contacts  |    |
Car maintenance Ford Car maintenance Hyundai Car maintenance Chevrolet Car maintenance BMW Car maintenance Audi Car maintenance Opel Car maintenance AvtoVAZ
VWmanual.ru


Main   Passat   Golf   Polo   Touareg   Tiguan   Sharan   Transporter   Others  
Tiguan 1 (2007-2015)

Removal and installation the clutch pedal servo spring (VW Tiguan 1)

  • Main
  • Tiguan
  • Tiguan 1
  • Transmission
  • 6-speed manual gearbox 0A6
  • Removal and installation the clutch pedal servo spring
            0


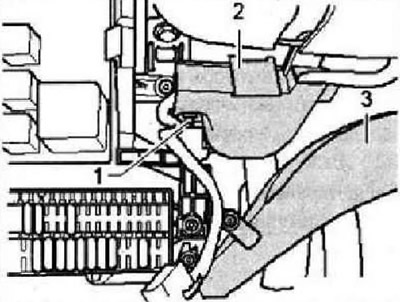
Move the driver's seat as far back as possible and set the steering wheel to its maximum height. Remove the storage compartment and trim on the driver's side. Carefully cut the cable tie "1". If present, disconnect the cable channel "2" from the steering column. Remove the footwell air duct "3".

Move the driver's seat as far back as possible and set the steering wheel to its maximum height.…


Remove safety frame element "1" by unscrewing bolt "2". Unscrew the fuse box on the left under the front panel and move it to the side. Disconnect the relay box on the left under the front panel and move it to the side.
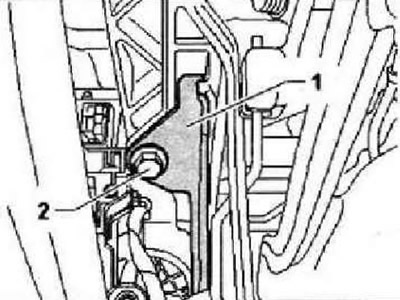
Remove safety frame element «1» by unscrewing bolt «2». Unscrew the fuse box on the left under the…


Remove the footwell trim by unscrewing the "arrow" nuts.
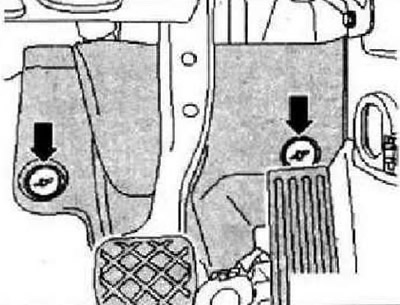
Remove the footwell trim by unscrewing the «arrow» nuts.


Loosen bolt "1" and remove cardan joint "2" from the steering gear shaft.
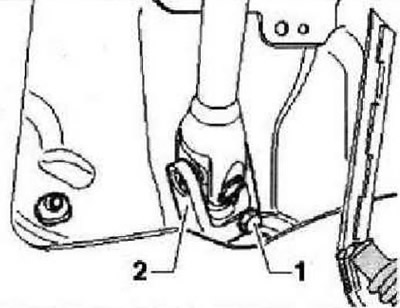


Loosen bolt «1» and remove cardan joint «2» from the steering gear shaft.


If present, remove the noise-insulating cover "arrow" from the lower part of the clutch pedal support bracket.
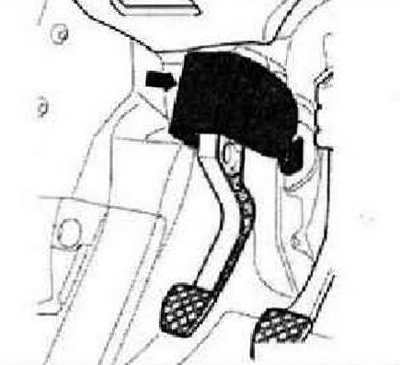
If present, remove the noise-insulating cover «arrow» from the lower part of the clutch pedal…


To do this, remove the clamping washers "A" of the noise-insulating casing. Disconnect the noise-insulating casing.
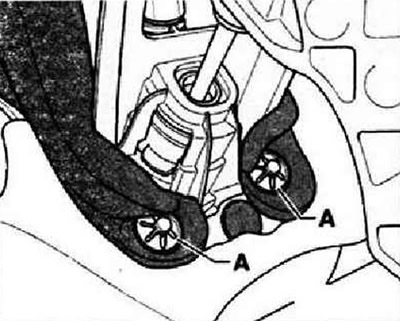
To do this, remove the clamping washers «A» of the noise-insulating casing. Disconnect the…


View the original on this resource (vwmanual.ru)

Pull up "arrow" the noise-insulating casing in the area of the upper fastening nut "1" above the brake pedal "A".
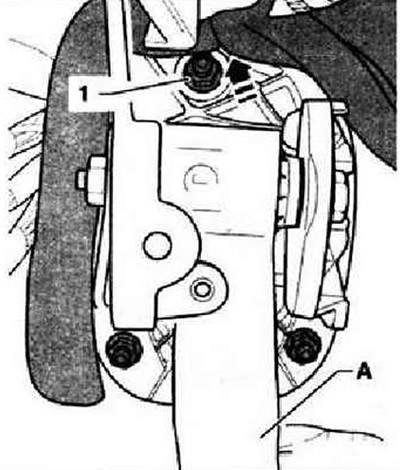

Pull up «arrow» the noise-insulating casing in the area of the upper fastening nut «1» above the…


Remove the clutch pedal "1" from the support bracket "3" by unscrewing the nut "2" and removing the bolt "5".

Instructions: The clutch pedal will then remain connected to the master cylinder rod.


Lower the clutch pedal and remove the servo spring "4" from the support bracket.
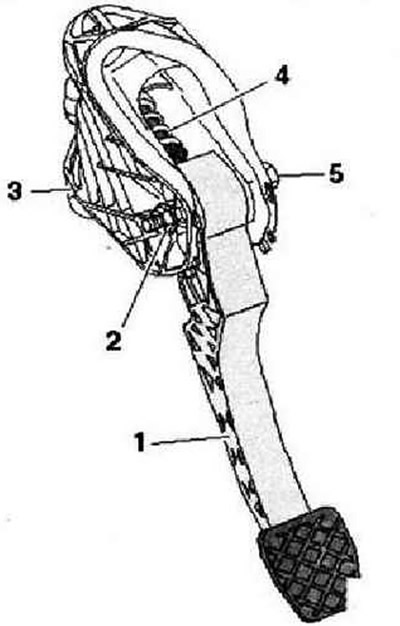
Lower the clutch pedal and remove the servo spring «4» from the support bracket.


Installation is carried out in reverse order.

Instructions: Self-locking nuts must be replaced.


Insert the servo spring from above into the support bracket. The "arrow" socket for the clutch pedal pin "A" should be vertical. Install the clutch pedal pin into the servo spring socket. Lightly press the clutch pedal, insert the bolt and tighten the self-locking nut.
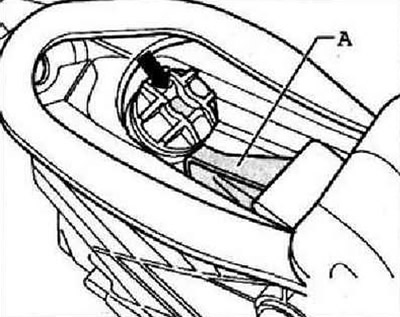
Insert the servo spring from above into the support bracket. The «arrow» socket for the clutch…


In some vehicles, a noise-insulating cover "arrow" is installed on the clutch pedal support bracket. Install it in the installation position. Install safety cage member "1" in place and tighten bolt "2" to the specified torque. On the driver's side, install the trim and the cover underneath. Place crosspiece "2" on the steering gear shaft tailpiece and screw in a new bolt "1". Perform basic installation of the steering angle sensor "G85" using the tester -VAS 5051-. On the driver's side, install the trim and the cover underneath. Tightening torque: pedal safety cage member to support bracket - 20 Nm. Replace the bolt securing the safety cage member.

This article is available at russian, bulgarian, belarusian, ukrainian, serbian, croatian, romanian, polish, slovak, hungarian
The text has been checked: Tarasov Ivan

Share information:

Previous articles
Removal and installation the support bracket
Clutch pedal assembly
Location of markings on the transfer case
Marking, gear ratios, filling capacities
Location of markings on the manual transmission
Next articles
Removal and installation the clutch master cylinder
Clutch hydraulic drive parts and components
Repair of the clutch release mechanism
Clutch repair
Gear shift mechanism repair
Repair of the gear shift lever and gear shift housing


Similar articles from other manuals for VW cars:
Removal and installation the clutch servo spring Passat B4 (1988-1996)
Clutch pedal — disassembly and assembly Golf 2 (1984-1993, petrol)
Brake light switch, clutch pedal sensor (since 10.1999) Polo 3 (1995-2003)
Removal the coil spring Touareg 1 (2002-2006)
Clutch — design description Sharan 1 (1995-2000)
Replacing spring plates Transporter T4 (1990-2003)
Adjusting the clutch pedal free play Beetle (1960-1986)
Link to this page in different formats


Visitor comments


No comments yet


How much will 21 + 11 =


Tiguan 1 
  • General information
  • Characteristics
  • Vehicle overview
  • Power unit
  • Petrol engine 1.4 BWK
  • Petrol engine 1.4 CAVA
  • Engine 2.0 (petrol)
  • Engine 2.0 (diesel)
  • Transmission
  • 6-speed manual gearbox 0A6
  • 6-speed automatic gearbox 09M
  • Drive shafts
  • Chassis
  • Front suspension
  • Rear suspension (2x4)
  • Rear suspension (4x4)
  • Air suspension
  • Wheels and rims
  • Brake system
  • Steering gear
  • Body
  • External equipment
  • Internal equipment
  • Electrical equipment
  • Power devices
  • Appliances and lighting
  • Communication systems
  • Heating and air conditioning
  • Electrical circuits
VWmanual.ru © 2016-2026 | Mobile version | News and articles | Sitemap: EN BG BY UA RS HR RO PL SK HU | Write message | Site search
Passat B2 • Passat B3 • Passat B4 • Passat B5 • Passat B6 • Golf 1, diesel • Golf 1, petrol • Golf 2, petrol • Golf 2 • Golf 3 • Golf 4 • Golf 5 • Polo 3 • Polo 4 • Touareg 1 • Tiguan 1 • Sharan 1 • Transporter T3 • Transporter T4 • LT 28 • LT 2D • Beetle • Caddy 3 •
Our website uses cookies to ensure functionality and convenience.