
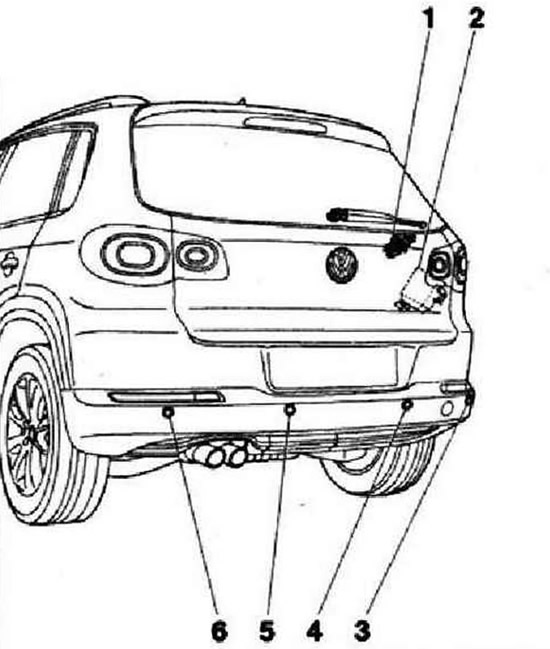
- 1 - Rear warning buzzer -H15-, behind the right side luggage compartment panel
- 2 - Rear parking aid control unit, on vehicles without front PDC or rear PLA: behind the right side wall trim near the rear light, on vehicles with front PDC or PLA: in the footwell, behind the dash panel relay box on the left. On vehicles with parking aid, the parking aid functions are controlled only in the rear bumper trim by the parking aid control unit -J446-. In vehicles that are additionally equipped with a front parking aid (PAP) or parking assistant in the gaps (APP (PLA)), the parking aid functions are controlled by the clearance parking aid control unit -J791-
- 3 - Right rear parking aid sensor -G206-, in rear bumper trim
- 4 - Parking aid sensor, rear center right -G335-, in rear bumper trim
- 5 - Parking aid sensor, rear center left -G334-, in rear bumper trim
- 6 - Left rear parking aid sensor -G203-, in rear bumper trim
Instructions: In case of malfunctions, it is necessary to know how the parking aid works and how to operate it. Rear parking aid system ROS (Park Distance Control) (ZPA) assists the driver when reversing parking by signaling the distance to an obstacle behind the vehicle using audible tones. The rear parking aid is activated automatically when the reversing lights are switched on. A distinction is made between vehicles with rear parking aid and front parking aid or gap assist. The parking aid is an integral part of the parking aid in the gaps (PLA).
Rear parking aid control unit
On vehicles with one parking aid only in the rear bumper trim, the parking aid functions are controlled by the parking aid control unit -J446-. The parking aid control unit -J446- is located behind the right-hand side wall trim next to the reversing light. In vehicles that are additionally equipped with a front parking aid (PAP) or parking assistant in the gaps (APP (PLA)), the parking aid functions are controlled by the clearance parking aid control unit -J791-. The control unit for clearance parking aid -J791- is located behind the dash panel insert.
Removing and installing rear parking aid control unit -J446-

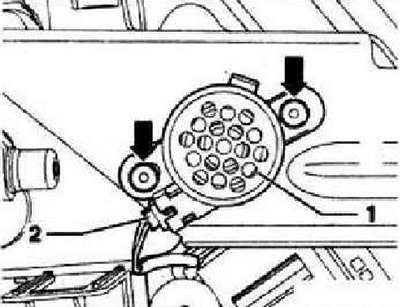
Switch off the ignition and all electrical consumers, remove the ignition key. Remove the right side luggage compartment trim. Unlock and unplug electrical connector -2-. Release both knurled rivets -arrows- and remove parking aid control unit -J446- -1-.
Installation is carried out in the reverse order.
Removing and installing rear parking aid sensors
The following four sensors are located in the rear bumper trim.
- Left rear parking aid sender -G203-
- Parking aid sensor, rear center left -G334-
- Rear parking aid sender, center right -G335-
- Right rear parking aid sender -G206-
Instruction: Removal and installation of the rear parking aid sensors is carried out in the same way for all, therefore the description is given for only one sensor.
Switch off the ignition and all electrical consumers, remove the ignition key.
Caution: Be sure to follow the order of removing the lattens. Otherwise, the sensor may be damaged. When excessive force is applied to the sensor, microcracks can occur, which lead to its failure. First remove the sensor from the holder and then disconnect the sensor connector.
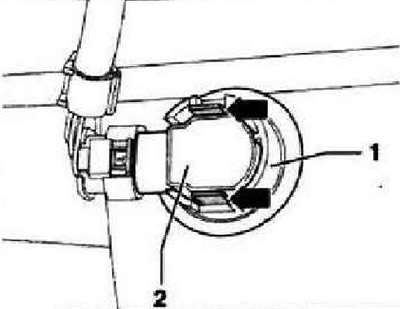
Remove the rear bumper cover. Press catches -arrows- on sensor holder -1- outward and pull sensor -2- with wires connected back out of holder.
Instructions: When removing the sensor, make sure that the decoupling ring (black silicone ring) remained on the sensor head, not in the holder and was not lost. Stretching of the disconnect ring must be absolutely avoided.
Unlock and unplug connector -2- and remove sensor -1-.
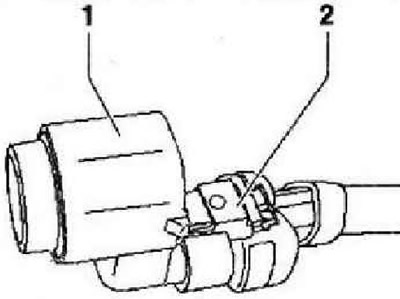
Installation in reverse order.
Caution: Malfunctions may occur if the disconnect ring is damaged. Stretching of the disconnect ring must be absolutely avoided. Replace damaged disconnect ring. When mounting the sensor, make sure that the decoupling ring is correctly positioned on the sensor head and is not twisted or folded when inserted into the sensor holder. The two probe holder latches should make an audible click when the probe is mounted.

After mounting the sensor, check that the sensor fits correctly in the holder. On the outer side of the bumper, the dimension -a- of the annular gap between the sensor head and the bumper cover should be visible evenly around the entire perimeter.
Rear warning buzzer -H15-
The rear parking aid warning buzzer -H15- is located behind the right side wall trim.
Removing and installing rear parking aid warning buzzer -H15-
Remove right side wall trim Unlock and unplug electrical connector -1-. Remove pop rivets -arrows- and remove rear parking aid warning buzzer -H15- -1-.
Installation is carried out in reverse order.
Visitor comments