



The following conditions will terminate the parking process using the APP:
- The APP is switched off by pressing the parking assistant button in the gaps "E581" The ignition is switched off
- Parking speed is too high (up to 7 km/h)
- Driver intervention in steering during parking
- Disengaging reverse gear
- Exceeding the time limit for being stationary (about 30 sec)
- ESP is switched off or ESP intervention occurs
- ASR intervention
- Availability of a trailer
- The front parking assistant (PDC) is activated
- Sensors detect conditions that prevent reliable determination of the vehicle's position
- System error
WARNING: The driver is responsible for parking. The parking assistant cannot replace the driver's attention. The sensors have blind spots in which people and objects cannot be detected. Pay particular attention to children and pets, as the sensors may not always be able to recognize them.
The APP system consists of...
- Control unit for parking assistant in gaps "J791"
- Gap parking assistant button "E581"
- Parking assistant button "E266"
- Front left sensor for automatic transmission, left side of the car "G568"
- Front left sensor "G255" Front left middle sensor "G254"
- Front right middle sensor "G253" Front right sensor "G252"
- Front right sensor for automatic transmission, right side of the car "G569"
- Front Parking Assist Warning Buzzer "H22"
Fault detection and error indication
The automatic transmission system is equipped with a self-diagnosis system that facilitates troubleshooting. To troubleshoot, use the VAS 5051 A tester in the "Guided Troubleshooting" mode. To check the entire automatic transmission system, perform diagnostics of the actuators.
Parking assistant in gaps
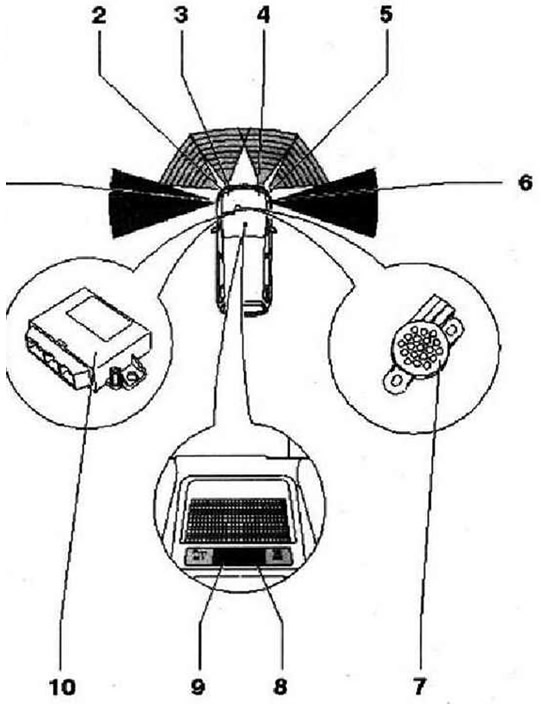
- 1 - Front left sensor for automatic transmission, left side of the car "G568", in the front bumper trim. In case of repair, replace the sensor and sensor holder
- 2 - Front left sensor "G255", in the front bumper trim, in case of repair replace the sensor and sensor holder
- 3 - Front left middle sensor "G254", in the radiator grille, in case of repair replace the sensor and sensor holder
- 4 - Front right middle sensor "G253", in the radiator grille
- 5 - Front right sensor "G252", in the front bumper trim, in case of repair replace the sensor and sensor holder
- 6 - Front right sensor for automatic transmission, right side of the car "G569", in the front bumper trim, in case of repair replace the sensor and sensor holder
- 7 - Front parking assistant warning buzzer "H22", in the driver's side footwell above the left dash panel relay box
- 8 - Front parking assistant button "E266", in the center console compartment in front of the gearshift lever
- 9 - Parking assistant button in the gaps "E581", in the center console compartment in front of the gearshift lever
- 10 - Control unit for parking assistant in the gaps "J791", in the footwell on the driver's side above the relay unit of the front panel on the left, tightening torque of the mounting bolt: 5 Nm
Control unit for parking assistant in gaps "J791"
The rear parking assistant control unit "J791" is located behind the storage compartment in the driver's footwell, above the relay unit. In vehicles with PPA or APT, the rear parking assistant control unit also controls the functions of the rear parking assistant.
Removal and installation the parking assistant control unit in the gaps "J791"
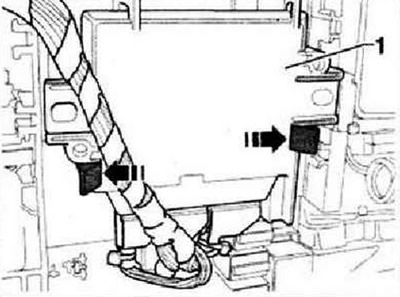
Switch off the ignition and all electrical consumers, remove the ignition key. Remove the trim in the driver's footwell. Press the "arrow" latches apart and remove the parking assistant control unit into the gaps "J791" with the wires connected from its holder.
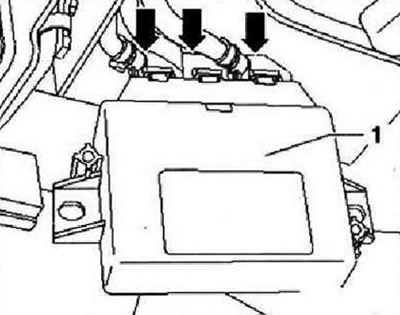
Unlock and disconnect the three "arrow" connectors and remove the parking assistant control unit into the gaps "J791" "1" from the car.
Installation is carried out in reverse order.
Front parking aid sensors or gap parking aid sensors
The front parking aid sensors and the rear parking aid sensors are installed in the front bumper trim. Both rear parking aid sensors are located at the edges of the front bumper trim and are used during the parking process together with the rear parking aid sensors to measure the distance.
Instructions: When installing a new front bumper cover or a new radiator grille, it is necessary to glue the sensor holders into the bumper cover or radiator grille, following the specified process steps.
Removal and installation front parking assist sensors or parking assist sensors in the gaps
The front bumper cover contains the following 6 sensors.
- Front left sensor for automatic transmission, left side of the car "G568"
- Front left sensor "G255"
- Front left middle sensor "G254"
- Front right middle sensor "G253"
- Front right sensor "G252"
- Front right sensor for automatic transmission, right side of the car "G569"
Instructions: Removal and installation of the front parking assistant sensors and the parking assistant sensors in the gaps is performed similarly, therefore the following description is given only for one sensor.
Turn off the ignition and all electrical consumers, remove the ignition key.
Caution: It is essential to follow the order of removing the sensors. Otherwise, the sensor may be damaged. Applying excessive force to the sensor may cause microcracks, which will lead to its failure. First remove the sensor from the holder and then disconnect the sensor connector.
Remove the front bumper trim. Press the "arrow" latches on the sensor "1" holder outward and remove sensor "2" with the wires connected back from the holder.
Instructions: When removing the sensor, make sure that the separating ring (black silicone ring) remains on the sensor head, not in the holder and is not lost. It is imperative to avoid stretching the disconnecting ring.
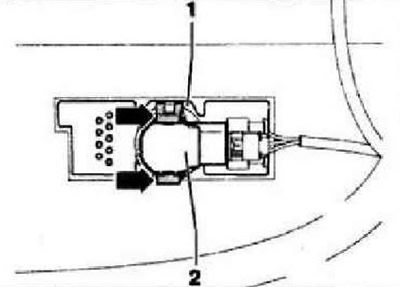
Unlock and disconnect connector "2" and remove sensor "1".
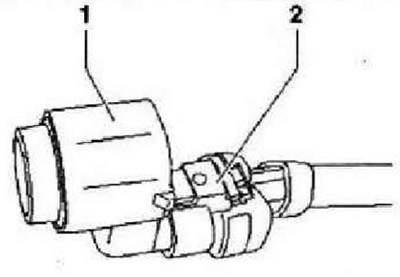
Installation in reverse order.
Caution: If the decoupling ring is incorrectly or damaged, malfunctions may occur. It is essential to avoid stretching the decoupling ring. Replace damaged decoupling rings and ensure that the correct decoupling ring is installed. Since the front parking aid sensors and the clearance parking aid sensors have different head lengths, decoupling rings of different heights are also installed.
Check that the disconnecting ring is installed correctly on the sensor head.
Gap parking assistant button "E581"
The button for the parking assistant in the gaps is installed in the central console compartment in front of the gearshift lever. It has a control lamp for the parking assistant in the gaps "K241" and is not disassembled further. Removal and installation of the button for the parking assistant in the gaps "E581" is performed similarly to the other buttons in the central console compartment.
Front Parking Assist Warning Buzzer "H22"
The front parking assistant warning buzzer "H22" is located on the left under the instrument cluster, above the relay block. Switch off the ignition and all electrical consumers, remove the ignition key. Remove the instrument cluster. Pull out the pins of both pull-out rivets "arrows" and remove the front parking assistant warning buzzer "H22" "1" taking into account the length of the connected wires.
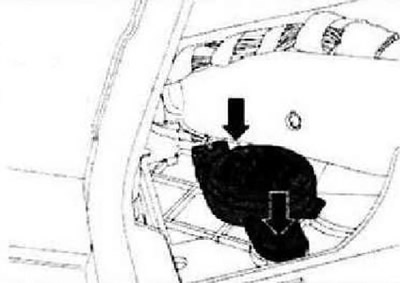
Unlock and disconnect the "arrow" connector and remove the front parking assistant warning buzzer "H22" "1" from the vehicle.
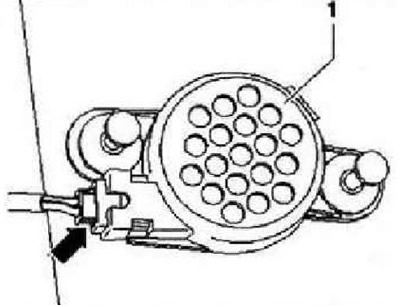
Installation is carried out in reverse order.
Rear parking assistant warning buzzer "H15" (cars with automatic transmission)
In vehicles with PPA or APP, the functions of the parking aid are controlled by the Clear Parking Assistance Control Unit "J791". For this reason, the adaptation of the rear parking aid (RPA) warning buzzer "H15" in vehicles with PPA or APP is performed via the Clear Parking Assistance Control Unit "J791".
Visitor comments