
English Русский
Български
Беларускі
Український
Српски
Hrvatski
Română
Polski
Slovenský
Magyar
  |  Articles  |  Sitemap  |  Contacts  |    |
Car maintenance Ford Car maintenance Hyundai Car maintenance Chevrolet Car maintenance BMW Car maintenance Audi Car maintenance Opel Car maintenance AvtoVAZ
VWmanual.ru


Main   Passat   Golf   Polo   Touareg   Tiguan   Sharan   Transporter   Others  
Sharan 1 (1995-2000)

Disassembling the cylinder head (VW Sharan 1)

  • Main
  • Sharan
  • Sharan 1
  • Diesel engines
  • Engine repair
  • Disassembling the cylinder head
            0


If the timing mechanism parts are to be reused, each part should be installed back in the same place where it stood before disassembly. To avoid confusion, it is recommended to make a corresponding board with notches for storing the removed parts.

Disconnect all parts located on the cylinder head. Unscrew the four injectors from the head and place them in such a way that they are well protected from damage due to impact with each other. Unscrew the glow plugs.

Clamp the cylinder head, together with the clamp screwed to the exhaust manifold set screw, in a vice.

Remove the camshaft (see paragraph 17.8.1).
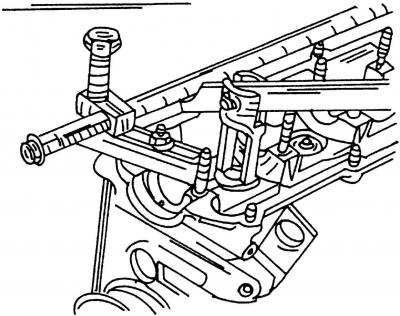
Fig. 394. Compressing the valve spring using a special puller

Fig. 394. Compressing the valve spring using a special puller


The standard valve removal and installation tool and the method for installing it are shown in Fig. 394. The heel of the tool must be on the inside of the valve spring seat, otherwise the spring cannot be compressed. Press the lever of the tool and compress the spring so that the valve stem halves can be removed. Another way to remove the valves is to use a piece of pipe that fits over the upper spring plate. Something must be placed under the valve plate on the other side to fix it. Give the pipe a short hammer blow so that the valve stem halves come out. They will remain inside the pipe. But do not tear the pipe away from the spring plate, so as not to lose half the valve stem.


The valve spring plates can also be compressed using two screwdrivers. In this case, place a rag in the combustion chamber of the cylinder head to prevent the valve from falling down.

Remove the valve stem halves and springs, then remove the valve.
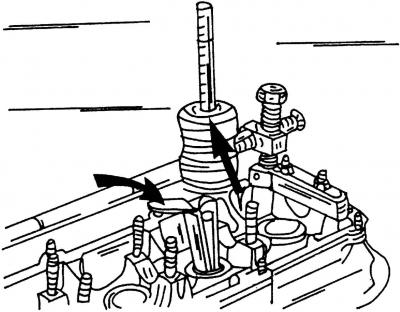
Fig. 395. Removing the oil deflector caps

Fig. 395. Removing the oil deflector caps


Remove the valve stem seals. To remove the valve stem seals, it is best to use a special tool (3047A), as shown in Fig. 395. The tool is similar to a plastic mallet with an adapter, which is placed under the valve stem stem seals. The valve stem seals can also be removed using an angle screwdriver. However, in this case, special care should be taken not to damage the surface of the tappet holes. Always install new valve stem seals.

Remove the lower plates of the disc spring from the holes.

This article is available at russian, bulgarian, belarusian, ukrainian, serbian, croatian, romanian, polish, slovak, hungarian
The text has been checked: Tarasov Ivan

Share information:

Previous articles
Cylinder Head — Removal with Engine Installed
Engine assembly
Disassembling the engine
Removal and installation the engine
Diesel engine — general information
Next articles
Cylinder head repair
Cylinder head assembly
Installing the cylinder head
Hydraulic tappets — removal and installation
Poly V-belt and toothed drive belts
Removal the timing belt


Similar articles from other manuals for VW cars:
Removal and installation the cylinder head Passat B3 (1988-1993)
Disassembling the cylinder head Golf 3 (1991-1997)
Cylinder head Polo 3 (1995-2003)
Removal and installation the cylinder head cover Touareg 1 (2002-2006)
Cylinder head Tiguan 1 (2007-2015)
Removal and installation the cylinder head (petrol 4-cylinder) Transporter T4 (1990-2003)
Checking the cylinder head for warpage Caddy 3 (2003-2010)
Link to this page in different formats


Visitor comments


No comments yet


How much will 33 + 12 =


Sharan 1 
  • General information
  • Introduction to guide
  • Maintenance
  • Petrol engines
  • Engine repair 2.8 l (AAA)
  • Engine repair 2.0 l (ADY)
  • Lubrication system
  • Cooling system
  • Fuel injection system
  • Ignition system
  • Diesel engines
  • Engine repair
  • Lubrication system
  • Cooling system
  • Supply system
  • Transmission
  • Clutch
  • Manual gearbox and shafts
  • Chassis
  • Steering
  • Car suspension
  • Brake system
  • Electrical equipment
  • Equipment and devices
  • Power devices
  • Electrical circuits
VWmanual.ru © 2016-2026 | Mobile version | News and articles | Sitemap: EN BG BY UA RS HR RO PL SK HU | Write message | Site search
Passat B2 • Passat B3 • Passat B4 • Passat B5 • Passat B6 • Golf 1, diesel • Golf 1, petrol • Golf 2, petrol • Golf 2 • Golf 3 • Golf 4 • Golf 5 • Polo 3 • Polo 4 • Touareg 1 • Tiguan 1 • Sharan 1 • Transporter T3 • Transporter T4 • LT 28 • LT 2D • Beetle • Caddy 3 •
Our website uses cookies to ensure functionality and convenience.