
English Русский
Български
Беларускі
Український
Српски
Hrvatski
Română
Polski
Slovenský
Magyar
  |  Articles  |  Sitemap  |  Contacts  |    |
Car maintenance Ford Car maintenance Hyundai Car maintenance Chevrolet Car maintenance BMW Car maintenance Audi Car maintenance Opel Car maintenance AvtoVAZ
VWmanual.ru


Main   Passat   Golf   Polo   Touareg   Tiguan   Sharan   Transporter   Others  
Sharan 1 (1995-2000)

Oil pump repair (VW Sharan 1)

  • Main
  • Sharan
  • Sharan 1
  • Diesel engines
  • Lubrication system
  • Oil pump repair
            0


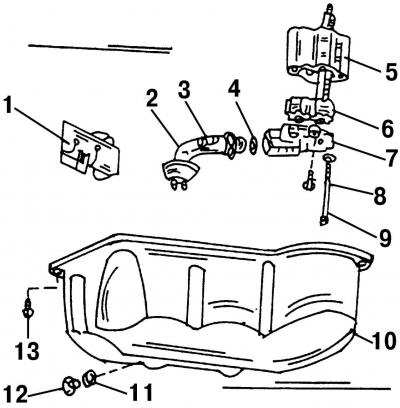
Fig. 452. View of the oil sump and disassembled oil pump: 1 - guide plate; 2 - oil intake pipe; 3 -…

Fig. 452. View of the oil sump and disassembled oil pump: 1 - guide plate; 2 - oil intake pipe; 3 - oil intake pipe bolt, 10 Nm; 4 - sealing ring, 10 Nm; 5 - oil pump housing; 6 - oil pump gears; 7 - oil pump cover with pressure reducing valve; 8 - short cover bolt, 10 Nm; 9 - long cover bolt, 25 Nm; 10 - oil pan; 11 - sealing ring (always replace with a new one); 12 - drain plug, 30 Nm; 13 - oil pan mounting bolt, 25 Nm


When disassembling the oil pump, refer to Fig. 452.

Remove the two short bolts from the pump cover.

Remove the cover together with the oil intake pipe.

Remove the gear wheel with the shaft and the gear wheel without the shaft from the pump housing. You can also remove the drive shaft.

Remove both oil pickup pipe screen bolts from the pump cover and remove the sealing ring located in the center of the pipe. Clean all parts thoroughly before checking their condition.

Check the oil pump housing for deformation. If the bearing locations are worn, replace the oil pump housing, as this will cause pressure loss.
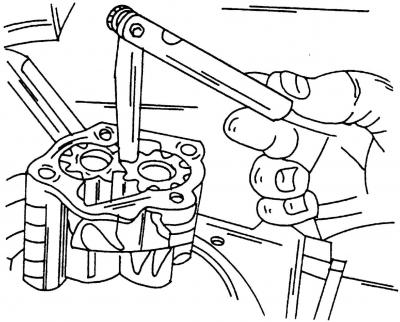
Fig. 454. Measuring the radial clearance in the oil pump

Fig. 454. Measuring the radial clearance in the oil pump


Check the degree of wear of the gear wheels, to do this, insert a feeler gauge between the teeth (Fig. 454) and measure the radial clearance. The permissible clearance is 0.05-0.20 mm. If the clearance exceeds the permissible value, replace the gears, and if necessary, the entire pump.
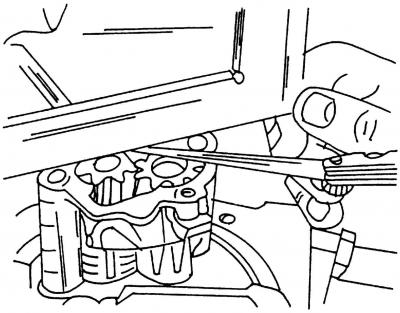
Fig. 455. Measuring the axial clearance in the oil pump

Fig. 455. Measuring the axial clearance in the oil pump

  • using a feeler gauge and a steel ruler or angle, measure the axial clearance in the oil pump (Fig. 455). The permissible value of the axial clearance is 0.06-0.15 mm.

Check if the drive gear shaft fits tightly in the pump housing. If it is loose, replace the pump housing.

If you find damage or wear on the teeth, replace the gears in pairs. As a rule, traces of wear on the side surface of the teeth look like a polished shiny surface.

When assembling the oil pump, make sure that the pump surfaces are absolutely clean. Lubricate all parts with oil before assembly. Pay particular attention to lubricating the gears so that they do not get scored and damaged when the engine is first started. Before installing the pump, make sure that the gears rotate easily, without jamming.


The text is copied from this portal (VWManual.ru)

When starting the engine for the first time, do not immediately operate it at high speeds so that the oil pump can work in well.

This article is available at russian, bulgarian, belarusian, ukrainian, serbian, croatian, romanian, polish, slovak, hungarian
The text has been checked: Tarasov Ivan

Share information:

Previous articles
Removal and installation the oil pump
Removal and installation the oil pan
Diesel Engine Lubrication System — General Information
Next articles
Oil filter — removal and installation
Checking oil pressure and replacing it
Oil radiator — removal and installation


Similar articles from other manuals for VW cars:
Oil pan / oil pump Passat B3 (1988-1993)
Liquid pump repair Golf 2 (1984-1993)
Checking the fuel pump Polo 3 (1995-2003)
On-board tool, spare wheel, tire repair kit, jack Touareg 1 (2002-2006)
Removal and installation the cooling system pump Tiguan 1 (2007-2015)
Windshield Washer Water Pump — Checking and Replacing Transporter T4 (1990-2003)
Valve mechanism repair Caddy 3 (2003-2010)
Link to this page in different formats


Visitor comments


No comments yet


How much will 46 + 36 =


Sharan 1 
  • General information
  • Introduction to guide
  • Maintenance
  • Petrol engines
  • Engine repair 2.8 l (AAA)
  • Engine repair 2.0 l (ADY)
  • Lubrication system
  • Cooling system
  • Fuel injection system
  • Ignition system
  • Diesel engines
  • Engine repair
  • Lubrication system
  • Cooling system
  • Supply system
  • Transmission
  • Clutch
  • Manual gearbox and shafts
  • Chassis
  • Steering
  • Car suspension
  • Brake system
  • Electrical equipment
  • Equipment and devices
  • Power devices
  • Electrical circuits
VWmanual.ru © 2016-2026 | Mobile version | News and articles | Sitemap: EN BG BY UA RS HR RO PL SK HU | Write message | Site search
Passat B2 • Passat B3 • Passat B4 • Passat B5 • Passat B6 • Golf 1, diesel • Golf 1, petrol • Golf 2, petrol • Golf 2 • Golf 3 • Golf 4 • Golf 5 • Polo 3 • Polo 4 • Touareg 1 • Tiguan 1 • Sharan 1 • Transporter T3 • Transporter T4 • LT 28 • LT 2D • Beetle • Caddy 3 •
Our website uses cookies to ensure functionality and convenience.